
Campaign workflow templates and participant statuses
Campaign workflows are used to associate each participant status in a campaign with actions that will be automatically performed when a participant is assigned that status. Creating a workflow template simplifies the process by allowing end users to load a predefined template instead of defining each status individually for every new campaign. After a template is loaded, the end user can customize the workflow as appropriate.
A participant status indicates where in the flow of the campaign the participant is. For example, a participant's status can indicate whether the participant has been contacted, whether they have replied to the campaign email, or whether they indicated that they were interested in the opportunity. A number of statuses are included by default, but you can also create additional custom statuses to reflect your company processes.
You can manage campaign workflow templates and participant statuses using the Campaigns tab on the Customize workspace ![]() .
.
Managing workflow templates
To manage campaign workflow templates, open the Campaigns tab on the Customize workspace ![]() . Select the Workflow Templates subtab in the Campaigns tab.
. Select the Workflow Templates subtab in the Campaigns tab.
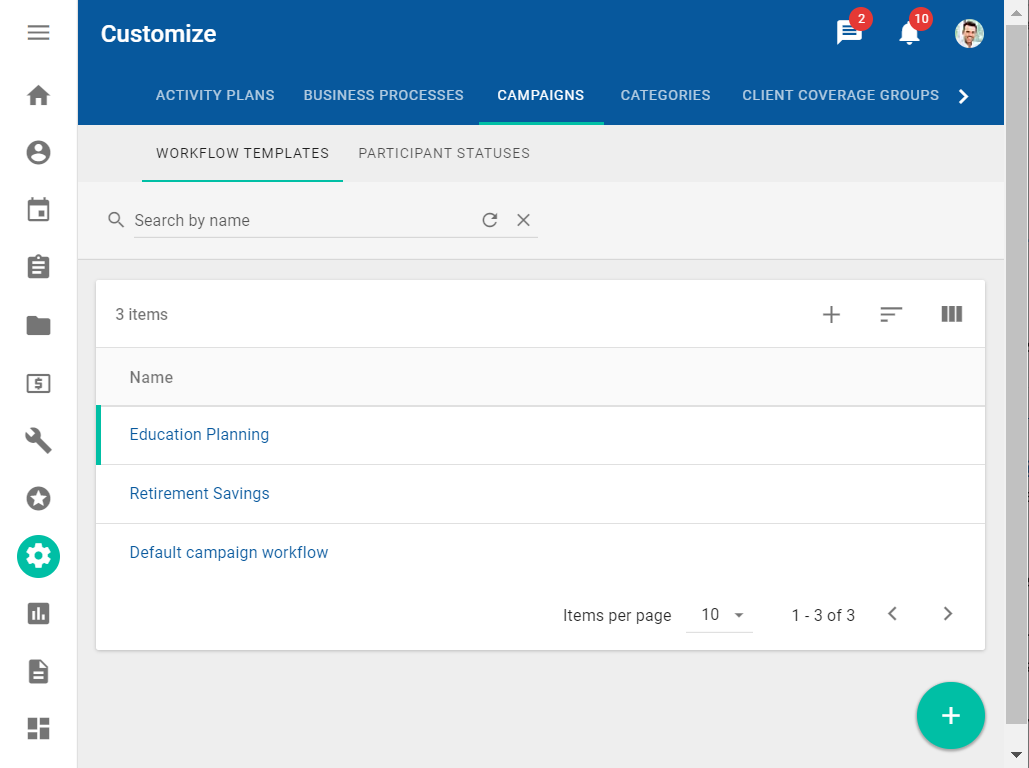
The Workflow Templates subtab displays the list of the existing campaign workflow templates. You can use the tab to create a new template, to edit an existing template, or to delete an existing template.
To configure a new campaign workflow template, you need to complete the following steps:
- Create the new template.
- Configure the statuses that should be included in the template.
- Specify which statuses should be used for specific campaign stages.
- Configure the actions that should be associated with each status in the template.
Creating campaign workflow templates
To create a new campaign workflow template, click the Add button ![]() on top of the data table, specify the template name in the New Campaign Workflow Template dialog, and click OK.
on top of the data table, specify the template name in the New Campaign Workflow Template dialog, and click OK.
The new template includes all available statuses and does not have any actions configured for any status. To further configure the new template, you can modify the statuses included in the workflow and which actions are associated with each status. It also specifies which the statuses should be used during specific steps of the campaign workflow. By default, when the campaign is in the Planning stage, then all participants have the Targeted status. As soon as the campaign has been started and moves into the In Progress stage, the status for all participants changes to Contacted.
Modifying campaign workflow template statuses
To indicate which statuses should be included in the workflow template, click the template name. The detailed view of the workflow template is displayed.
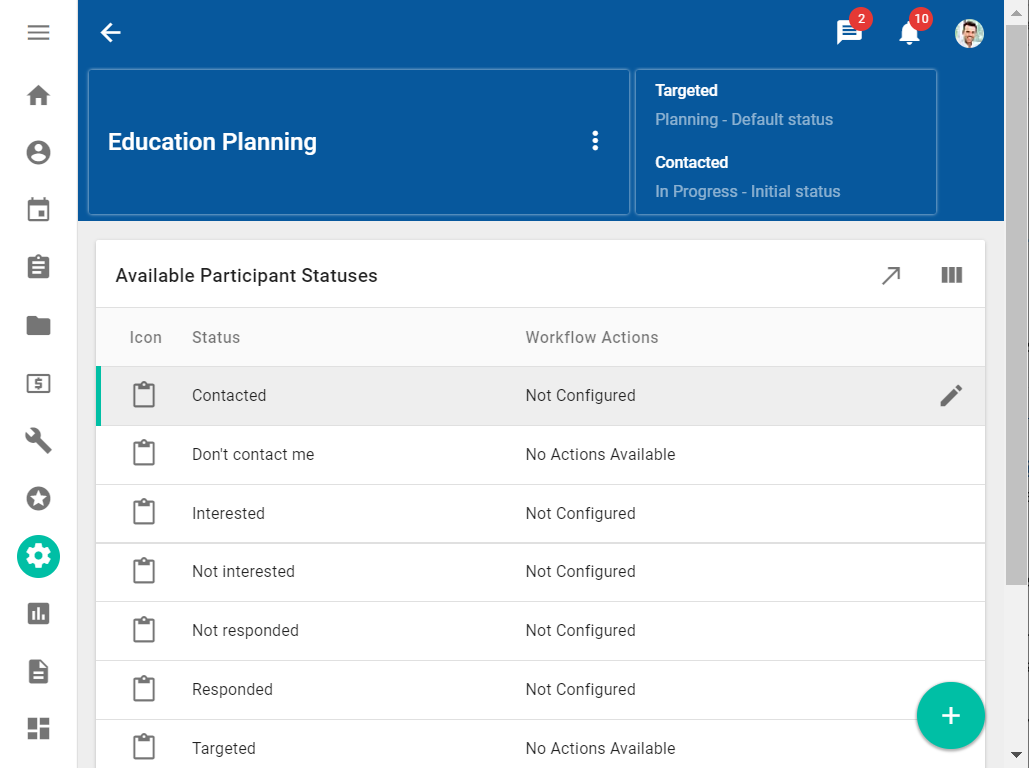
In the Available Participant Statuses table, click the Select status button ![]() to add or remove a status from the workflow.
to add or remove a status from the workflow.
After you have ensured that the correct statuses are included in the workflow, you can associate actions with each status.
Modifying actions and future statuses associated with campaign workflow template statuses
The detailed view of the workflow template is displayed. It lists all the participant statuses included in the workflow template.
You can now associate one or more actions with each status. You can also indicate supported future statuses for participants with this status.
Click the Edit button ![]() next to each status to open the Edit dialog.
next to each status to open the Edit dialog.
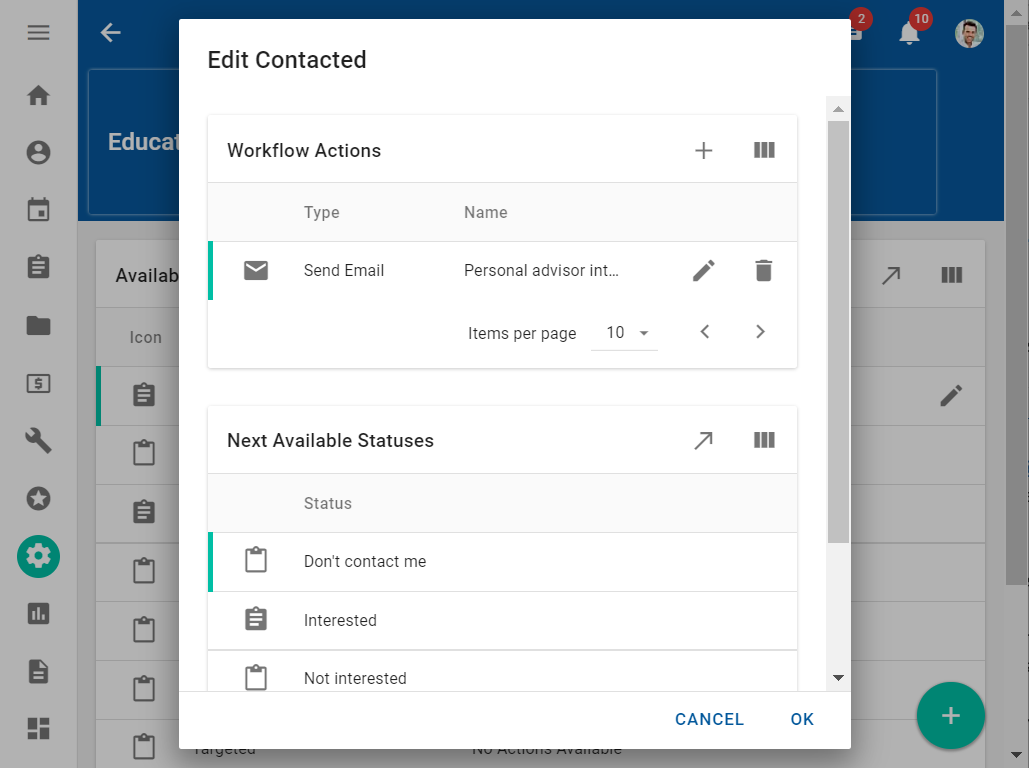
In the Workflow Action area of the dialog, click the Add button ![]() . The following actions can be associated with a workflow status:
. The following actions can be associated with a workflow status:
- Create task
- Create meeting
- Create opportunity
- Print document
- Send email
- New activity plan
In the Next Available Statuses area of the dialog, click the Select button ![]() . Select the statuses that participants with the current status should be able to change to.
. Select the statuses that participants with the current status should be able to change to.
If you do not define the next available status for the selected status, then the selected status for a participant cannot be changed during a campaign. The selected status indicates a final step in the workflow.
By default, only the Don't contact me and Targeted statuses do not have any next available statuses and no other next available statuses can be added.
Updating special participant statuses
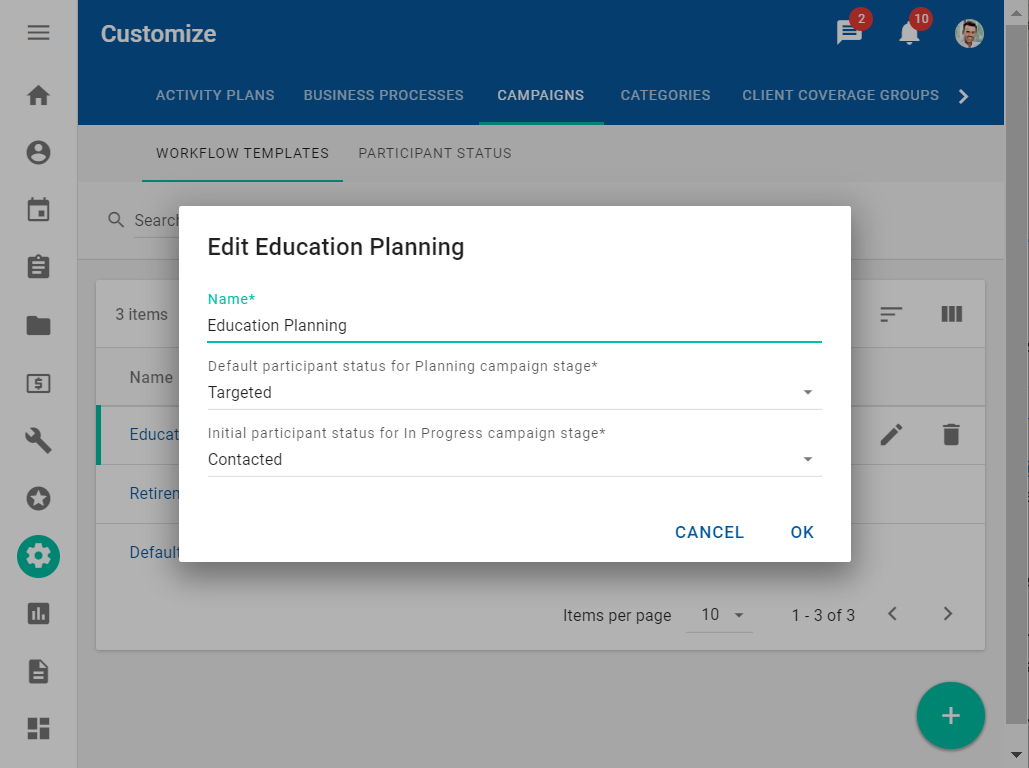
After you have configured all the statuses included in the workflow, you need to confirm which statuses should be used during specific steps in the flow. You need to confirm the following statuses:
- When the campaign is in the Planning stage, then all participants have the same status. This status does not have any associated workflow actions. It has only one next available status, which is the initial status of the In Progress stage. By default, this is the Targeted status.
- When the campaign has started and the campaign stage has changed to In Progress, then the status for all participants changes to the same status. By default, the initial status for the In Progress stage is Contacted.
To change one of the special participant statuses, click the Edit button on the data table row with the template name, select the appropriate values in the dialog that appears, and then click OK.
Deleting campaign workflow templates
To delete a template, click the Delete button ![]() on the data table row with the template name.
on the data table row with the template name.
If the template is being used in a campaign, it cannot be deleted.
The default workflow template cannot be deleted at any time, even if it is not being used.
Using campaign workflow templates
Campaign workflows are displayed on the Campaigns workspace ![]() . Open the detail view for an individual campaign and navigate to the Summary tab. You can see the current workflow on the Workflow card.
. Open the detail view for an individual campaign and navigate to the Summary tab. You can see the current workflow on the Workflow card.
- After a new template has been created, you can use it in any campaign. In the Workflow card, click the Select Template button
 and choose an available template.
 - After an existing template has been modified, the Reload template button
 on the Workflow card becomes enabled. To update your campaign to use the latest version, click Reload template.
After a template is selected or reloaded, you can make any required changes or customizations in the Workflow card.
For more information about campaigns and campaign workflows, see Campaigns.
Managing user-defined participant statuses
The participant status indicates where in the flow of the campaign the participant is. For example, a participant's status can indicate whether the participant has been contacted, whether they have replied to the campaign email, or whether they indicated that they were interested in the opportunity.
System defined participant statuses are included by default. The names of these statuses cannot be changed. You can also define custom statuses to reflect your company's processes.
To manage campaign workflow templates, open the Campaigns tab on the Customize workspace ![]() . Select the Participant Statuses subtab in the Campaigns tab.
. Select the Participant Statuses subtab in the Campaigns tab.
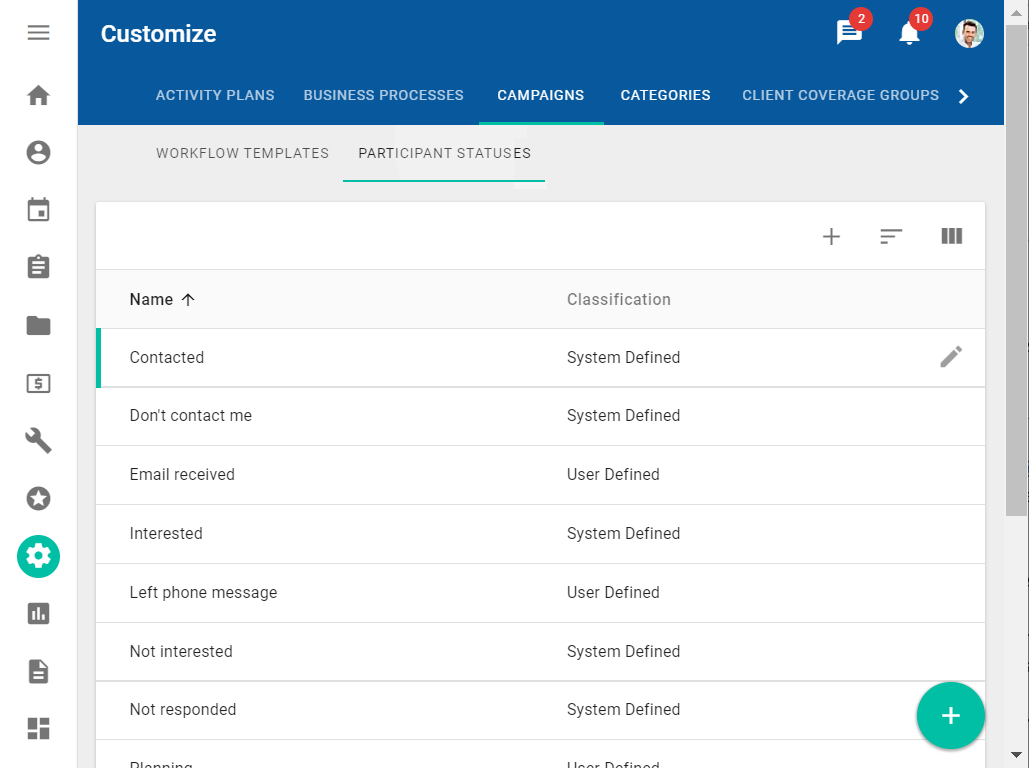
The Participant Statuses subtab displays the list of existing system-defined and user-defined participant statuses. You can use the tab to create a new participant status or to rename an existing user-defined participant status.
- To create a new participant status, click the Add button
 on the top of the data table, complete the dialog that appears, and click OK.
 - To rename a user-defined participant status, click the Edit button
 on the data table row with the status name, and click OK.
You cannot create multiple participant statuses with the same name. Each participant status name must be unique.
System-defined participant statuses cannot be renamed.