
Navigator list portlet
The navigator pattern can be used to present a list of items (for example, persons, opportunities, or service requests) that allow you to navigate to the details of a particular item.
Learning objectives
- Learn about best practices with the navigator pattern. The end result will have filtering, paging, sorting, multi-select, and polymorphic detail sections for
Person,Company, andUser, and should look similar to the following: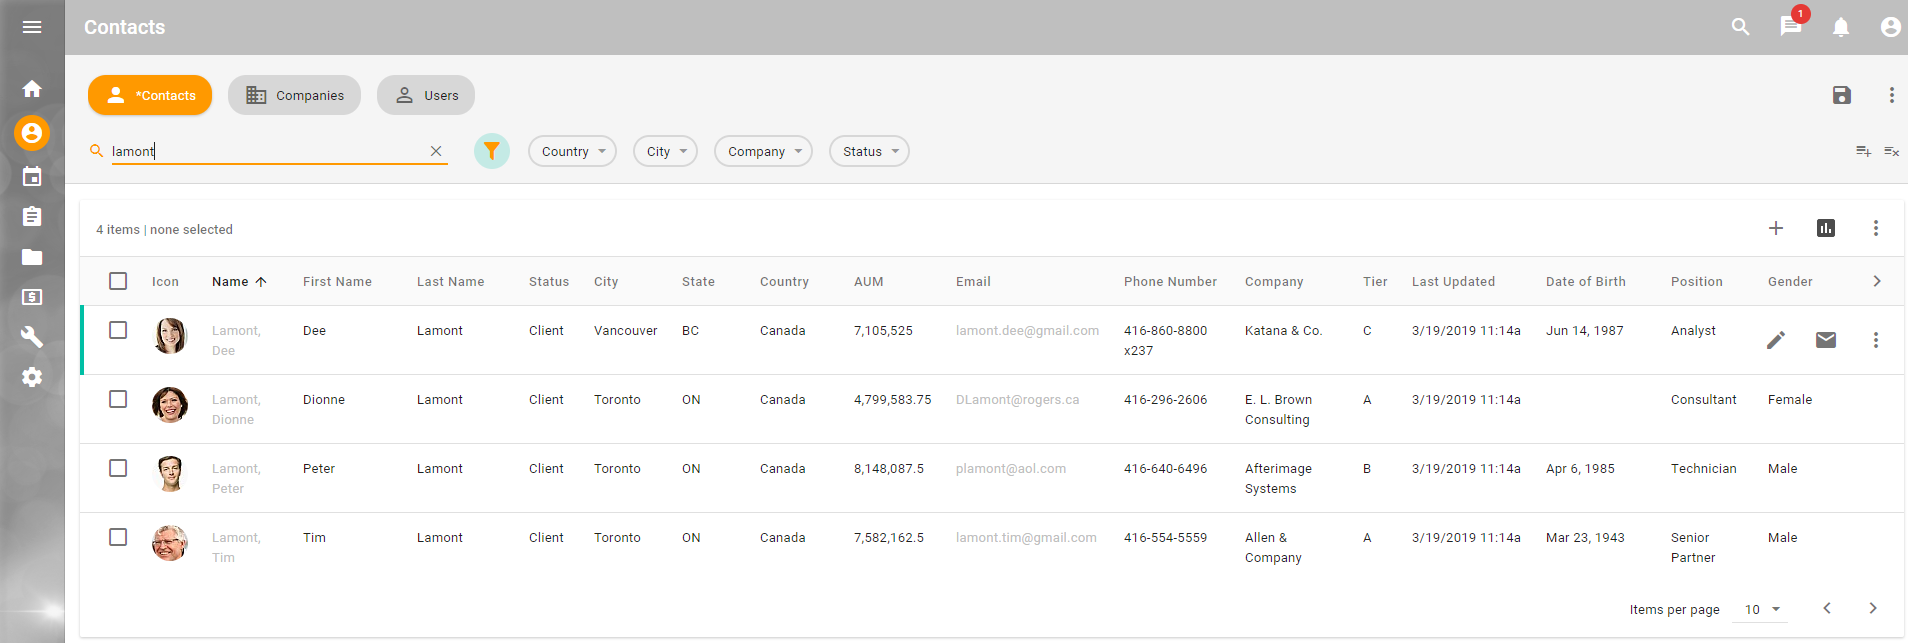
In the example we have used so far, the table in the layout is bound to a single class and shows attributes from that class without filtering. In this lesson, we will enhance our example to use the Entity class, which has subclasses.
Key concepts
Key workspace concepts include:
- Navigator - an optional workspace portlet that displays a list of items. Clicking on an item in the list typically allows you to navigate to a detail page.
- Page - arranges portlets into meaningful functional groups. You may display different pages depending on characteristics of the selected item.
- Banner - an optional banner portlet to display summary information at the top of a page.
- Tabs - optional groupings of portlets within a page.
When dealing with more complex business models:
- Polymorphism - the ability of an object to take on many forms.
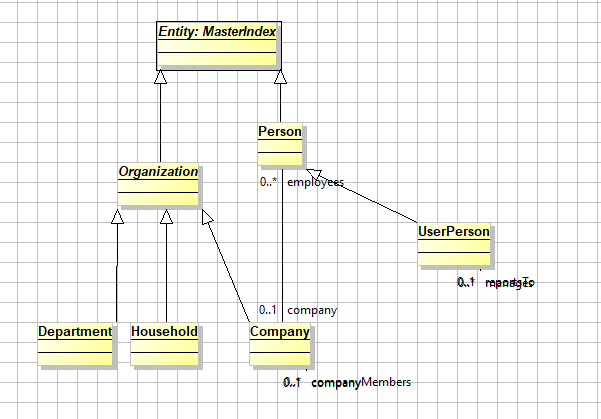
For example, we may have a class calledEntity, with subclassesPersonandCompany. We can show persons and companies side-by-side in an entity navigator, but when we navigate to the details for a person and a company, they should be different. This is accomplished by having a single navigator with two child pages - one for persons and the other for companies. The decision is made based on the page'scaseproperty. This is a powerful ability, which you can see in action on the Contacts workspace in NexJ CRM.
In preparation for the learning activities in this lesson, make sure that your files include the following code. If not, copy this code into your files before continuing.
training:Contact.portal
<Portal caption="idsa.training.portal.Contact.caption">
   <Tool name="toolNotifications" caption="ids.notifications" icon="icon:notifications" event="setSidebar" parameter="NOTIFICATIONS"/>
   <WorkspaceRef name="refSandbox" workspace="training:Sandbox"/>
   <WorkspaceRef name="refHome" workspace="mda:Home"/>
   <WorkspaceRef name="refContacts" workspace="mda:Contacts"/>
   <Drawer event="setSidebar" name="refNotifications" portlet="mda:NotificationDrawer"/>
</Portal>
training:Sandbox.workspace
<Workspace caption="idsa.training.workspace.Sandbox.caption" icon="icon:attach_money">
   <Page name="page">
      <Tab caption="IDS_DETAIL" layout="cols:3 fluid:true" name="spltDetail" type="grid">
         <PortletRef name="training_EntityList_portlet" portlet="training:EntityList"/>
         <PortletRef name="training_EntityDetail_portlet" portlet="training:EntityDetail"/>
         <PortletRef name="aflBus" portlet="app/bus"/>
      </Tab>
   </Page>
</Workspace>
training:EntityList.portlet
<Portlet context="EntityId">
   <Script><![CDATA[(context-form-source (this'view) "EntityId" "training_EntityList_layout")]]></Script>
   <Composite name="composite">
      <LayoutRef association="training_EntityList_layout" layout="training:EntitySearch" name="training_EntitySearch_layout" query="true"/>
      <LayoutRef layout="training:EntityList" name="training_EntityList_layout"/>
   </Composite>
</Portlet>
training:EntitySearch.layout
<Layout class="Entity">
   <Composite name="composite">
      <Filter name="filter"/>
   </Composite>
</Layout>
training:EntityList.layout
<Layout class="Entity">
   <UIActions>
      <UIAction event="sysProperties">
         <Popup association="tblEntityList" edit="true" screen="training:mda:EntityProperties"/>
      </UIAction>
   </UIActions>
   <Composite name="composite">
      <Table caption="idsa.training.layout.EntityList.caption" name="tblEntityList" rows="(@)">
         <Menu name="mnuRightClick">
            <Item caption="ids.edit2" event="sysProperties" icon="edit" name="mitProperties"/>
            <Item event="sysRemove" name="deleteItem"/>
         </Menu>
         <Column name="colType" caption="idsa.training.layout.EntityList.type" icons="type iconDefault"/>
         <Column name="colIcon" caption="idsa.training.layout.EntityList.icon" icons="(image . image)(data . mimeData)(type . mimeType)" texts="initial"/>
         <Column name="colName" caption="idsa.training.layout.EntityList.name" length="100" values="fullName"/>
      </Table>
   </Composite>
</Layout>
training:EntityDetail.portlet
<Portlet context="EntityId">
   <Script><![CDATA[(context-form-target (this'view) "EntityId" "training_EntityDetail_layout" ())]]></Script>
   <Composite name="composite">
      <LayoutRef layout="training:EntityDetail" name="training_EntityDetail_layout"/>
   </Composite>
</Portlet>
EntityDetail.layout
<Layout class="Entity" caption="idsa.training.layout.EntityDetail.caption">
   <Composite name="composite">
      <Label caption="firstName" head="true" name="lblFirstName"/>
      <Label caption="lastName" name="lblLastName"/>
   </Composite>
</Layout>
training:mda:EntityProperties.dialog
<Dialog caption="ids.caption.editPopup">
   <Composite cols="2" name="composite">
      <LayoutRef layout="mda:EntityPropertyDashboard" head="true" name="mda_EntityPropertyDashboard_layout"/>
      <Switch caption="ids.detail" head="true" name="grpDetailLayout" span="2" value="mda_EntityPropertyDashboard_layout">
         <Composite case="UserPerson" name="compUser">
            <LayoutRef association="mda_EntityPropertyDashboard_layout" layout="mda:UserPersonEditDetail" head="true" name="mda_UserPersonEditDetail_layout"/>
         </Composite>
         <Composite case="Person" name="compPerson">
            <LayoutRef association="mda_EntityPropertyDashboard_layout" layout="mda:PersonEditDetail" head="true" name="mda_PersonEditDetail_layout"/
         </Composite>
         <Composite case="Company" name="compOrg">
            <LayoutRef association="mda_EntityPropertyDashboard_layout" layout="mda:CompanyEditDetail" head="true" name="mda_CompanyEditDetail_layout"/>
         </Composite>
      </Switch>
      <LayoutRef association="mda_EntityPropertyDashboard_layout" head="true" layout="mda:EntityAuditFields" name="mda_EntityAuditFields_layout" span="2"/>
   </Composite>
   <Actions layout="mda:PopupButtons" name="mda_PopupButtons_layout"/>
</Dialog>
idsa.training.en.strings
idsa.training.layout.EntityDetail.caption=Entity Detail
idsa.training.layout.EntityList.caption=Entity List
idsa.training.layout.EntityList.icon=Icon
idsa.training.layout.EntityList.name=Name
idsa.training.layout.EntityList.type=Type
idsa.training.portal.Contact.caption=My Training Application
idsa.training.workspace.Sandbox.caption=Sandbox
The navigator
In previous lessons, we configured our Sandbox workspace to have a page with a tab and placed a reference to our portlet there, similar to the configuration you see in workspaces such as the Home workspace in NexJ CRM. The navigator (also known as the list or detail) pattern is a common pattern as well, easily supported by workspaces. To develop a navigator pattern, you need to:
- Add a sysDetail event to a column in the list portlet. When this event is raised, the system displays one of the workspace's pages based on the case property. If no case is used, the first page displays.
- Add a navigator element to the workspace with a reference to a list portlet.
Learning activity
Modify the
fullNamecolumn ofEntityList.layoutto raise thesysDetailevent as follows:EntityList.layout
XML... <Table name="tblEntityList" rows="(@)"> ... <Column name="colName" caption="idsa.training.layout.EntityList.name" event="sysDetail" length="100" values="fullName"/> ...We removed the caption from the table. While the card pattern uses captions, the navigator pattern does not, relying on the workspace for its name instead.
Configure
training:Sandbox.workspaceto add our list portlet to theNavigatorelement by pasting the following source code into yourtraining:Sandbox.workspacefile.training:Sandbox.workspace
XML<Workspace caption="idsa.training.workspace.Sandbox.caption" icon="icon:attach_money"> <Navigator name="training_EntityList_portlet" portlet="training:EntityList"/> <Page name="page"> <Tab caption="IDS_DETAIL" layout="cols:3 fluid:true" name="spltDetail" type="grid"> <PortletRef name="training_EntityList_portlet" portlet="training:EntityList"/> <PortletRef name="training_EntityDetail_portlet" portlet="training:EntityDetail"/> <PortletRef name="aflBus" portlet="app/bus"/> </Tab> </Page> </Workspace>- Save your changes and re-seed.
- Reload and refresh the UI. Now, when you click on a name entry in the list (navigator), the detail portlet should open with the selected entity's first name, last name, and ID.
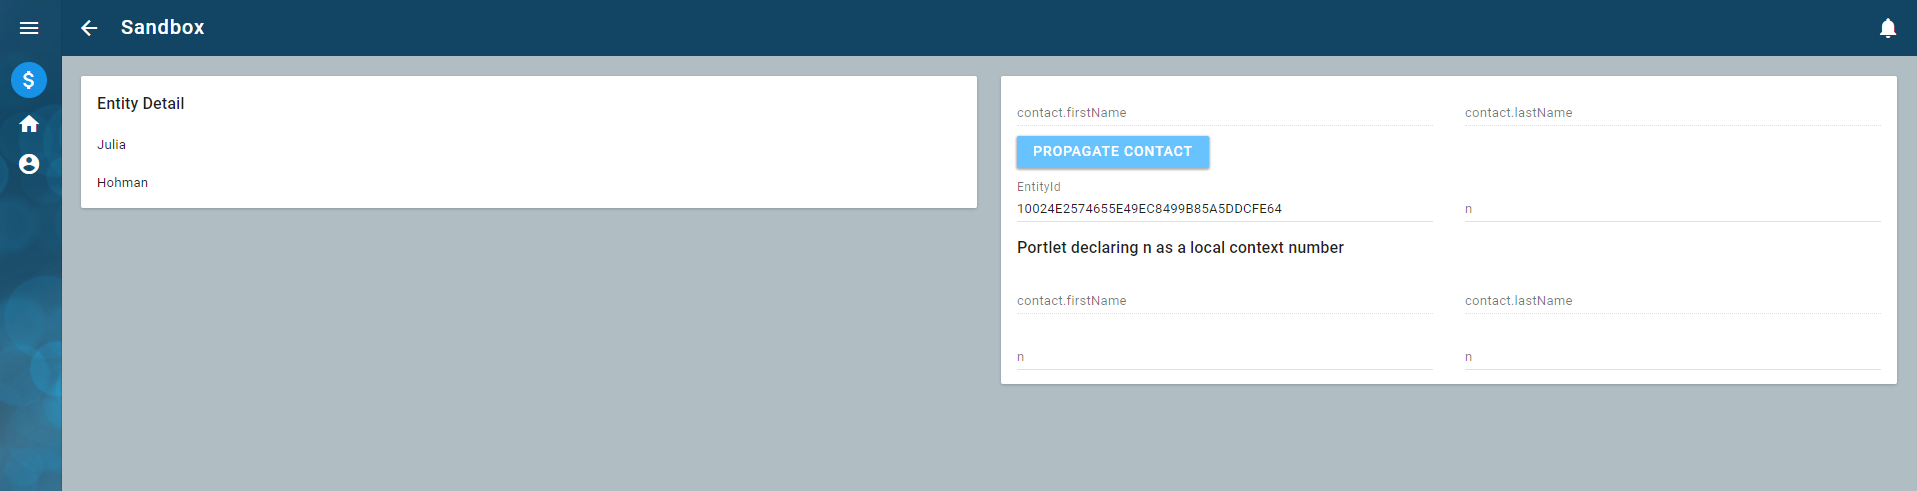
In this learning activity, we set the EntityId context variable from the EntityList portlet and saw the context change in the EntityDetail portlet. When we clicked a name, a sysDetail event was raised, and the default behaviour for the event showed the detail page. This again demonstrates the capabilities of portlets, the portal application, and the portal bus and context event.
Enhancing a navigator list
We will now explore sorting, selectability, multi-selection and polymorphism with respect to columns.
Sorting
You can configure columns to sort by clicking the column title or the Sort By button 
#t) or descending (#f). A simple example is lastName, with multiple columns with alternate sort orders - ((name . #t) (company . #f))
Learning activity
In your
Entity.List.layoutfile, add a default sort oflastNameto the table as in the following code.training:EntityList.layout
XML... <Table name="tblEntityList" order="lastName" rows="(@)"> ...- Save your changes.
- Reload the UI and observe that by clicking on the column header or selecting the Sort By menu option, you can sort items by name.
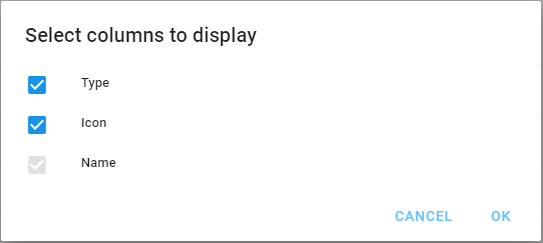
Selecting columns
Columns display automatically in the Select Columns dialog. You can invoke this dialog by clicking the Select Columns button
If a column's customizable property is set to #f and its visible property is set to #t, the column cannot be hidden by the user.
Learning activity
In the
training:EntityList.layout, mark the name column ascustomizable="#f"andvisible="#t".training:EntityList.layout
XML... <Column caption="idsa.training.layout.EntityList.name" event="sysDetail" length="100" name="colName" customizable="#f" values="fullName" visible="#t"/> ...- Save your changes.
- Reload the application and open the Select Columns dialog. You can see that the Name column is selected by default and cannot be cleared.
You can use the table's permanent property to specify the number of initial columns that should always be displayed. This affects column selection and impacts responsive display with a carousel effect.
Customizable and visible properties use #t and #f rather than true and false because they accept view paths to attributes to determine their value or Scheme expressions (#t is true and #f is false in Scheme). You can see this information in NexJ Studio by looking at the status bar at the bottom of the screen when you select either of these properties in the properties view. Pressing Shift+F2 can provide even more information on how this works. You have the ability to make properties have dynamic effects based on selected instances, user properties, or privileges in the model.
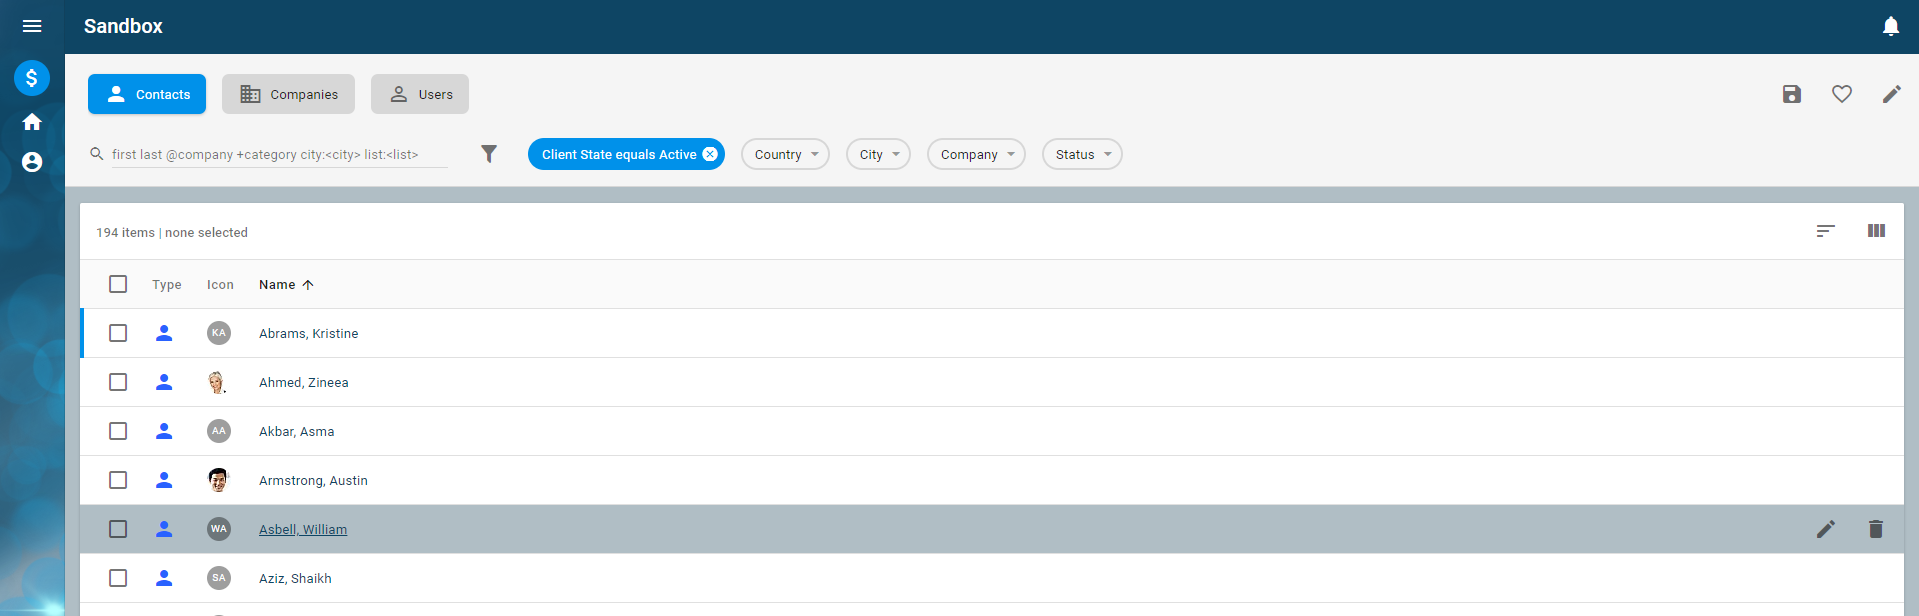
Multi-selection and actions for selected items
You can configure multi-selection and processing in a list using the SelectionMenu.
Learning activity
In
training:EntityList.layout, add aSelectionMenuto your table:training:EntityList.layout
XML... <SelectionMenu name="mnuMultiSelect"/> ...- Save your changes.
- Reload the application. You should see that selection checkboxes, a column heading for select/deselect all, and a selected status have been added to the table.
- Select a few items and you will see the heading change color and the none selected text change to the number of selected items.
Add the following
UIEventto the list intraining:UIEvents.uievents. The file should already exist from a previous lesson. If not, create the file.training:UIEvents.uievent
XML<UIEvents> <UIEvent caption="idsa.training.uievents.UIEvents.showSelection" icon="icon:select" name="trainingShowSelection" tooltip="idsa.training.uievents.UIEvents.showSelection"/> </UIEvents>- Save your changes.
Add the following stringId to the
idsa.training.en.stringsfile and save your work.idsa.training.en.strings
CODE... idsa.training.uievents.UIEvents.showSelection=Show Selection ...To create a menu item that will raise this event, update your
SelectionMenuintraining:EntityList.layoutas follows:training:EntityList.layout
XML... <SelectionMenu name="mnuMultiSelect"> <Item event="trainingShowSelection" name="mnuMulti"/> </SelectionMenu> ...Create a
UIActionto handle the event. We do this by creating a new ScriptUIActionintraining:EntityList.layoutthat listens for thetrainingShowSelectionevent and runs the following:training:EntityList.layout
CODE(logger'info ((@ model)'multipleSelection)) (@ confirm : (format "{0} items selected." ((@ model)'multipleSelectionCount)))Notice that we are using the
multipleSelectionandmultipleSelectionCountattributes on the model. If you select one or more items, click Show Selection, and look in your browser console (F12), you should see something like this:SCHEME#((message (: :class "Person") (: :oid (oid #zE47838A31F904497807191B3AE64F88E))) (message (: :class "Person") (: :oid (oid #z2630F7D4DDC340EF84CB1F11A90474F8))) (message (: :class "Person") (: :oid (oid #z7650B7D6EEC3445E99AB071093D79793))))Which is an array of objects that have a class and an oid that you could iterate through with code similar to the following:
SCHEME(for-each (lambda (i) (@ confirm : (format "You selected {0}." (i':oid))) ) ((@ model)'multipleSelection) )
The result should be similar to:

Polymorphic columns
When a list portlet has a filter (layout with query="true"), the list may display a different set of columns based on the filter card selection (the Filter Subject visualized as a filter card, as seen with Contacts, Companies, and Users above). Table columns can then be made polymorphic by using the case property on each column. This is done by adding switch="filter searchContext value" to the Table control.
Learning activity
In
training:EntityList.layout,modify the Table element as follows:training:EntityList.layout
XML... <Table name="tblEntityList" order="lastName" rows="(@)" switch="filter searchContext value"> ...The switch property should be set to
filter searchContext value, with an association path starting from thefilter:Filterobject underlying the portlet's filter control. For the majority of cases, value is what is needed to support this pattern. After setting your table's switch property, you can set acaseattribute on columns that only applies to a particular filter subject area. A missing case value or one of"*"means the column will show up in all cases.Update your table's columns as follows and save.
training.EntityList.layout
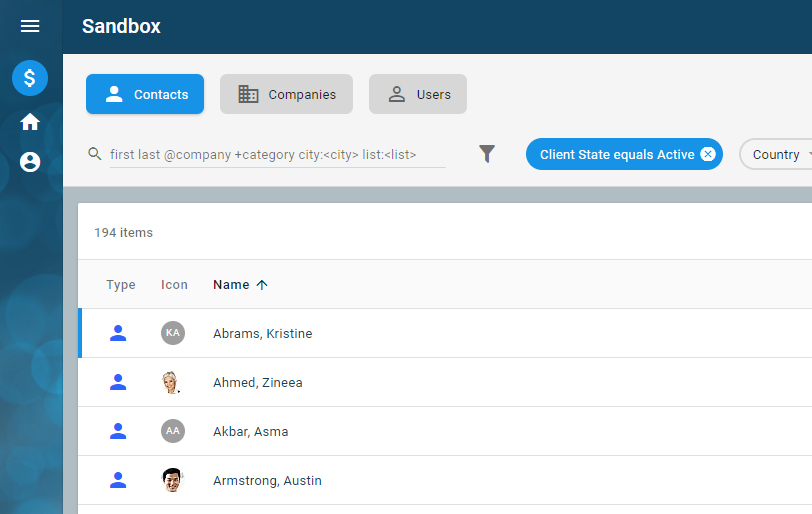
XML... <Column caption="idsa.training.layout.EntityList.type" icons="type iconDefault" name="colType"/> <Column caption="idsa.training.layout.EntityList.icon" icons="(image . image)(data . mimeData)(type . mimeType)" name="colIcon" texts="initial"/> <Column caption="idsa.training.layout.EntityList.name" event="sysDetail" length="100" name="colName" customizable="#f" values="fullName" visible="#t"/> <Column caption="ids.Email" case="PSN" name="colPEmail" sortable="false" values="email fullAddress"/> <Column caption="ids.phoneNumber" case="PSN" length="20" name="colPAddress" sortable="false" values="workPhone fullAddress"/> <Column caption="ids.company" case="PSN" name="colFullCompany" values="companyName"/> <Column caption="ids.caption.lastUpdated" case="PSN" name="colPLastUpdated" values="editTime"/> <Column caption="IDS_LANGUAGE" case="PSN" name="colPLang" values="defaultLang caption"/> <Column caption="ids.city" case="CO" name="colBranch" values="defaultAddress city"/> <Column caption="IDS_TELEPHONE" case="CO" name="colCompAddress" sortable="false" values="workPhone fullAddress"/> <Column caption="ids.caption.lastUpdated" case="CO" name="colCompLastUpdated" values="editTime"/> <Column caption="ids.caption.lastUpdated" case="USR" name="colULastUpdated" values="editTime"/> ...- Reload the application. You should see the columns on the table change as you click from one filter card to the next. The following example shows the columns for contacts, which are of the
Personclass.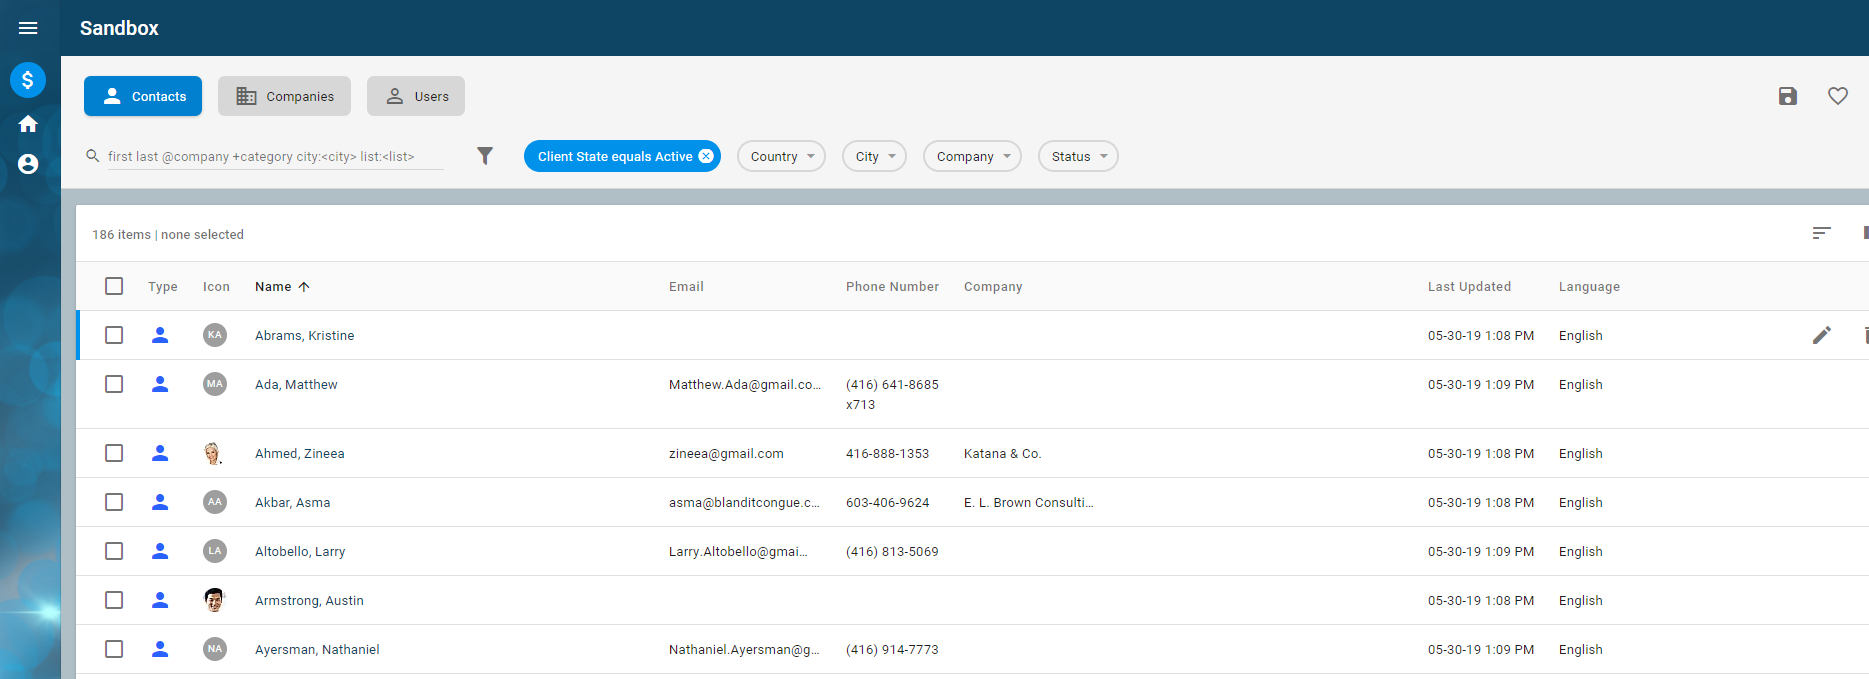
This is because these columns either didn't have a case property, or they were set to "PSN" which is the Subject Area for the person filter.

Summary
To sum up what we did in this lesson, we created a navigator portlet that provided a list with filtering, sorting and polyporphic columns for Contacts, Companies and Users with the ability to navigate to a detail page for the currently selected item (using sysDetail).