
Workflows
This lesson introduces the concept of workflows. By completing this module, you will learn:
- What a workflow is and why to use one
- How to initiate a workflow
- The types of steps supported in a workflow and their purpose
Key concepts
Workflows are a series of decisions and steps that define a business process. Workflows are invoked by events in the business model, and their process token ("this") is an instance of a business class. Workflow steps can run script that interact with the business model, send emails, invoke rule sets, write to log files, wait for timer events, invoke parallel processing of queues, etc.
The workflow engine is aware of all activity in the business model. Workflows can be used for very complicated processes that support long running, persisted operations. Workflows are sometimes used simply as a visual programming tool in the design of your business logic.
Create a workflow
In this lesson, you add a Tentative Delete feature to the training:Person class. When someone calls the delete event on a training:Person instance (or any object instance), the instance is removed from the system. With this new feature, a new event submitDelete flags an instance for deletion. The instance is removed only if that flag remains after a period of time. Another event, cancelDelete, allow someone to cancel the deletion by removing the delete flag. These events are managed using a workflow.
Add events to the training:Person class
Add two events to the training:Person class that are used to trigger functionality in the new workflow:
- Open the
training:Personclass and click the Events tab. - Add two new events,
submitDeleteandcancelDelete. For each event, add a new, emptymainaction.These two events are left empty. They exist simply to trigger a workflow.
Create the workflow
Create the workflow and add the steps necessary to implement the new functionality.
To create the workflow:
- In the Business Model layer, click the Workflows tab.
- Create a new workflow called
TentativeDelete. - In the Properties view for the new workflow, set the following attributes:
- Class:
training:Person - Event:
submitDelete - Variables:
deleteFlag
TentativeDeleteworkflow whenever thesubmitDeleteevent is invoked. The deleteFlag variable is available to all steps of the workflow. - Class:
Add an action:
- In the workflow diagram editor, if the Palette is not visible click the left-pointing arrow at the top of the right border of the editor window to display it.

- Select the Action tool from the Steps folder of the Palette and click on the workflow line.
- In the Property Editor tab, set the following properties in the General and Script tabs:
- Name:
init - Caption:
Initialize delete flag Script:
CODE(set! deleteFlag #t)
- Name:
Add a fork with an action and a timeout:
- Select the Fork tool from the Flow folder of the Palette and add it after the
initstep. - Set the following properties for the Fork:
- Name:
timedWait - Type:
any
- Name:
- Add an Action inside the Fork.
- Set the following properties:
- Name:
cancelDelete - Caption:
Handle Cancel event - Description:
This script fires if Person'cancelDelete is invoked. This sets deleteFlag to false. - Event:
cancelDelete Script:
CODE(set! deleteFlag #f)
- Name:
Add a timeout
- Select the Timeout tool from the Steps folder of the Palette.
- Add the Timeout inside the
timedWaitFork. - Set the following properties:
- Name:
deleteDelay - Caption:
Delay before deleting - Description:
Timer fires if Person'cancelDelete doesn't happen before timeout is complete. - Value:
10000(the wait time in milliseconds)
- Name:
Add a decision:
- Select the Decision tool from the Flow folder of the Palette and add it after the
timedWaitFork. - Set the decision's Name to
checkDeleteFlag.
Add an action to perform the deletion:
- Add another Action after the Decision with the following properties:
- Name:
doDelete - Caption:
Invoke delete Script:
CODE(this'delete)
- Name:
Add connectors that determine the flow of the workflow:
- Select the Connector tool from the Flow folder of the Palette and connect the
checkDeleteFlagdecision node to theInvoke deleteaction. - Set the Connector Branch properties to:
- Name:
deleteTrue - Caption:
Delete set Condition:
CODE(= deleteFlag #t)
- Name:
- Add another Connector between the
checkDeleteFlagdecision node and the end of the workflow. Set the Connector Branch properties to:- Name:
deleteFalse - Caption:
Delete cancelled Condition:
CODE(= deleteFlag #f)
- Name:
- Add another Connector between
Invoke delete(thedoDeleteaction node) and the end of the workflow.
Add notes to the workflow:
- Right-click a blank area of the workflow canvas and select Create Note.
- Set the text of the note to
Tentatively deletes a Person. When training:Person'submitDelete is invoked, the workflow starts. - Right-click the
initaction and select Create Note. The text of the note is the node's Description. - Right-click each node inside the fork and select Create Note. Position the notes so they do not overlap other nodes.
- Save your work.
- Your workflow should look similar to the following:
TentativeDelete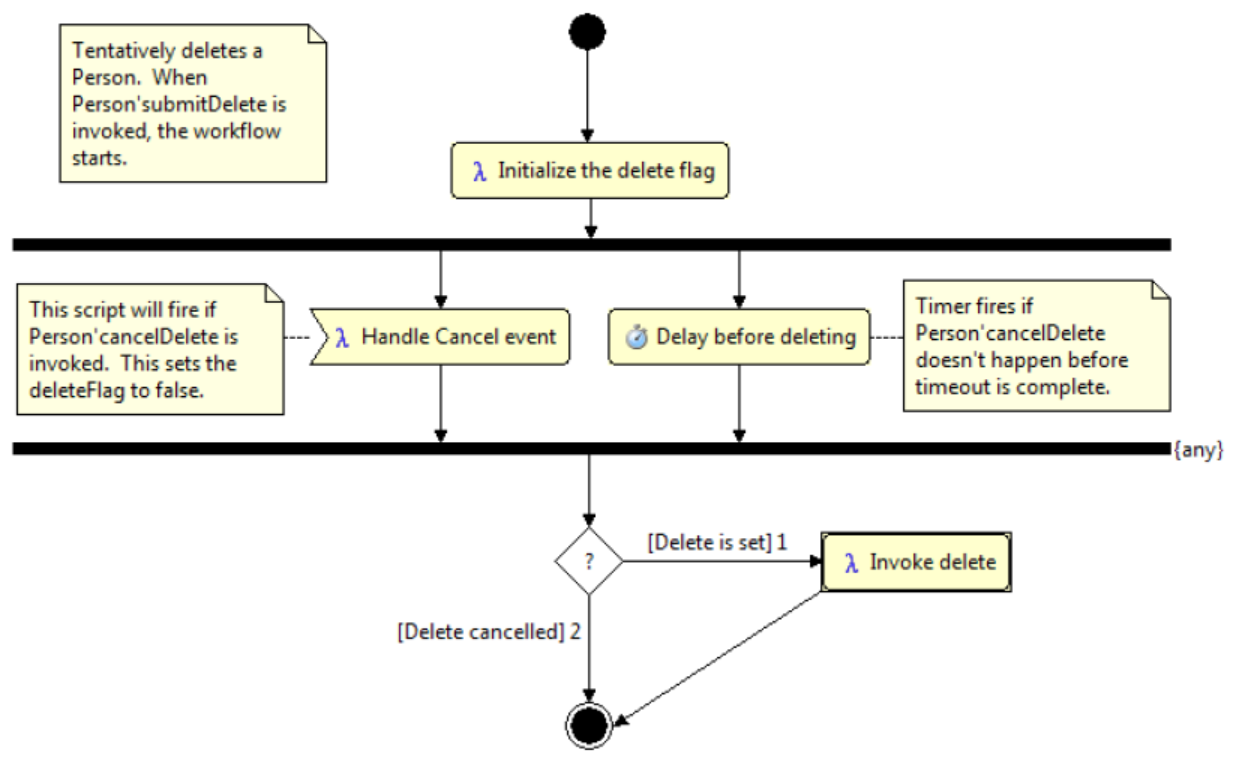
Test the workflow
The timers that the workflow depends on do not work in the Scheme Minimal Console.
Timers use services provided by an application server, so you must use the Server Console rather than the Minimal Console.
To test the workflow:
- Run the Server Console.
In a scratchpad enter the following code.
CODE; used to create the test Person record: Bob A Event (define pCreate (lambda () (begin-transaction (training:Person'new (: firstName "Bob") (: initials "A") (: lastName "Event") (: primaryLanguage (training:LanguageEnum'get'ENGLISH)) ) ) ) ) ; used to call submitDelete on the "Event" person (define pSubmit (lambda () (begin-transaction ((read-instance training:Person '() '(= lastName "Event") '())'submitDelete) ) ) ) ; used to call cancelDelete on the "Event" person (define pCancel (lambda () (begin-transaction ((read-instance training:Person '() '(= lastName "Event") '())'cancelDelete) ) ) ) ; used to query if an "Event" person exists (define pLookup (lambda () (let ((p (read-instance training:Person '() '(= lastName "Event") '()))) (if (null? p) "Person not found!!!" (string-append (p'firstName) " " (p'lastName) " is still here!!!") ) ) ) ) ; delete all instances of Person with last name "Event" (define pCleanUp (lambda () (begin-transaction (for-each (lambda (x) (x'delete) ) (training:Person'read '() '(= lastName "Event") '() -1 0 #f) ) ) ) )Info
Any work that is transaccional in nature must be wrapped in a transaction. If you ever get an
Error: err.runtime.txMandatorywhen using the Server Console, wrap what you are trying to execute in a(begin-transaction ...)statement.- Select the code and execute it in the Server Console.
The code consists of function definitions. When you run the code, you create the functionspCreate,pSubmit,pCancel,pLookup, andpCleanup. In the following steps, you execute the functions to test the workflow. Create a person instance by executing the
pCreatefunction:CODE> (pCreate)Verify the person exists by executing the
pLookupfunction:CODE> (pLookup)CODE; 13:56:42,085 DEBUG [Person] (NexJ-ContainedProcess) Invoking Event training:Person.read(attributes, where, orderBy, count, offset, xlock) ; 13:56:42,085 DEBUG [SQLAdapter] (NexJ-ContainedProcess) select A.id, A.locking from NJTrainingEntity A where A.lastName = ? and A.classCode = ? for read only ; 13:56:42,085 DEBUG [Adapter] (NexJ-ContainedProcess) Bind[0] = 'Event' ; 13:56:42,085 DEBUG [SQLAdapter] (NexJ-ContainedProcess) Bind[1] = 'PERSON' ; 13:56:42,086 DEBUG [SQLAdapter] (NexJ-ContainedProcess) SQL execution time: 1 ms ; 13:56:42,086 DEBUG [SQLAdapter] (NexJ-ContainedProcess) Retrieved 1 instance(s) of Person in 0 ms ; "Bob Event is still here!!!"SQLTest the delete path of the workflow by submitting a delete request using the
pSubmitfunction.CODE> (pSubmit)Wait at least 10 seconds. You will see some debug statements scroll in the console. Verify the person is now deleted using the
pLookupfunction.CODE> (pLookup)CODE14:00:13,458 DEBUG [Person] (NexJ-ContainedProcess) Invoking Event training:Person.read(attributes, where, orderBy, count, offset, xlock) ; 14:00:13,458 DEBUG [SQLAdapter] (NexJ-ContainedProcess) select A.id, A.locking from NJTrainingEntity A where A.lastName = ? and A.classCode = ? for read only ; 14:00:13,458 DEBUG [SQLAdapter] (NexJ-ContainedProcess) Bind[0] = 'Event' ; 14:00:13,458 DEBUG [SQLAdapter] (NexJ-ContainedProcess) Bind[1] = 'PERSON' ; 14:00:13,459 DEBUG [SQLAdapter] (NexJ-ContainedProcess) SQL execution time: 1 ms ; 14:00:13,460 DEBUG [SQLAdapter] (NexJ-ContainedProcess) Retrieved 0 instance(s) of Person in 0 ms ; "Person not found!!!"Create a person instance again by executing the
pCreatefunction:CODE> (pCreate)Verify the person exists by executing the
pLookupfunction:CODE> (pLookup)CODE; 14:04:09,597 DEBUG [Person] (NexJ-ContainedProcess) Invoking Event training:Person.read(attributes, where, orderBy, count, offset, xlock) ; 14:04:09,597 DEBUG [SQLAdapter] (NexJ-ContainedProcess) select A.id, A.locking from NJTrainingEntity A where A.lastName = ? and A.classCode = ? for read only ; 14:04:09,597 DEBUG [SQLAdapter] (NexJ-ContainedProcess) Bind[0] = 'Event' ; 14:04:09,598 DEBUG [SQLAdapter] (NexJ-ContainedProcess) Bind[1] = 'PERSON' ; 14:04:09,599 DEBUG [SQLAdapter] (NexJ-ContainedProcess) SQL execution time: 1 ms ; 14:04:09,599 DEBUG [SQLAdapter] (NexJ-ContainedProcess) Retrieved 1 instance(s) of Person in 0 ms ; "Bob Event is still here!!!"Try the cancel path.
First issue:CODE(pSubmit)then before 10 seconds are up issue:
CODE(pCancel)After 10 seconds during which several debug statements are logged to the console, verify that the person still exists:
CODE> (pLookup)CODE; 00:07:00,708 DEBUG [Person] (NexJ-ContainedProcess) Invoking Event training:Person.read(attributes, where, orderBy, count, offset, xlock) ; 00:07:00,709 DEBUG [SQLAdapter] (NexJ-ContainedProcess) select A.id, A.locking from NJTrainingEntity A where A.lastName = ? and A.classCode = ? for read only ; 00:07:00,709 DEBUG [SQLAdapter] (NexJ-ContainedProcess) Bind[0] = 'Event' ; 00:07:00,709 DEBUG [SQLAdapter] (NexJ-ContainedProcess) Bind[1] = 'PERSON' ; 00:07:00,711 DEBUG [SQLAdapter] (NexJ-ContainedProcess) SQL execution time: 2 ms ; 00:07:00,711 DEBUG [SQLAdapter] (NexJ-ContainedProcess) Retrieved 1 instance(s) of Person in 0 ms ; "Bob Event is still here!!!"
Create a unit test
Create a unit test to ensure that the workflow continues to work successfully even after future model changes.
To create the unit test:
Create a new unit test named
Person.In the Overview tab, set the following properties:
Description:
Unit tests for the Person classDump:
UnitTestMode:
sequential
Add a test case:
Name:
cancelDeleteDescription:
Test cancelling a tentative deleteScript:
CODE(define p '()) (training:Person'new (: firstName "Bob") (: initials "A") (: lastName "Event") (: primaryLanguage (training:LanguageEnum'get'ENGLISH))) (commit) (reset-context) ; submit the delete ((read-instance training:Person '() '(= lastName "Event") '())'submitDelete) (commit) ; cancel the delete ((read-instance training:Person '() '(= lastName "Event") '())'cancelDelete) (commit) (reset-context) ; ensure that the person still exists (set! p (read-instance training:Person '() '(= lastName "Event") '())) (assert-equal "Bob" (p'firstName))
- Run the unit test and ensure that the test case successfully completes.
Update the revision and publish the model
Since you did not change the database schema in this lesson, you do not edit the Upgrade file, upgrade the UnitTest dump file, or upgrade the database. The model's version number that is used to identify data source schema remains the same.
However, you should increment the Model Revision number of the project. Updating the revision number of the model indicates that the metadata has changed since the previous "release"..
- Update the model's revision number (e.g. from
9.0.0.5to9.0.0.6). - Publish the model