Integration fundamentals
Learning objectives
- Learn about the concepts and components used in integration including channels, messages, transformations, and services.
- Understand the key concepts of model services and the NexJ integration engine.
Key concepts
- Integration is the process of enabling different systems to communicate with each other. It attempts to address the challenges of enterprise environments, such as unreliable or slow networks, varied or incompatible applications, and changing framework needs.
Enterprise environments often consist of many varied and complex systems. Most companies store information across a number of different systems, which can present challenges when information needs to be shared. Examples include:
- Information is stored in a database that does not allow direct access.
- A system requires synchronous communications that another system does not provide.
- Information is stored as a file instead of in a database.
NexJ approaches integration in the following ways:
File transfer - An application writes a file to a shared directory where it is read by another application.
Messaging - An application sends a message to a common message channel shared with other applications. Messaging is used for asynchronous communications, where the sender sends a message and moves on without requiring a response from the receiver.
Remote procedure call (RPC) - An application exposes functionality that can be accessed remotely by another application. RPC is used for synchronous communications, where the sender waits for a response from the receiver.
Shared database - Multiple applications share the same database schema in a single physical database. To carry out these approaches, the task of integration is broken up into a number of components. Each component has a role in the process of abstracting data, enabling it to be delivered between the applications and platforms being integrated.
The integration engine is made up of the following six components:
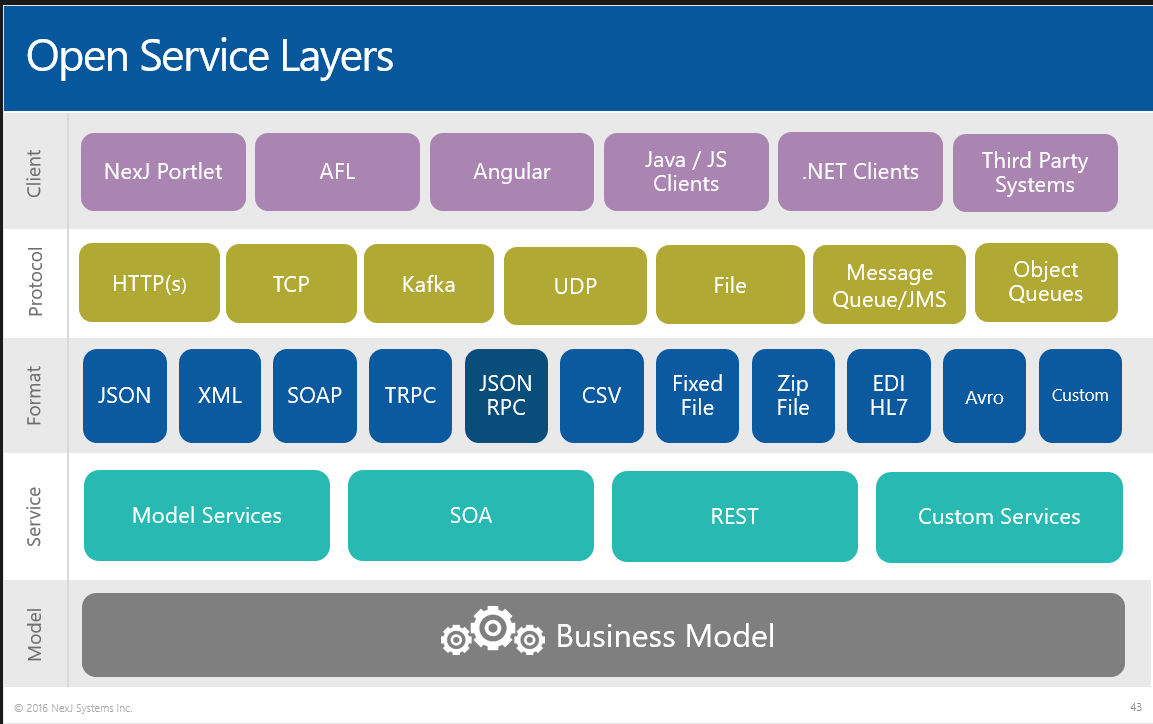
Channels - Channels are what we send and receive messages over. They are abstract integration endpoints that represent the network transport layer, or protocol. Specific channel types include:
HTTP - both as a client and as a server to receive and send HTTP messages.
- Message Queue - send and receive using JMS
- UDP - send and receive using the User Datagram Protocol
- TCP - send and receive using the Transmission Control Protocol
- Mail - send and receive email messages
- File - send and receive using a set of directories
- Kafka - send messages to a Kafka Server
- Generic - for a custom developed channel
- Object Queue - domain model message queueing
Connections - Binds a channel to a physical endpoint.
Messages -A message carries information from a source system to a destination system over an integration channel. Inside the machine they are represented as Transfer Objects. On the wire, they take on different representations. This is called the wire format or the "serialized" message. To convert from wire format to internal format, you parse the message. To go the other way around, you format the message. Supported message formats include:
Object - Maps message parts to attributes in class instances
Fixed - Maps message parts to record fields in a fixed length file, or flat file database.
JSON - Maps message parts to JSON objects, arrays or primitives.
Avro - Maps message parts to Avro objects, arrays or primitives.
HL7 - Maps message parts to segments and fields in a Health Level Seven (HL7), v2.x file.
CSV - Maps message parts to columns in a CSV file.
XML - Maps message parts to XML elements, attributes or values.
Zip - Maps message parts to files in a Zip file archive.
VCard - Maps message parts to elements in a vCard file.
Services - Services tie together integration structures and provide message orchestration. They are very similar to Workflows, but instead of a Class as the process token, a Service uses a message. Each step in a Service returns a message. Steps can:
- run script,
- send messages,
- send and receive messages to external systems asynchronously,
- transform messages
- persist object messages to the domain model
- sync object messages using the additional capabilities of the synchronization framework. The sync framework maintains a model of various sync targets and keeps track of each synchronized instance so it can detect conflicts. The sync step is really an extension of the persist step that allows for processing and conflict resolution.
- try/catch blocks to handle exceptions
- dispatch for branching based on conditions of the message or service
- parse and format messages
Transformations -Transforms one type of message to another.
Interfaces - A list of request and response messages that are used to filter messages being sent and received.
Overview
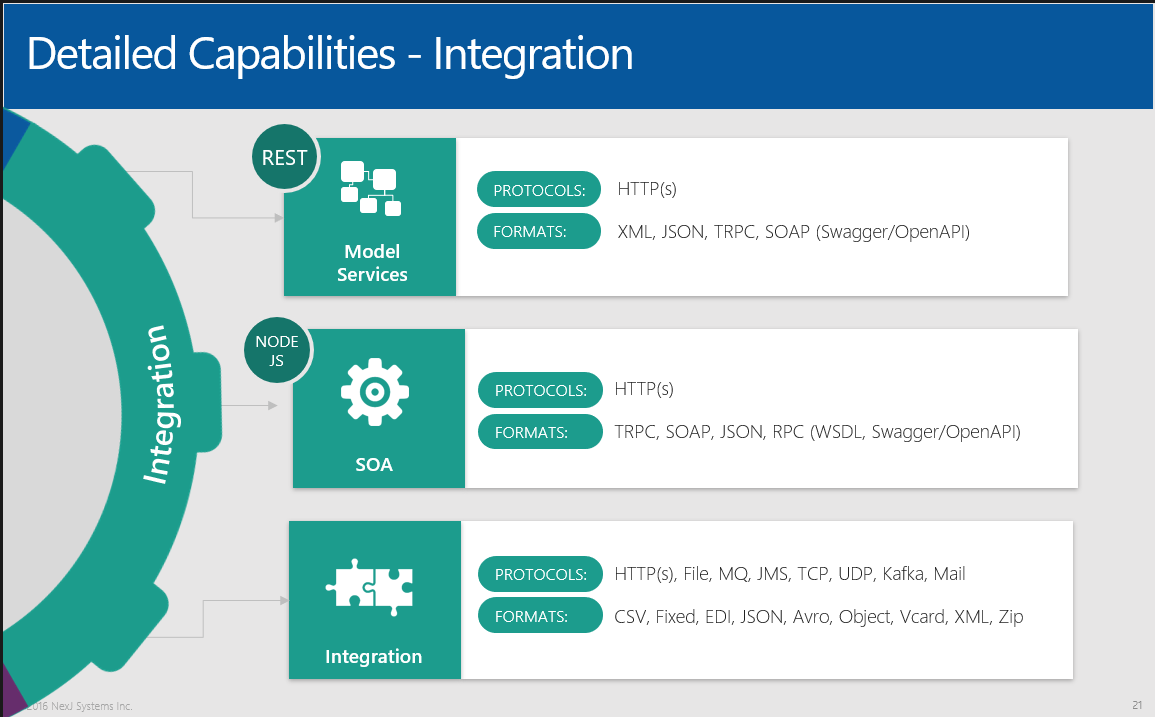
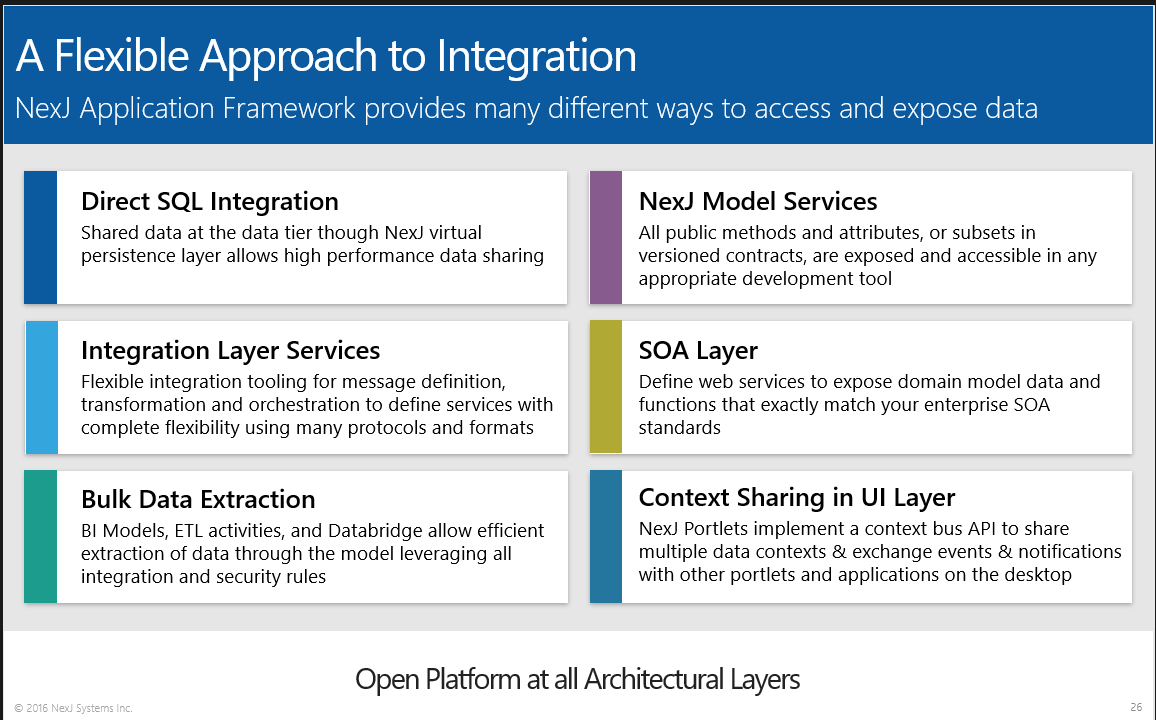
NexJ’s integration capabilities are designed to provide many different ways to access and expose data, including file, API, and real-time based interactions. Following is a brief summary of the platform capabilities used to support various integration patterns.
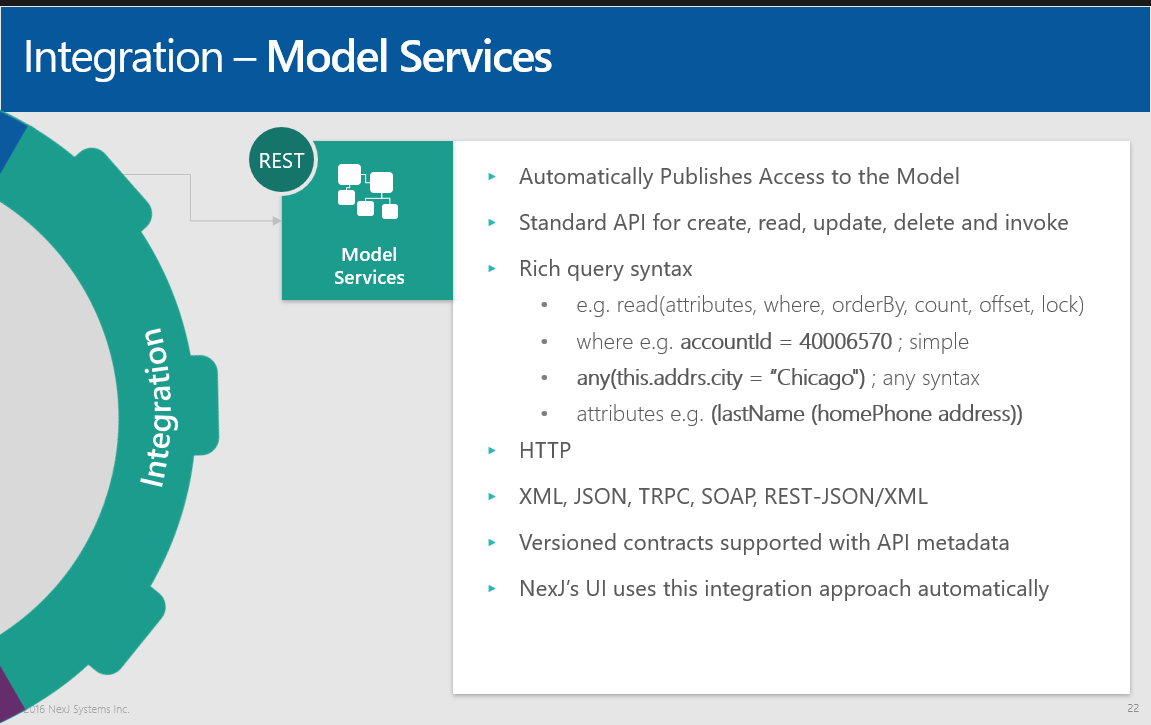
- Model Services (REST) provide secure API access to the business model automatically (public methods and attributes) over HTTP(s). It is available as XML, SOAP, JSON, and REST interactions from any HTTP-capable client, including Javascript libraries, .NET, and Java applications. These are the services used by NexJ’s UI. A mechanism to provide versioned contracts over this API is also available to better support micro-service development and continuous integration. The capabilities of the REST interface are documented automatically with OpenAPI.
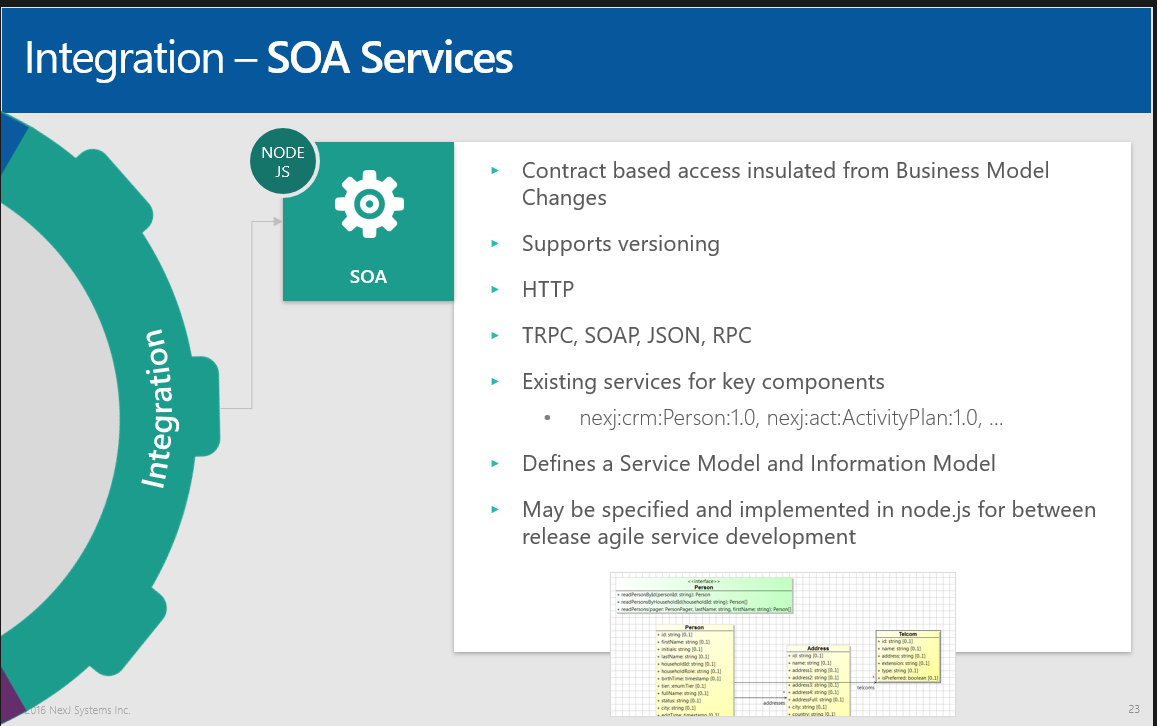
- SOA Services provide contract-based web services to integrate with client enterprise SOA standards. This approach insulates services from business model changes between releases and provides versioning support. It is available over HTTP(s) using SOAP or JSON-RPC. These services may also be implemented in NodeJS for agile service development between releases. The behaviour of the contract interfaces is protected between releases, until the version is retired or deprecated.
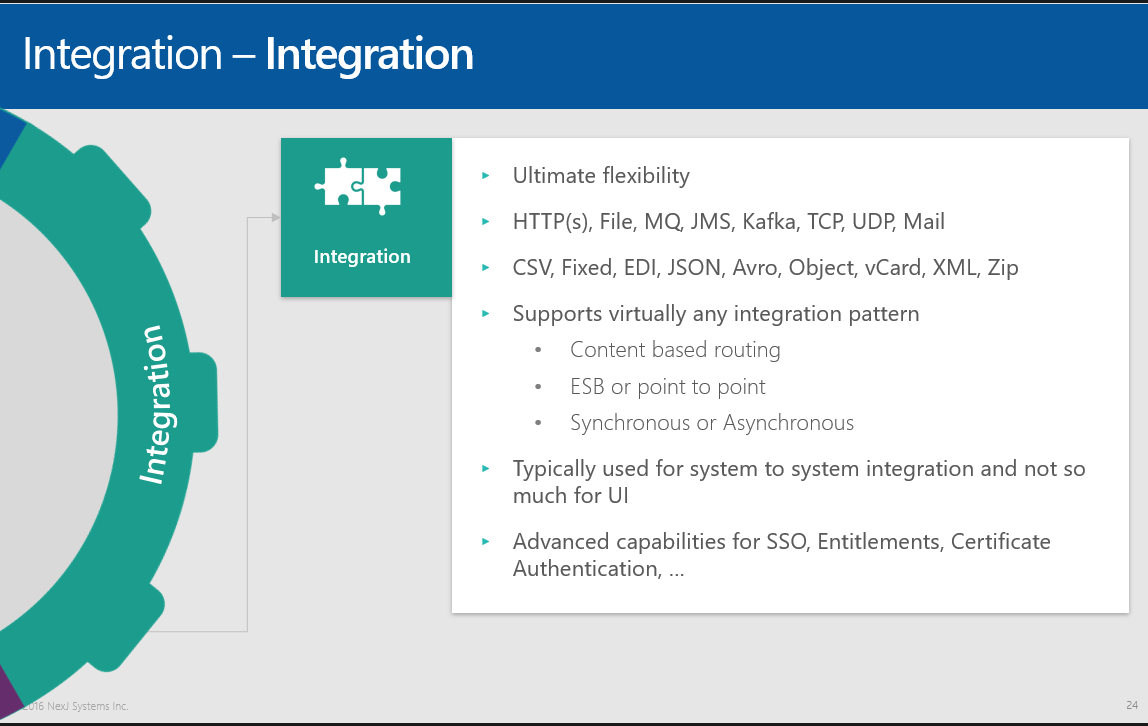
- Integration Services provide the most flexibility for custom service development. They are capable of sending and receiving over HTTP(s), file drops, message queues, TCP, UDP, kafka, and mail protocols. Supported wire formats include comma-separated value, tab-separated value, fixed or copybook, EDI, JSON, Avro, Object, vCard, XML, SOAP, and Zip. Orchestration is visually declared and can support virtually any integration pattern, for example, content based routing, ESB or point-to-point, synchronous or asynchronous. It also supports advanced capabilities for SSO, entitlements, and certificate authentication.
Additional capabilities for integration include:
- NexJ Portal provides context sharing and UI mashups in the presentation layer. NexJ declarative portlets, custom UI, and 3rd party content can share context, events, and notifications on the client without the need for server-to-server integration.
- Business Model Persistence Mapping provides real-time connectivity to databases and services giving you a virtualized view of your enterprise data. This flexible tooling provides high-performance access to data at source while consistently applying security, auditing, business rules, and processes. The mapping of classes and attributes to database tables and columns is done logically and declaratively at design-time. During deployment, the mapping binds to the appropriate physical database type (for example, MSSQL, Oracle, DB2, …). Advanced capabilities, such as intelligent caching and sharding, are also supported. Once the mapping is completed, designers can create UI, analytics, and reporting without having to think about schema, SQL statements, or service calls.
- Bulk Data Ingestion and Extraction can move large volumes of data in and out while respecting the security, business rules, and processes defined in the business model. BI Models and Databridge provide simplified views of the operational model to analytics and reporting and may be populated in batch or real time. ETL tooling also leverages the business model and provides page-based workflow for data. System flags can be used to turn off certain capabilities, such as auditing, for more efficient updates during a high-volume data transfer.
- The Synchronization Engine keeps data in two or more systems in sync. This powerful feature is what is behind NexJ’s Enterprise Synchronization for Microsoft Exchange and can synchronize any two systems with mappable keys, in read time or in batch.
- Direct SQL Integration with NexJ products databases is possible, but the recommended approach to use the business model, ETL tooling, or the synchronization engine so as to respect the security, auditing, and business rules enforced by the business model.
- The Streaming Interface provides real-time access to any audited changes in the business model. It is used by Databridge to capture and process changes.
Business Model Persistence Mapping provides real-time connectivity to databases and services giving you a virtualized view of your enterprise data. This flexible tooling provides high-performance access to data at source while consistently applying security, auditing, business rules, and processes. The mapping of classes and attributes to database tables and columns is done logically and declaratively at design-time. During deployment, the mapping binds transparently to the appropriate physical database type (MSSQL, Oracle, DB2, Sybase, …). Advanced capabilities, such as intelligent caching and sharding are also supported. Once the mapping is completed, designers can create UI, analytics, and reporting without having to think about schema, SQL statements, or service calls. Additionally, classes may be “service persisted” to seamlessly make requests to back-end APIs.
Integration is important to user adoption. Users perceive value only when they get more out of the solution than they put in and have all enterprise information readily available. This is especially important in the Enterprise environment. At NexJ we understand this and provide world-class tools and techniques to best support enterprise integration.
Updating proxy settings, if required
Many enterprises use proxy servers for internal users to access external web resources. Browsers are configured to use HTTP and HTTPS proxy servers to reach sites outside the corporate network. This learning module requires access to external resources. You may have to configure proxy settings in Eclipse and NexJ Studio. Eclipse and NexJ Studio must have the same proxy settings as the Windows LAN settings to be able to access external resources.
Determine whether a proxy server is being used
Learning activity
To view Windows proxy settings:
- From the Windows Start menu, select Control Panel > Network and Internet > Internet Options > Connections > LAN Settings.
- If the values are blank, a proxy server is not being used.
- Otherwise, note the values for the port and the server.
Configuring proxy settings for Eclipse
Learning activity
To configure proxy settings for Eclipse:
- In NexJ Studio, select Window > Preferences > General > Network Connections.
- In the Active Provider field, select Manual.
- In the Proxy entries section, select the HTTP row and click Edit.
- In the Host and Port fields, enter the Windows LAN settings.
- Click OK. Leave the Preferences window open.
Configuring JVM options
NexJ Studio tools, such as the Scheme Console and the built-in NexJ Model Server, use a different JVM than Eclipse. Since Eclipse's Network Connections do not propagate to NexJ Studio, you need to add JVM options for the proxy settings.
Learning activity
To add JVM options for NexJ Studio Scheme Consoles and NexJ Studio Server/Application:
- In the Preferences dialog, select NexJ Studio > Launch Settings > Scheme Console Settings.
In the Common VM arguments field, enter the following code.
Replace the <SERVER> and <PORT> values with HTTP proxy details from the Windows LAN settings.
CODE-DproxySet=true -DproxyHost=<SERVER> -DproxyPort=<PORT>Click Server/Application Settings.
In the Common VM arguments field, enter the following code.
Replace the <SERVER> and <PORT> values with the HTTP proxy details from the Windows LAN settings.
CODE-DproxySet=true -DproxyHost=<SERVER> -DproxyPort=<PORT>Click Apply and Close.

