This lesson introduces the concept of a calculated attribute and shows you how to create one. By completing this module, you will learn:
What a calculated attribute is, and when it is useful to create one.
How to define a calculated attribute by using the Value and Dependency properties.
How to use the @ shorthand symbol in the Scheme expressions that define a calculated attribute.
Create a calculated attribute
All the class attributes that you have created so far have been assigned values that are persisted to the data store. Sometimes the value of an attribute is not explicitly assigned but is the result of an operation performed on other attributes. Attributes that obtain their values this way are called calculated attributes. Typically, the values of calculated attributes are not persisted.
Calculated attributes reduce storage redundancy by deriving values from information that has already been persisted. Since the values of calculated attributes are not persisted, they can reduce the size of your data store, and the number of commits that must be made to it. For example, if a model stores a person's date of birth, you can define their age as a calculated attribute using the birth date and the current date. Using this technique means that you do not have to separately persist an age attribute, or create logic to recalculate and repersist that value every time the person has a birthday.
Use calculated attributes when a value that you want to display or for other purposes can be computed from existing data in the business model. That existing data can be from the same business object instance, from its subcollections, or from any other relevant area. The data can also come from external web services or other integration channels.
Sometimes the calculation of an attribute's value is so complex that using a persisted value is a better choice in terms of the performance of your model. This is particularly true for calculations that require aggregation of massive amounts of data, or highly complex table joins. Persisted attributes might also be preferable if the value is repeatedly used by your application.
In this module, you add a calculated attribute called fullName to each of the existing classes in your model. Each attribute is defined differently, so that each fullName value is meaningful in the context of the class.
Add the fullName attribute to your model's classes
Use the class diagram to quickly add the attribute to the relevant classes.
To add the fullName attribute to your model's classes:
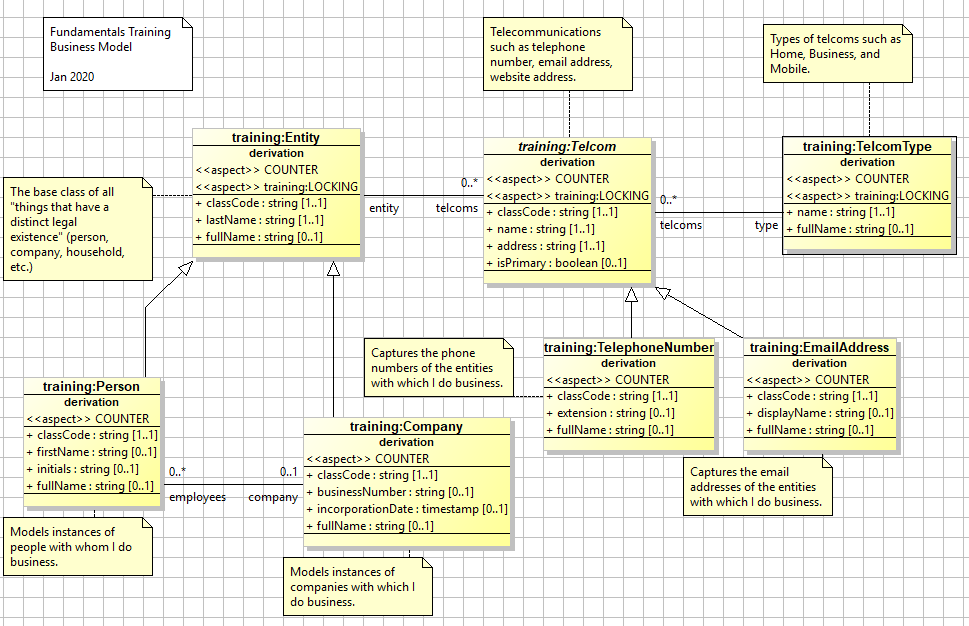
Open the training:Fundamentals class diagram (Business Model → Diagrams).
Right-click the training:Entity class and select Create Attribute.
Edit the new attribute to read:
+ fullName : string [0..1] This means the attribute fullName is a public (+) attribute of type string, is optional, and is not a collection (there can be zero or one instance of the attribute).
Add the attribute to the following additional classes in the diagram:
training:Person
training:Company
training:TelephoneNumber
training:EmailAddress
training:TelcomType
Do not add the attribute to the Telcom class. You are defining the attribute differently in every one of training:Telcom's derived classes, so there is no gain from having the attribute defined in this abstract parent class. When you are done, your model diagram should resemble the following:
Set the value and dependency properties for the fullName attributes
To set the value and dependency properties for the fullName attribute of the Entity class:
In the class diagram, right-click the fullName attribute of the training:Entity class and select Go to Definition. This opens the class editor and takes you to the Attributes tab of the training:Entity class, with the fullName attribute selected.
In the Common sub-tab, set the Description to The calculated full name for display.
In the Value sub-tab - or in the value column in the attribute list, set the Value property to: (format "Entity: {0}" (@ lastName))
Javascript
JS
format("Entity: {0}", this.lastName);
This specifies that the fullName attribute for the training:Entity class will be a string that reads “Entity: {0}”, where {0} is a variable that is substituted with the value of the lastName attribute. For example, if an entity's lastName attribute is “Turner”, then the fullName attribute has a value of “Entity: Turner”.
Set the Dependency property to lastName. This indicates that the value of the fullName attribute should be recalculated whenever the lastName attribute changes. The Dependency property typically contains all the fields used to calculate the value of an attribute.
Update the value and dependency properties for the remaining classes, using the following values listed below. training:Person
The value of the fullName attribute of the training:Person class refers to both its own simple attributes as well as the fullName attribute of the associated Company class. The attribute of the associated class is accessed through the company complex attribute. This is a simple practical example of traversing the model through the associations set by the reverse property.
6. Save your changes and validate the model by clicking the Validate Model button in the toolbar.
Info
The @ symbol in this context acts as a shorthand for accessing the current class instance. In javascript it is this and can be chained. In calculating the value of the fullName attribute for an Entity, the (@ lastName) gives the instruction to look first at the instance for which the fullName value is being calculated, and then to get the value of the lastName attribute from it. The @ notation can increase the legibility of a complex get instruction.
Compare:
(@ lastName) is equivalent to (this'lastName) and this.lastname in "js". (@ company fullName) is equivalent to ((this'company)'fullName) and this.company.fullName in "js".
Test the model
Start the Server Console with Debug logging enabled.
In a scratchpad addthe following script:
CODE
; Test code for calculated attributes
; Create all of the training:Entities and training:Telcoms
(define entity (training:Entity'new (: lastName "Thing4")))
(define comp (training:Company'new (: lastName "YourCo") (: businessNumber "BN-5678") (: incorporationDate (now))))
(define person (training:Person'new (: firstName "John") (: initials "X") (: lastName "Doe") (: company comp) (: primaryLanguage (training:LanguageEnum'get'ENGLISH))))
(define tp (training:TelcomType'new (: name "Business2")))
(define email (training:EmailAddress'new (: entity person) (: type tp) (: name (tp'name)) (: address "john.doe@nexj.com") (: displayName "John Doe")))
(define tel (training:TelephoneNumber'new (: type tp) (: name (tp'name)) (: address "(416) 555-1212") (: entity person) (: extension "x123")))

(commit)

; Loop over all the training:Entities and (polymorphically) print their
; fullNames (and their Telcoms)
(define outString "")
(for-each
   (lambda (e)
      (set! outString (string-append outString "\n" (e'fullName)))
      (for-each
         (lambda (t)
            (set! outString (string-append outString "\n -" (t'fullName)))
         )
         (e'telcoms)
      )
    )
    (training:Entity'read '() '(in? lastName "Thing4" "YourCo" "Doe") '() '() '() '())
)
(logger'info "\n\nAll the fullnames are... \n" outString)
Javascript
JS
; Test code for calculated attributes
; Create all of the training:Entities and training:Telcoms
var entity = new #"training:Entity"({lastName: "Thing4"});
var comp = new #"training:Company"({lastName: "YourCo", businessNumber: "BN-5678", incorporationDate: now()});
var person = new #"training:Person"({firstName: "John", initials: "X", lastName: "Doe", company: comp, primaryLanguage: #"training:LanguageEnum".get.ENGLISH});
var tp = new #"training:TelcomType"({name: "Business2"});
var email = new #"training:EmailAddress"({entity: person, type: tp, name: tp.name, address: "john.doe@nexj.com", displayName: "John Doe"});
var tel = new #"training:TelephoneNumber"({type: tp, name: tp.name, address: "(416) 555-1212", entity: person, extension: "x123"});

commit()

; Loop over all the training:Entities and (polymorphically) print their
; fullNames (and their Telcoms)
var outString = "";
#"for-each"(
   function (e) {
      outString = outString + "\n" + e.fullName;
      #"for-each"(
         function (t) {
            outString = outString + "\n -" + t.fullName;
         },
         e.telcoms
      );
    },
    #"training:Entity".read(null, scm("'(in? lastName \"Thing4\" \"YourCo\" \"Doe\")"), null, null, null, null)
);
logger.info("\n\nAll the fullnames are... \n", outString);
In brief, this code does the following:
It defines an entity called Thing4, a company called YourCo, and a person named John Doe.
It defines a business email and telephone number for John Doe.
It commits these values to the database.
It identifies all entities with a lastName value of Thing4, YourCo, or Doe.
For each of the entities that it identifies, it adds to a string variable, outString, as follows:
It reads in the entity.
It appends the entity's fullName value to the outString string.
If the entity has any telcoms associated with it, then it appends the fullName values of those telcoms to the string.
It echoes the full contents of outString to the console as an information message.
Run the code. Your output should resemble the following:
This will take a while. Only do it if you want practice publishing. You did not make any changes to the database schema, so you do not need to make any changes to the upgrade file or the database. There is no need to change the model version.
You did make a change to the way the model operates, so you should update the model revision number. Updating the revision number indicates that you have changed the metadata structure of the model since its last “release.”
Click the Validate model button in the toolbar to validate the model and ensure there are no errors.
Click the Set current model button to open the Model Library.
With the current model selected, click Edit.
Update the Model Revision field by incrementing the final digit by one.
Click OK.
Click Publish. The Publish Model window opens.
Select the directory that you want to publish your model to and click Save.
Close the Model Library.
The console view provides a record of the actions taking place as NexJ Studio publishes the model. If the publish is successful, the message BUILD SUCCESSFUL appears.
Info
If the model contains any warnings or errors, you are asked to confirm whether you want to continue publishing. In this course you can ignore warnings, but you must resolve any errors. To disable warnings, ensure checkbox found at Window → Preferences → NexJ Studio → Disable validation warnings is checked.
More about value behavior
In this module, you created a purely calculated attribute. The value of this attribute is never persisted to a data store.
The value of non-persisted attributes, such as the ones you defined in this module, is recalculated every time the object containing that attribute is requested. By contrast, the value of a persisted attribute is recalculated only when there is a change to the attributes identified in the Dependency property. However, both invalidate the value if dependent attributes change. This means that if the value is explicitly set and one of its dependent attributes change, then accessing the attribute again recalculates the value.
JavaScript errors detected
Please note, these errors can depend on your browser setup.
If this problem persists, please contact our support.