Learning objective In this lesson, you will learn to:
Create a CSV file that contains the contact details of some people.
Write a script to parse and format the details to a message.
Persist the message to the business model through a channel.
Investigate how a service interacts with the file system.
Configure a channel to use a service and interface to process and parse the message.
Creating a CSV message
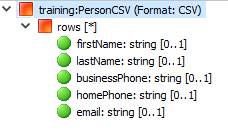
Let's create a new message called training:PersonCSV that stores the first name, last name, business phone number, home phone number, and email address of a person. The person's details are stored in a child message called rows. A default mapping is applied to the training:PersonCSV message. The default mapping specifies that the file has a header row, and sets other default options. It look similar to the following:
Learning activity
To create the CSV message:
In the Integration layer, select the Messages tab.
Right-click the list area inside the tab and select New Message. The New Message dialog opens.
Name the message training:PersonCSV.
Click Finish.
Do one of the following:
Enter or drag and drop the following code on the Source tab.
In the Overview tab, select the training:PersonCSV root node.
Set the Format to CSV.
Click Create Mapping. Do not change any of the CSV Mapping default values.
Right-click the training:PersonCSV root node, select Insert Child > Message, and specify the following details:
Name: rows
maxCount: 0
Right-click the rows node and select Insert Child > Value for each of the fields listed below. For each of these fields, set the name property and set the Type to String.
firstName
lastName
businessPhone
homePhone
email
10. Save your work.
Formatting and parsing the message
Using a scratchpad and Scheme script, you will create an unformatted message, format it, and then parse it into a defined message format. The first statement in the script creates two messages in the rows collection and specifies values for the fields. The second statement converts the message into its wire format, a CSV string. The third statement parses the CSV string into the the specified message format.
In the Console, execute each of the statements from the scratchpad individually and review the results.
Execute the statement (display fm) to see the formatted message, and (display pm) to see the parsed message.
Creating a service, channel, and interface for the message
You now need to create a channel that receives the incoming training:PersonCSV message. The channel is bound to a service that processes the message using an interface that validates and parses it.
Learning activity
To create a new service called training:CSVImportService:
In the Integration layer, select the Services tab.
Right-click the list area inside the tab and select New Service.
In the New Service dialog, name the service training:CSVImportService.
Click Finish. The new service you created opens in an editor.
To create a new channel called training:CSVImportChannel and bind the training:CSVImportService to the channel:
In the Channels tab, right-click the list area inside the tab and select New Channel.
In the New Channel dialog, specify the following values:
Name: training:CSVImportChannel
Type: File
Click Finish. The channel opens in an editor.
Do one of the following:
Enter or drag and drop the following XML on the Source tab:
In the Property Editor view, set the Interface to training:PersonCSVInterface.
In the Palette, select Log and click a location on the line between the start and end of the service to place the log.
In the Property Editor view for the log, select the Parameters tab.
In the Level field, enter "info".
In the Id field, enter "Incoming rows: {0}"
In the Arguments field, enter (this'rows).
Save your work.
Adding the channel to the development environment
Connect the channel to the physical world by configuring a connection in your environment.
Learning activity
To add the channel to the development environment:
In the Deployment layer, select the Environments tab and double-click the Development environment to open it for editing.
In the Channel Connections tab, click the Select Channel Connections button and add training:CSVImportChannel.
In the Channel Connections area, select the new channel and set the following properties. If necessary, substitute paths that are more appropriate to your system.
Incoming Directory: C:\temp\CSVImport\in
Processed Directory: C:\temp\CSVImport\processed
Temporary Directory: C:\temp\CSVImport\temp
Outgoing Directory: C:\temp\CSVImport\out
Interval: 5000
Incoming Message File Age: 5000
As an alternative to setting your properties individually, you can paste the following code into your environment file:
In your computer's file system, create the corresponding folders. This is required because the folders specified in the channel connection must exist on your computer in order for the channel to operate correctly.
C:\temp\CSVImport\in
C:\temp\CSVImport\processed
C:\temp\CSVImport\temp
C:\temp\CSVImport\out
Save your work.
Testing the message processing
In this learning activity, you will test the message processing.
Learning activity
To test the message processing:
In your computer's file system, create a new file called test.csv and add the following text into it. Do not create this file in any of the folders you specified for the channel connection.
Once the Console has launched, copy the test.csv file to the Incoming Directory that you created in your computer's file system. In the Console view, you should see processing information similar to the following:
In your computer's file system, inspect the CSVImport folder and its subdirectories. The test.csv file was moved from the in folder to the processed folder, and the file now has a time stamp appended to its name.
Stop the Scheme Console by clicking the Terminate button .
Persisting the message
Before persisting the data, you'll need to add some script steps to the service to persist the Person and Telcom information through the business model.
Learning activity
First, you'll need to add a user to the channel so you can do some data work. If the channel does not have a user associated with it, the message will be received and processed but the service fails when creating the Person instances.
Open your environment file.
In the Channels tab, open training:CSVImportChannel.
In the Overview tab, set the Default User to nexjsa.
Click the Save button in the toolbar.
To persist the data:
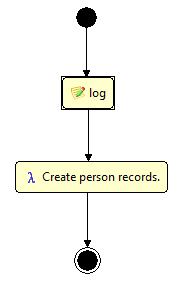
In the training:CSVImportService, add a script step to the service diagram. Place it after the log step.
In the General tab of the Property Editor for the script step, set Name to createPersons and Caption to Create person records.
Save your work. The service diagram should display as follows:
To test the training:CSVImportService:
Run the Server Console.
After the Console launches, copy the test.csv file to the Incoming Directory. You should see activity in the the Console view. The file is taken from the in folder and output to the processed folder. The file now has a date-modified string appended to the file name.
Inspect the Console output to see how the framework persisted the Person and Telcom objects.
Stop the Server Console.
You can use the user interface at http://localhost:7080/training/ui/portal to look up contacts with the last names of Test or Doe.
Or, you can use the REST API with: http://localhost:7080/training/json/Person?attributes=(firstName lastName)&where=(or (= lastName "Test") (= lastName "Doe"))
JavaScript errors detected
Please note, these errors can depend on your browser setup.
If this problem persists, please contact our support.