Learning objectives This lesson is a continuation of the previous lesson. It is basically the same, but we change the message format we are using to JSON. By doing this you will see how the structure of a message is independent of it's format.
Create the message
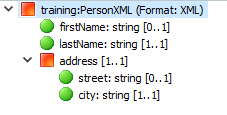
In this lesson, you will create a new message called training:PersonJSON containing the following information:
First name
Last name (required)
Address, consisting of:
Street
City (required)
This is the same structure as the previous lesson's training:PersonXML structure.
Learning activity
To create a message file:
In the Integration layer, select the Messages tab.
Find the training:PersonXML message you created in the previous lesson and select Right Mouse Button/Create Copy... and name your message PersonJSON in the training folder. Open your new training:PersonJSON message.
With the message open in the Message Editor, change the format of the message (found on the Root part) to JSON from XML. If you are warned that changing the format will remove all the existing mapping... Press "Yes". You do want to remove the XML mappings and replace them with a default JSON mapping.
Save your work.
Formatting the message input to JSON
In this learning activity, you will use a scratchpad and Scheme script to create an unformatted message and convert it into JSON format for display. The first statement of the script creates the message and specifies values for all the fields. The four statements that follow display the message in a variety of XML formats.
Learning activity
To create and format a message:
Use an existing scratchpad or create a new one.
Enter the following code in your scratchpad.
SCHEME
(define jmsg
	(message
		(: :class "training:PersonJSON")
		(: firstName "Kate")
		(: lastName "Magenta")
		(: address
			(message
				(: street "Broadway Ave")
				(: city "Manhattan")
			)
		)
	)
)

; See the "wire format" (the JSON string)
(format-message jmsg)

; See the "wire format" without the escape characters
(display (format-message jmsg))

; See the "pretty wire format"
(format-message-pretty jmsg)

; See the "pretty wire format" without the escape characters
(display (format-message-pretty jmsg))
Save the scratchpad.
Run the Server Console.
In the Console, execute each statement from the scratchpad individually and review the results.
Notice that the pretty output of the default JSON message is very similar to the structure of a Transfer Object - a tree of parts and name/value pairs.
Save the scratchpad.
Parsing JSON input to a message
In this learning activity, you will use a scratchpad and Scheme script to create an JSON string and parse it into a defined message format.
The first statement in the script defines a string containing a number of JSON fields and values. The second statement attempts to parse the JSON string into the specified message format. The three statements that follow, display values from the parsed message.
Learning activity
To create an JSON message and parse it:
Use an existing scratchpad or create a new one.
Enter the following code in the scratchpad.
SCHEME
; Define a JSON string
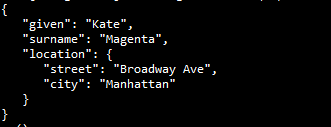
(define body
"{
\"firstName\": \"Kate\",
\"lastName\": \"Magenta\",
\"address\": {
\"street\": \"Broadway Ave\",
\"city\": \"Manhattan\"
}
}"
)
; Parse the external format to the internal representation
(define jmsg (parse-message body "training:PersonJSON"))
; Inspect elements of the message
(jmsg'firstName)
(jmsg'address)
((jmsg'address)'city)
Save the scratchpad.
Use the Server Console to execute each of the statements from the scratchpad individually and inspect the results.
Adding mappings to a message
A mapping is used to control how message elements are mapped between internal and external format. Mappings are used to modify how a message is formatted into an external format, and how externally formatted information is parsed into a message.
In this learning activity, the first name and last name nodes are mapped to names different that the default value name.
Learning activity
To define a mapping for the message:
In the Integration layer, select the Messages tab and open the training:PersonJSON message.
Select the firstName node and click Create Mapping.
In the JSON Mapping section, change the Name to given.
Select the lastName node and click Create Mapping.
Change the Name to surname.
Select the address node and click Create Mapping.
Set the Name to location.
Save the changes made to the message.
Reviewing how mapping impacts formatting
Run the Scheme script from your scratchpad again to see how mappings affect the output.
Learning activity
To see the effect of your mapping:
Open the scratchpad you used earlier in this learning module.
In the Console view, stop the Server Console by clicking the Terminate button , then restart it by clicking the Run Scheme Console button in the toolbar.
In the Console, execute each statement from the scratchpad and compare it with the output from the previous exercise.
Observe the changes in the JSON message's key names to given, surname, and location.
Reviewing how mapping impacts parsing
Run the script from your scratchpad to see how mappings affect the output.
Learning activity
To see the effect of mapping on parsing:
Open your scratchpad.
In the Console, execute the first two statements from the scratchpad. You should see errors generated because of the changes you made to the training:PersonJSON message.
In the scratchpad, modify the (define body) statement with the following changes so that it parses correctly:
In the Console, execute each of the statements from the scratchpad.
When you are finished, save the changes made to the scratchpad.
Creating a JSON message containing a collection of messages
In this learning activity, you will create a new message called training:PersonJSONCollection that stores a collection of people. The list should reference training:PersonJSON so that each element of the list is its own training:PersonJSON message.
Learning activity
To create a message that contains a collection:
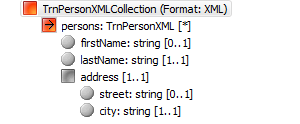
Create a new message called training:PersonJSONCollection.
In the editor window, click the Overview tab and set the Format to JSON.
Add a child message to the training:PersonJSONCollection root node and specify the following details:
Name: persons
Max Count: 0
Ref: training:PersonJSON
Save the message. The training:PersonJSONCollection message should look similar to the following:
Restart your server
Formatting a message collection to XML
In this learning activity, you will use a scratchpad and Scheme script to create two unformatted messages, combine them into a message collection, and convert the collection into a specified format for display.
The first two statements in the script create the messages and specify values for various fields. The next statement collects the messages into a message collection. The final statement displays the collection in the format defined by its class.
Learning activity
In your scratchpad (use an existing scratchpad or create a new one), enter the following code:
SCHEME
; Create some person messages
(define batman
	(message
		(: :class "training:PersonJSON")
		(: firstName "Bruce")
		(: lastName "Wayne")
		(: address
			(message
				(: street "1007 Mountain Dr")
				(: city "Gotham City")
			)
		)
	)
)

(define robin
	(message
		(: :class "training:PersonJSON")
		(: firstName "Dick")
		(: lastName "Grayson")
	)
)

; Create the collection of the persons
(define msg
	(message
		(: :class "training:PersonJSONCollection")
		(: persons
			(collection batman robin)
		)
	)
)

; See the "wire format"
(display (format-message-pretty msg))
In the Server Console, execute each of the statements from the scratchpad individually and review the results. Because there is no address for the robin message, you should see errors generated.
In the scratchpad, add an address to the robin message. Use the same address structure as in the batman message.
Save the scratchpad.
In the Console, execute each of the statements from the scratchpad again and inspect the results.
When you are finished, stop the Console.
JavaScript errors detected
Please note, these errors can depend on your browser setup.
If this problem persists, please contact our support.