
Persisted classes
Learning objectives
In this lesson, you will be introduced to classes. When you complete this lesson, you should know:
- How to define a new class, including the creation of a simple string attribute.
- How to map that class to a data source using a persistence mapping.
- How to create and use an upgrade file to modify the data source.
Key concepts
- Class - describes a set of objects that share common characteristics and behaviors. Classes are the concepts that your application is based on, for example, Customer, User, Account, Company, and so on.

- Attributes - capture the characteristics of a class.
- Events - model the behaviors of a class.
For example, a class called Person models traits shared by all people. Some of its attributes include name, height, and eye color. Some of its events, the actions that people carry out, could be open an account or change my address. - Instance - an instance of a class is a specific member of the group that the class models. For example, a person named Tim Lamont with a height of 68 inches and an eye color of blue is an instance of the Person class.
- Data Source - a logical representation of physical storage that is used to create, read, update, and delete object instances.
- Persistence Mapping - A class’ persistence mapping specifies how its instances will be persisted in a given data source.
In addition to attributes and events, classes have an optional persistence mapping which maps the classes attributes to columns in a database or parts of an API and are used to create, read, update, or delete instances.
Two MODL elements related to classes that are used to support modular development are:
- Aspects - encapsulate repeated structural or behavioral patterns seen in the business model and promote code re-use.
- Augments - are used to extend a class for a given customer or business domain. They are used for modularization, that is, separating the domain model into several modules without circular dependencies between them.
Creating a new class
Classes are part of the Business Model in NexJ Studio's Navigator View.
Classes that are defined in base or mixed-in models have grey icons. Classes defined in the model that you are editing have colored icons.

To get familiar with classes, you are going to create a class called training:Entity that represents the people and companies that your business has contact with.
Learning activity
As with most elements in Studio, you have options for creating a new class. You can use the navigator and associated editor, or work directly with the XML files, or use Class Diagrams. Let's start with a class diagram.
- In the Business Model layer of the navigator, right-click in the Diagrams tab and select New Class Diagram.
- In the New Class Diagram window, enter the name
training:Fundamentalsand click Finish. - Right-click on the canvas of your new diagram, and select New > Class.
- Name your class
training:Entity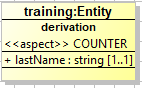
- Right-click on the class and select Create attribute.
- Enter
+ lastName: string [1..1]
If you press Enter, it tries to add a second attribute. Press ESC to stop adding attributes. - Double-click on the class to open for further editing.
About the UML class diagram syntax:
- The
+indicates that the attribute is public. - Next comes the name of the attribute, followed by a colon (
:). stringindicates the type of attribute which can be any primitive type or another class.Primitive types
string - Sequences of characters that represent text.
- String values are surrounded by double quotation marks. For example, the value
"Hello World!"is a string. Strings may contain letters, numbers, and symbols. The symbols"and\are special characters that cannot be written directly in a string. If you want to write a double quotation mark in a string, use the token\". If you want to write a backslash in a string, use the token\\.
binary - Binary data of arbitrary length.
integer - Whole numbers that do not include a decimal place.
For example, the value2is an integer, while2.0is not.
long - Values that represent a 64-bit integer.
- Longs can be used to store numeric values that are too large for storage in an integer data type.
decimal - Numeric values that contain decimal fractions.
currency - Numeric values representing a monetary value.
- Currency data types are persisted as decimals.
float - Values representing a single-precision 32-bit floating-point number.
- They can be whole numbers or numbers that contain a fractional component. For example, the values 2.0 and 2.1 are both floats.
double - Values that represent a double-precision 64-bit floating-point number.
- Doubles can be used to store numbers that are too small or too large to be stored in a float.
percentage - Values that represent a percentage.
- Percentage data types values are persisted as doubles. In the user interface, percentage data type values are formatted as percent when a field or label is bound to the attribute.
timestamp - Values that represent a specific date and time.
- Timestamp values differ from date values in that they include a time component and can be mapped to time zones other than UTC.
date - Values that represent a calendar date.
- Date values cannot include a specific time value and persist at 0 hour UTC.
boolean - Either true or false.
- Boolean values are typically the result of logical expressions. For example, the expression 5 < 10 returns the boolean value
#t, and the expression 5 > 10 returns the boolean value#f.
any - Any type of data.
This list of types and their description is maintained in the modl documentation for message part types.
[1..1]indicates the cardinality of the attribute, meaning that there is a minimum of one and a maximum of one (required).0..0indicates a collection.
Other approaches to creating Classes
The following alternate approaches for creating your class are presented for the purpose of information and discussion. You don't need to follow these steps if you have already created your class with the Class Diagram Editor.
- In the Business Model layer of the navigator, right-click in the Classes tab and select New Class.
- In the New Class window, enter the name
training:Entityand click Finish.
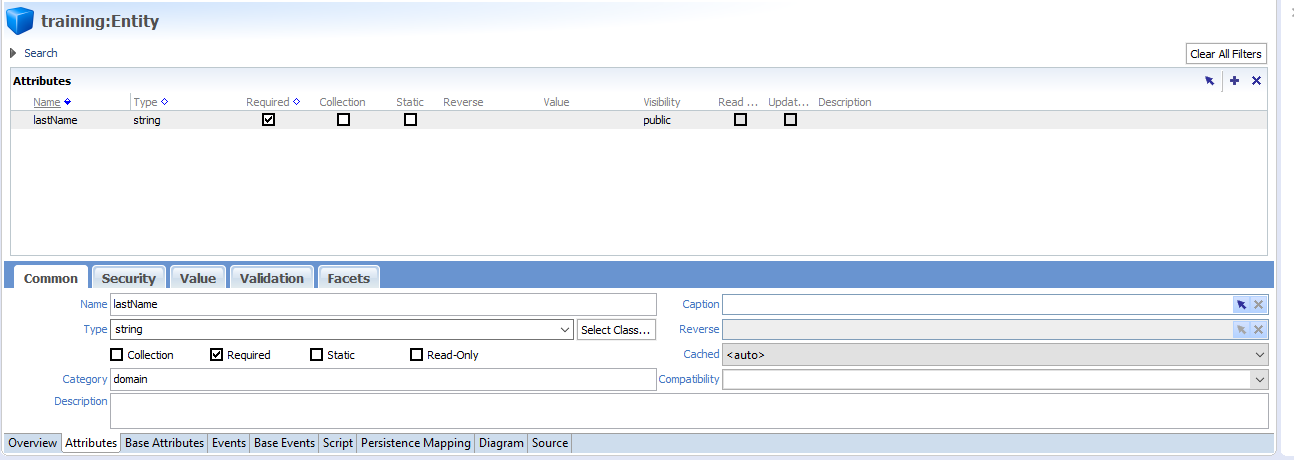
The Class editor opens with the newly created class. There are several tabs across the bottom of the editor. When you open a class, the default tab is Attributes. This tab is where you add, remove, and modify the class attributes. - Use the Attributes tab to add an attribute called
lastName- Click the Add button
 located at the upper right corner of the Attributes window.
 - Double-click the name of the new attribute to put the field into edit mode, and rename the attribute
lastName. - In the Type field for the attribute, select string.
- Select the Required checkbox.
- Leave the other attribute properties blank.
- Click the Add button
The Attributes tab has multiple subtabs where you can configure additional details of the class attributes. You will use some of these tabs in future lessons.
You have created a simple attribute that is required by every instance of the Entity class.
You should now have the class editor open on the Attributes tab, similar to the following:
Learning activity
- In the Caption field for the lastName attribute, click the Select button
 . The Select Attribute Caption window opens.
 - Click the Add button to create a new string.
- Set the id for the string to
idsc.training.lastname.caption, set the en value toLast Name, and click OK.
Attribute and class captions are used in informational and error messages. They are defined as string IDs. This helps enable translation and internationalization. In this step, you specified an English value for the caption. In a later lesson, you will see how captions for other languages are implemented. - Click the Overview bottom tab.
- In the Description field, type:
The base class of all "things that have a distinct legal existence" (person, company, household, etc.) - In the Caption field, click the Select button . The Select Class Caption window opens.
- Click the Add button to create a new string.
- Set the id for the string to
idsc.training.entity.caption, set the en value toEntity, and click OK.
Class captions are defined as string IDs. This helps enable translation and internationalization. In this step, you specified an English value for the caption. In a later lesson, you will see how captions for other languages are implemented. - In the Aspects field, click the Select button. The Select Aspects window opens.
- Select the training:LOCKING aspect and click Include > OK. The training:LOCKING aspect is now included in the definition of the
training:Entityclass. This is more of a persistence concept, but is done here for convenience.
Aspects do not represent real classes in the business model. They represent functional groupings of additional attributes and events that may be applied to classes directly, as in this case, or through pointcuts. By specifying the training:LOCKING aspect ontraining:Entity, you incorporate the definition of the training:LOCKING aspect into thetraining:Entityclass as if you had copied and pasted this information. A detailed exploration of how to use aspects is beyond the scope of this course. However, you will see some of the effects of specifying a value for the aspect property when you create a persistence mapping later in this lesson. - Save your work and validate the model by clicking the Validate model button
 in the toolbar.
During validation, a progress bar appears and then closes if there are no errors. If there are validation errors, an error dialog displays. You can review the errors, if they occur, in the Problems view.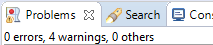
Click the Source tab of the editor to view the XML contents of your files. It should look similar to the following:
And your string file will contain something like... (this is optional to look at the contents here, but if you are interested, the file should be in the Resources/Strings folder of the Navigator.
Use a scratchpad to test the class that you created. To do this:
Click Run > Run Scheme Console > Server Console or click the arrow next to the Server Console button
 > Server Console in the toolbar.
Whenever you test new concepts added to the model, you need to start a new Console. The Console is not aware of any model additions made after it starts. If you have just changed attributes, then you may be able to use the Project/Metadata Hotswap/Reload All.
In the Resources folder, select Scratchpads.
Using an existing scratchpad or create a new one and enter the following expression to create a new instance of the
training:Entityobject and define thelastNameattribute asThing1:(training:Entity'new (: lastName "Thing1"))
or if your console is running in Javascript
var e = new #"training:Entity"();
e.lastName = "Thing1";
e;
Tip
Press Ctrl+Space after a parenthesis
"("in a scratchpad, or any other script area control to activate the Auto Completion functionality for scheme. This displays correct syntax and documentation for Scheme functions and business model classes, attributes, and events.Select the expression and press Ctrl+U. This runs the expression in the Console, which should output the following response:
; #<Instance<training:Entity, null, new>(
   lastName="Thing1"
)>
- Stop the Console by clicking the Terminate button
 .
.
Class Persistence Mapping
In general, setting up class persistence involves these steps:
- In the Persistence Mapping tab of a class, selecting the data source where you want to persist the data.
- Specifying the table name in which to store the instance data.
- Specifying the class's attributes you want persisted.
- Specifying a key generator to automatically assign each instance of the class a unique ID in the data store.
- Using Update Data Source to automatically define the table in the Persistence layer using default properties.
- Use the Generate Upgrade Steps tool to keep track of your changes in an .upgrade file
- make any necessary changes to the default properties.
Another approach is to manually create the logical table first, then map the class attributes to the logical table.
Learning activity
We are now ready to define persistence for the training:Entity class:
- Open the
training:Entityclass for editing (Business Model > Classes). - Click the Persistence Mapping tab at the bottom of the Class Editor.
- Set the Data Source property to
training:DB.
You can type the value directly in the field, or use the Select button. - For the Primary Table, specify
Entity.
This identifies the main table for storing and accessing the persisted class data. It is the Entity table in the training:Entity datasource, so the physical table will become TRNEntity because of the datasource's prefix property of "TRN". - In the Key Generator field, select KeyGenerator.GUIDGen (GUID key generator).
This automatically generates a unique 16-byte key to use as the value for each row of the table's primary key column. An ID column is automatically created to store this value. At the upper right of the Attribute Mappings section, click the Select Attribute Mappings link and add the
lastNameattribute.
The value for Column defaults to the name of the attribute. If you want the column name in the database to be different from the attribute name, change the column name by double-clicking the column entry for the attribute and entering the appropriate value. (but don't do that in this training )
)There is no need to set the Extension Table property as the lastName column in the primary table. If you set the Extension Table property, the column is stored in an extension table related to the
TrainingEntitytable. This is discussed in another lesson.Press OK to save and dismiss the Select Attribute Mappings dialog and Save your work.
Click Update Data Source. A dialog opens indicating that the data source is not customized and asking if you would like to customize it. Click Yes.
The Update Data Sourcetraining:EBwindow opens and displays the changes that will be made to the data source.
In this case, a table namedEntityis created and two columns added to the table:id: stores the primary keylastNamestores the attribute.If you need to change the default properties of the table or columns, you can do so in the next steps.
Click OK.
You are taken to the column properties of thetraining:DBin the Data Sources tab of the Persistence layer.Select the Columns tab and change the Case Insensitive property of the id column to disabled (unselected).
This is just something you need to do for binary fixed columns for efficiency.
On the General tab, enter "
Stores the primary entities"as the Description.Click the Indexes tab to review how the primary key has been implemented. An index called
Entity.PKbased on the id column has been created.
This is because you selected a key generator in the Persistence Mapping tab of thetraining:Entityclass.Save your work.
Editing the upgrade file
This process is similar to what we already did with the Version table.
Learning activity
To update the upgrade file:
- In the Persistence layer, click the Data Sources tab.
Right-click the
training:DBdata source and select Generate Upgrade Steps.Set theCurrent Data Source to training:DB and the Upgrade should be Main.Under Old Data Source, select Local History.
The training version of studio is configured to keep old revisions around, even for large files. This is controlled with the Window/Preferences... General/Workspace/Local History options.
This allows you to look at the changes you've made to the file recently and find the appropriate old version to start from.- You want to select the Revision that doesn't have your table in it. You can look at the differences by double clicking on the Revision History items. You should end up with an upgrade step that has a single CreateTable step in it. Your compare should look something like:
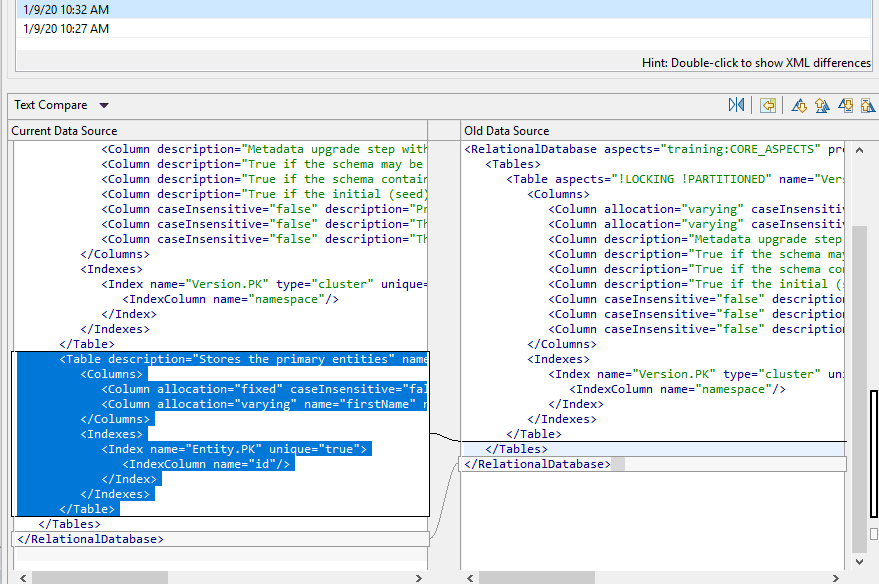
- Press Next
- Whenever you upgrade a database, you must increment the model version number by a whole number.
If there is a conflict with the version retrieved from the upgrade change the Version to 3.1120.1307.168.53. Your version number may vary slightly but the first number should currently be "3". - In the Description field, enter
Added Entity table. - On the left side, you can see a list of the upgrade steps that will be applied to the database. There is a single step, CreateTable, for the
Entitytable. Click the Columns and Indexes tabs to review how the table will be created. - Click Finish.
- At the top of the screen you can see a list of all upgrades that have been applied to the data source, including upgrades inherited from the base model. Note that your upgrade is the first one on the list.
- You must ensure that your model's version matches your new upgrade version. Click the Set current model button
 in the toolbar to open the Model Library.
 - With the training model selected, click Edit. Update the Model Version field to match the version associated with the upgrade you just created. If your new upgrade step has a version of 3.1120.1307.168.53, change the Model version to be the same. This enables NexJ Studio to recognize that the model has changed from the previous version and that your update needs to be applied to any existing data stores.
- Click Apply and Close. The new version is now reflected in the list in the Models tab.
- Click Close.
- Click the Save button
 in the toolbar to save your work.
Publishing the model (optional)
To maintain a snapshot of your model at this point in time, you may Publish the updated model from the Model Library. This is not necessary for the lesson and may take a while, but is hear for you to review for learning as there are times you will want to publish. Examples of these are if you are using the Old Model approach for generating upgrade steps, or you are going to publish so you can deploy your solution outside of NexJ Studio. It also runs through a validation of the model so would highlight any errors if you had introduced them.
Learning activity
- Click the Set current model button to open the Model Library.
- Select the
trainingmodel. - Click Publish. The Publish Model dialog opens.
- Select the folder that you want to publish your model to. This should already be set to your
out/publishfolder. Click Save.
The Console view lists the actions taking place as NexJ Studio publishes the model. If the publish is successful, you will see the messageBUILD SUCCESSFUL.Info
If the model contains any warnings or errors, you are prompted to confirm whether you want to continue publishing. For the purposes of this tutorial, it is okay to have warnings but no errors when you publish.
Upgrading the database
Complete the upgrade process by using the Data Load Tool to apply the changes specified in your upgrade file to the training database.
In development and test environments the Data Load Tool is a quick and convenient way to upgrade the database. However, in production environments the database is normally not directly upgraded using the Data Load Tool. Generally, the database or system administrator will want to review the schema modifications before applying them to the production database. You can use the Database Schema Tool's upgrade command to generate an SQL file containing the same schema modification steps that the Data Load Tool applies.
To protect against inadvertently upgrading the database directly from NexJ Studio, there is a flag in the database that controls whether the Data Load Tool can be used with this database. In this course, you will use the Ignore Upgradeable Flag to override this.
Learning activity
- If your server is running, stop it
- Click the down-arrow next to the Run tool button
 in the toolbar and select Data Load Tool.
 - In the Model section, select Current.
- In the Server field, select Development (Development.properties).
You must select this environment because you need a user with permissions to change the database table structure. - In the Command field, select upgrade.
- In the Data Source field, select *.
- Select Ignore Upgradable Flag.
- Click Run.
You should see an Exit code = 0 message in the console.

To verify that the upgrade worked:
- Run your database's management tool or query client.
Verify that the
Entitytable exists with the proper column definitions in thetrainingdatabase.For Microsoft SQL Server use
use training;
exec sp_help TRNEntity;
You should see something like...

Testing your work
Learning activity
To test your work:
- Set the Console to the DEBUG logging level.
- In the menu bar, select Window > Preferences.
- In the Preferences window, select NexJ Studio > Launch Settings > Scheme Console Settings.
- In the Default log level field, select DEBUG. You can override the default log level for a specific console through the appropriate submenu in this window.
- Click Apply and Close.
In the Resources layer, open your scratchpad and append the
commitstatement to the bottom:; Defines a new training:Entity instance and sets the lastName attribute to "Thing1". (training:Entity'new (: lastName "Thing1")) ; Persists the class changes to the data store. (commit)
- Run the Console.
Test your persistence configuration by selecting all the code in your scratchpad and pressing Ctrl+U.
When the first statement runs, you should see a response similar to the following:(training:Entity'new (: lastName "Thing1")) ; [Entity] Invoking Event training:Entity.new(values) (NexJ Main) ; [GenericTransactionManager] Starting new transaction Tx(4300000000000000DBDA89E88AE75967C286789AA93520AC, timeout=300s, status=0) (NexJ Main) ; [InvocationContext] Started new transaction Tx(4300000000000000DBDA89E88AE75967C286789AA93520AC, timeout=300s, status=0) (NexJ Main) ; [Entity] Invoking Event training:Entity.create() (NexJ Main) ; #<Instance<training:Entity, null, new>( lastName="Thing1" )>
The final line of Console output confirms that a new instance of the
training:Entityclass has been instantiated with alastNameofThing1.
In the second statement line, you should see a response similar to the following:; 15:11:32,055 DEBUG [Entity] Invoking Event Entity.create() ; #<Instance<training:Entity, null, NEW>(lastName="Thing1")> > (commit); 15:12:03,048 DEBUG [training:Entity] Invoking Event training:Entity.commit() ; 15:12:03,049 DEBUG [UnitOfWork] Committing 1 instance(s) ; 15:12:03,051 DEBUG [SQLAdapter] insert into NJTrainingEntity(id, lastName, locking) values (?, ?, ?) ; 15:12:03,058 DEBUG [<default>] Activated SQLConnection@137877221(pool=RelationalDatabaseConnectionPool(fragment=RelationalDatabaseFragment DefaultRelationalDatabase.<default>)) ; 15:12:03,058 DEBUG [SQLAdapter] Bind[0] = D2F82A01DE0A44FCB5807316DFCEB65F ; 15:12:03,058 DEBUG [SQLAdapter] Bind[1] = 'Thing1' ; 15:12:03,058 DEBUG [SQLAdapter] Bind[2] = 0 ; 15:12:03,140 DEBUG [SQLAdapter] SQL execution time: 82 ms ; 15:12:03,143 DEBUG [InvocationContext] Committing transaction Tx(000000000000000004621D1164C21211C97844FCEBAB478A) ; 15:12:03,143 DEBUG [GenericTransactionManager] Committing transaction Tx(000000000000000004621D1164C21211C97844FCEBAB478A) ; 15:12:03,146 DEBUG [<default>] Deactivating SQLConnection@137877221(pool=RelationalDatabaseConnectionPool(fragment=RelationalDatabaseFragment DefaultRelationalDatabase.<default>)) ; 15:12:03,146 DEBUG [UnitOfWork] Commit completed ; () >
You can see the steps taken by NexJ Studio to persist the instances by inserting a row into the
NJTrainingEntitytable and then committing the change. Future lessons will not include all of the DEBUG statements. However, you are still encouraged to read through the interactions to deepen your understanding of the underlying processes.Click the Terminate button
 to stop the Console.
To verify that the entity was persisted to the database:
- Run the database query tool and connect to the
trainingdatabase. Issue a select statement to view the values in that table:
select id, lastName from TRNEntity
You should see the new row, with a generated ID value in theidcolumn and a value ofThing1in thelastNamecolumn.
Related links
Aspect
Attribute
Augment
Class
Creating the databases and test connection
Event
Persistence mapping
UML class diagram syntax