
Table
Use the Table control to display a data table. You can configure the table as a whole to display only items of a particular type and configure the columns to show the different properties of items displayed. You can additionally make the columns interactive by associating UI Events to them.
If you want to enable end users to use the table to create associations between instances, then you can include a referenced picker in it for adding and removing items.
You can additionally add tables to pickers in the metadata. These tables will then display when the picker is opened. For more information on incorporating tables into pickers, see Working with Pickers.
For tables that are not in a picker or dialog, the following information applies:
- The selected number of items per page is saved as the new default in the client state. When you reload the application, the last selected value will be restored.
- A row range label (which indicates the first and last row of the current page) and total row count is displayed at the bottom of the data table. An item's row position can change if the row model is updated.
Example
This example is taken from ServiceRequestTemplatesList.layout.
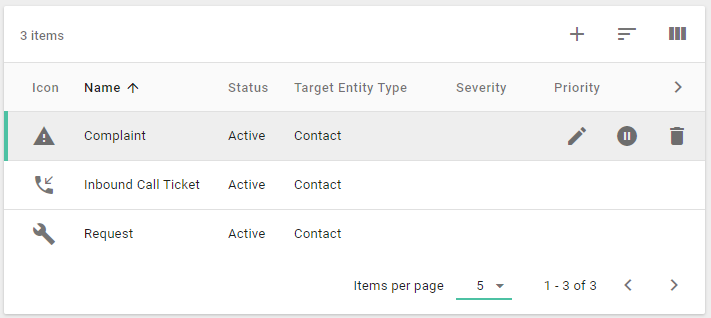
      <Table head="true" name="grdServiceRequestTemplates" order="((currentLocalization caption) . #t)" permanent="2" rows="(@)">
         <Toolbar name="toolbarMenu">
            <Item caption="ids.record.add" event="sysAdd" icon="plus_grey" name="addItem"/>
         </Toolbar>
         <Menu name="rightClickMenu">
            <Item caption="idsa.UIEvents.edit" event="sysProperties" icon="pencilRH" name="mitEdit"/>
            <Separator/>
            <Item caption="idsa.UIEvents.deactivateServiceRequestTemplate" event="deactivateServiceRequestTemplate" icon="deactivate" name="deactivate" visible="`,(@ active) "/>
            <Item caption="idsa.UIEvents.activateServiceRequestTemplate" event="activateServiceRequestTemplate" icon="activate" name="activate" visible="`(not ,(@ active)) "/>
            <Separator/>
            <Item caption="ids.record.remove" event="sysRemove" icon="remove" name="mitRemove"/>
         </Menu>
         <Column caption="ids.icon" customizable="`#f" icons="icon" length="10" name="colType"/>
         <Column caption="IDS_NAME" customizable="`#f" length="80" name="colName" values="currentLocalization caption"/>
         <Column caption="IDS_STATUS" customizable="`#f" name="colStatus" sortable="false" values="activeStatus caption"/>
         <Column caption="ids.ServiceRequestTemplate.targetEntityType" name="colTarget" values="targetEntityType caption"/>
         <Column caption="IDS_SEVERITY" name="colSeverity" values="severity caption"/>
         <Column caption="IDS_PRIORITY" name="colPriority" values="priority caption"/>
         <Column caption="IDS_CHANNEL" name="colChannel" values="channel caption"/>
      </Table>
Using the table view multiplier to display more than 20 records in a data table
As NexJ CRM 22.03, you can use the optional table view multiplier property to enable users to display more than 20 records in a specific data table. The following screenshot shows the default setting for the multiplier property in the properties for a table view in NexJ Studio:

The default setting is multiplier=1, which enables users to display 5, 10, or 20 items in the data table using the Items per page drop-down in the user interface. For example, you can change the property to multiplier=2 to enable users to display 10, 20, or 40 items in the data table or change the property to multiplier=3 to enable users to display 15, 30, or 60 items in the data table.
When the multiplier property is set for a table view, the global pageSizeMultiplier attribute configuration in the environment file will be ignored, and the table view multiplier value will be used instead. For more information about the global pageSizeMultiplier attribute, see Example environment settings for NexJ CRM deployment.
More details
More information about specific properties for the Table Control can be found in the Model Description Language Reference.