
Managing Models
Models are the design and implementation of an application service or module. This is simply an Eclipse project folder that contains:
- .project file - is an Eclipse project file containing the project name, build specifications, and dependencies in an XML format. These properties are usually maintained by opening the project and selecting Project/Properties... in NexJ Studio. For example, if your project is going to contain Java sources, give your project the Java nature. These properties are discussed along with the tasks where they are required in the documentation.

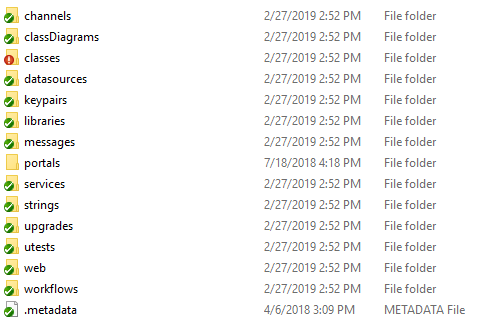
- meta folder - contains a subfolder for each type of element in the model e.g. classes, portlets, messages, datasources Each of these folders contain XML files that represent your design e.g. Account.meta, EntityList.portlet, Account.message, Inventory.channel. Deeper subfolders contribute to the namespacing of elements e.g. the meta/portlets/lead/Banner.portlet file becomes the lead:Banner portlet.
- .metadata file - The meta folder also contains a .metadata file which provides information about your service and it's relationship to other services. Documentation of the properties of the .metadata file can be found in the Model Description Language Reference.

- env folder - contains Environment and Properties files. An Environment represents physical system configurations and combines server and connection settings into one convenient file. e.g. Development, Staging, Production. Documentation of the properties of .environment files can be found in the Model Description Language Reference.
- .classpath file (optional) - contains src and output entries for build entries if this project is working with Java or Javascript
- mod folder (optional) - This is where any AFL or JavaScript files live.
- src folder (optional) - If this is also a Java project, and Java source will be found here.
- lib folder (optional) - any pre-build jars go here
- bin folder (optional) - if any Java or JavaScript elements are to be built as defined in the .project and .classpath files, the build output typically ends up here.
- There may be other files in your project folder for source code control or build outputs like .hgtags or .hgignore, and other optional folders sich as etc or doc.
You can build models from scratch, customize and expand an existing model, or combine the functionality of published models by mixing them together. A Model can be based on another Model to extend its functionality and each Model has a meta/.metadata file that contains information about itself and it's dependencies in the form of a "Base" model and Mixins. We currently have two best-practice approaches to creating Models.
When you publish your model, all are the relevant artifacts are build and packaged up into a .jar file (simply a zip file used by Java). These jars have an identifying name, version, revision, and checksum. The file will include any other modules that it references.
Base Models
Each model can specify a base model whose contents become a starting point for additional development. Elements in the base model can be modified and expanded through customization.
Models rarely exist in isolation. More often, when you develop a model, you want to base it on an existing model, and then create additional features or modify the functionality of the base.
When you first create a model, you must specify an available model as a starting point for your development. This model is called the base model, because it provides the base on which you build your new model.
The following diagram illustrates the structure of a newly created model.
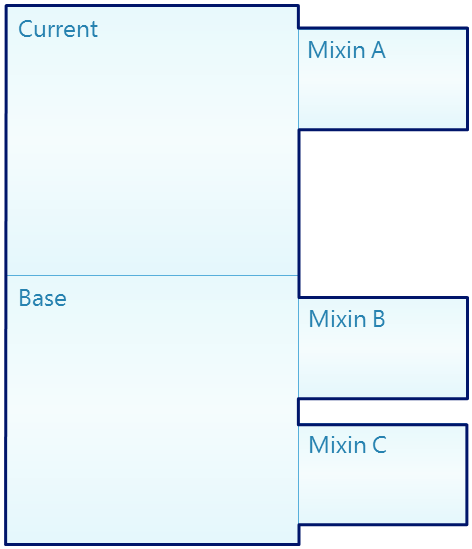
The base model contains a set of elements such as classes, screen definitions, and messages. The current model is the model that you edit directly and which will contain any customizations of the base model, overrides of the mixins, and additional unique resources. Collectively, all of these models together are called the working model.
At the time of creation, the current model only contains environment information. As you continue to develop your model, you will continue to add new elements to your current model. That is, all of the model information in the base model becomes part of the model you are creating.
You cannot directly edit the base model. The base model is contained in a published JAR file and cannot be modified. If you want to make changes to an element contained in the base model, you can do so using customization.
Customizing an element makes a copy of it within the current model. You can then edit the customized version as any other element inside the current model. When you publish your model, the customized version of the element will be included in the published JAR file along with all other resources defined in your current model, and any uncustomized resources in your base model.
The following diagram illustrates the idea of customization.

In the diagram, the Person class has been customized. A copy of the class from the base model has been added to the current model and modified. No mixins are shown in this diagram.
Limitations
Customized elements must always preserve the name of the element they customize. If you change the name of a customized element, you break the customization: the element in the current model behaves as if it was was created as part of the current model, and the inherited version of the element remains available as an inherited element.
Because the inheritance structure is all-inclusive, you are unable to remove model elements through customization. That is, if a resource, a test plan for example, exists in the base model, it must continue to exist in any working model that uses that base.
The linear inheritance structure provided by base models is powerful, but does not enable the inclusion of optional components. For example, test scripts are essential to ongoing development of a model but are not required to deploy and run it. Similarly, content in the documentation layer may contain information pertaining to the model, but does not affect model development or deployment. If more modular development is required, it can be achieved through the use of mixin models.
Mixin models
Mixin models contain modules of functionality that you can optionally add to your overall working model. The elements in a mixin are additional to those in the base model, and can potentially be overridden by the current model.
Mixins help developers work with base model inheritance while also developing loosely coupled optional components. Unlike a base model, a mixin is not inherited by the working model, but remains independent. When the working model is published, resources from the mixin are not part of the published model. Only a reference to the mixin is maintained, and that mixin must then be available when the working model is loaded or deployed.
Mixins support the development of independent components. Multiple mixins can be the responsibility of separate teams and then combined later into a single working model that references each mixin component.
When you include a mixin in your model, you can specify whether you want the ability to customize mixin elements or not. In the context of mixins, this customization is called overriding. When you allow your model to override a mixin, you are able to customize the elements in the same way that you do elements of the base model.
If a resource exists in both the base model and the mixin model, then you must allow overriding of the mixin and customize one or the other versions of the resource in the current model. If you do not allow your model to override the mixin, then any duplication of elements between the mixin and the other parts of the working model results in an error.
The following diagram illustrates a working model that includes both customization of a base resource and overriding of a mixin resource.
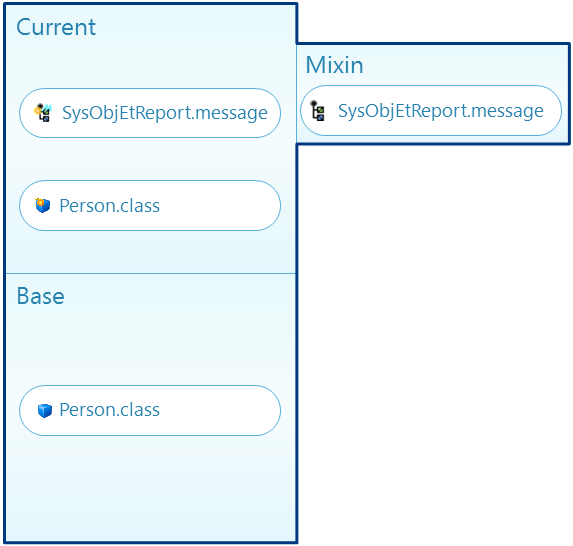
In this model, the Person class has been customized, and the SysObjEtReport message has been overridden. In both cases, the version of the resource contained in the Current model is what is used when you deploy the model.
Mixin design
A mixin can contain any number of resources, such as classes, message definitions, transformations, or services. A mixin can also use a base model and add its inherited resources to a working model. Any model can potentially be used as a mixin and contribute resources to your working model. However, you should design mixins that are logically independent of the working model.
If a mixin contains functionality that is a key component of the working model, you should consider putting that functionality into the base model instead.
Mixin override rules and constraints
Models can fail validation depending on a number of conditions affected by customization and override settings.
To pass validation, all elements in the model must be clearly identifiable. If the addition of a mixin causes ambiguity about which element a model should use, then the model will not validate.
Specifically, validation fails in any of the following situations:
- A resource exists in the current model and a directly referenced mixin, and the mixin's override option is not selected.
- A resource exists in more than two directly referenced mixins. To correct this issue, customize the resource in the current model and set the override option on all mixins containing a version of the resource.
- A resource exists in the current model, and in an indirectly referenced mixin. That is, a model that has been mixed into one of the mixins directly referenced by the working model. To pass validation, the directly referenced mixin must contain a customized version of the resource, and you must set the override option on the direct mixin.
- Mixins are connected in a reference loop. For example, mixin A references mixin B, B references C, and C references A.
Mixins overriding base model resources
Mixin models can override base model resources.
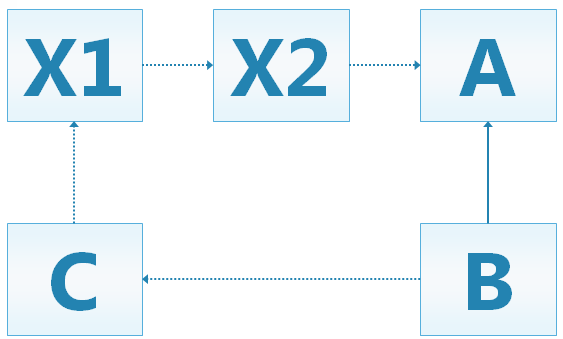
A model can override resources from a mixin if it is also the model's base. The following example demonstrates this dependency.
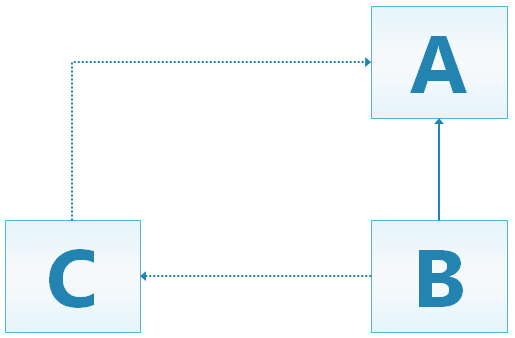
- Model B is based on base model A.
- Model C is added to B as a mixin.
- Model A is added to C as a mixin.
- Model B overrides the resources in model A.
This model dependency will not result in a MetadataValidationException error. Although mixin rules state B is only allowed to override resources from C, not A, the inheritance rule states that B is allowed to override resources in A as it is immediately based on it. NexJ Framework handles this scenario without mixin conflicts.
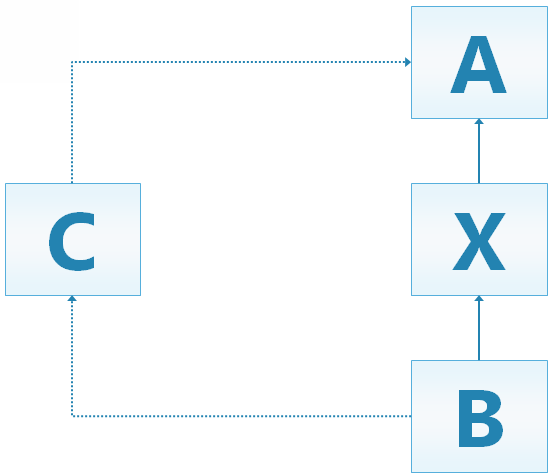
This type of dependency is only possible if A is the immediate base model of B. Any number of additional mixin levels do not affect the inheritance rule. The following example will not return a MetadataValidationException error.
NexJ Framework does not support scenarios with multi-level inheritance hierarchies.
The following example will return a MetadataValidationException error. B cannot override resources from A as A is not the immediate base model of B.
The .metadata file
Models are defined by a .metadata file. This file contains the model's version number, revision number, and namespace. Additionally it contains the information required to identify the base and mixins that the model references.
Normally, the .metadata file for a model is edited using the NexJ Studio Model Library. However, you can access the .metadata file source through the Eclipse Navigator view.
An example .metadata file follows this XML structure:
<Metadata baseChecksum="834e8dfd" baseNamespace="http://www.nexj.com/ns/testbase"
   baseVersion="41.48.27" coreVersion="8.0.164.0+" name="NexJ Model Test"
   namespace="http://www.nexj.com/ns/testparent" revision="2.0.0.0"
   version="6.41.48.27">
   <Mixins>
      <Mixin checksum="2351c612" namespace="http://www.nexj.com/ns/mixtest1"
         override="true" version="17.48.27"/>
      <Mixin checksum="696a054a" namespace="http://www.nexj.com/ns/mixtest2"
         override="false" version="23.48.27"/>
      <Mixin checksum="919b9964" namespace="http://www.nexj.com/ns/mixtest3"
         override="true" version="0"/>
   <Mixins>
</Metadata>
Creating working models
Use the Model Library to create a working model for you to begin developing.
To create a model:
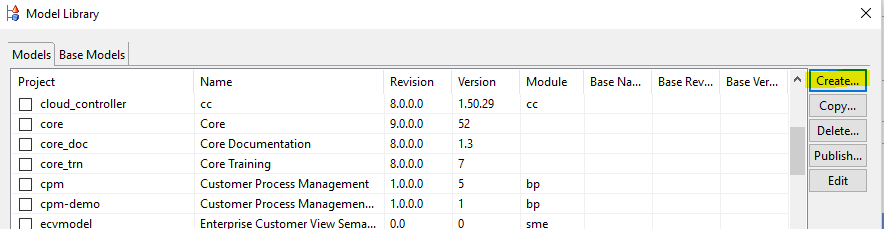
- In the main toolbar, click the Set Current Model button
 .
.
The Model Library dialog opens. - [Optional] If you want to use an existing model as a base for your model, specify it in the Base Model field.
If you do not require any functionality from a base model, you can create your model without a base. This is often done for mixin models, which may be functionally incomplete by themselves, but are useful when combined with a larger and more comprehensive model.- Beside the Base Model field, click the browse button
 .
.
The Select Base Model dialog opens.
The selected model is set as the base model. The model's name is displayed in the Base Model field. - Beside the Base Model field, click the browse button
Your new model is now created. If you chose the Create environment files option, the following three environments will be available for you to use:
- DBAdmin
- Development
- UnitTest
Removing base models from working models
Remove a base model from your working model if you do not require any functionality from the base model.
To remove the base model from a working model:
This is often done for mixin models, which may be functionally incomplete by themselves, but useful when combined with a larger and more comprehensive model.
- In the toolbar, click the Set Current Model button .
The Model Library dialog opens. - Beside the Base Model field, click the Remove button
 .
.
Your model no longer references a base model. Resources from the base model disappear from the Model view.
Review the contents of the Navigator view to ensure that the list of model elements that are part of your model are as expected, and delete any items that may have been placed in the dumps and upgrades directories.
Adding module prefixes
Module prefixes are a method of avoiding element name conflicts when using mixins.
Consider using module prefixes when you create a mixin model and anticipate that your resource names will overlap with the resources of models that incorporate your mixin. When you specify a model prefix, that prefix is added to all resources in the model, becomes part of their name, and must be used whenever reference is made to them, even from within the prefixed model.
If your working model incorporates a mixin with a module prefix that differs from your working model, then you will be unable to override any elements in that mixin.
Specify the module prefix in the model's Properties dialog.
To add a module prefix:
- In the toolbar, click the Set Current Model button .
The Model Library dialog opens.
Check the Model view to ensure that the module prefix has been added to the model's resources.
A resource from a mixin appears with an M on the resource icon, for example, the icon for a class looks like this: ![]() . Mixins that use a module prefix have their prefix added to their resources. For example, a mixin with the prefix nu has its resources appear as nu:<name>.
. Mixins that use a module prefix have their prefix added to their resources. For example, a mixin with the prefix nu has its resources appear as nu:<name>.
Adding a module prefix effectively places the mixin in its own namespace. As a result, when you incorporate a mixin with a module prefix into your working model, you are unable to override any of the resources it provides you.
If you use a model with a module prefix as your base model instead of a mixin, then the working model must use the same prefix in order to successfully validate.
Adding mixins to models
Expand the functionality of your working model by adding existing mixins.
Ensure that the published mixin JAR files are in a location that you can access while running NexJ Studio. These files also need to be available later when you deploy the model.
To add mixins to your model:
- In the toolbar, click the Set Current Model button .
The Model Library opens. - Click the Browse button next to the Mixin Models table.
The Edit Mixin Models dialog opens.
Resources from the mixin are now available in the working model. These resources appear with an M on the resource icon, for example, a class looks like this: ![]() .
.
You can now continue development of your working model, incorporating the functionality of the mixin that you have added.
Overriding mixin resources
When adding a mixin to a working model, you can specify whether the working model has the ability to override the mixin's resources. You can only override resources of mixins that are directly referenced by the working model.
Overriding resources allows you to customize resources of a mixin in the working model.
To override the resources of a mixin:
- In the toolbar, click the Set Current Model button .
The resources of the mixin are now available for customization.
Customizing resources
Customizing a resource creates a copy of it and places it into the working model. The copied resource is then used instead of the original resource, and can be altered to meet the needs of the working model.
Customizing a mixin's resources is possible only when the working model has enabled overriding resources for the mixin.
To customize a resource of a mixin:
- In the Model view, find the resource that you want to customize.
- Customize the resource:
- If the selected resource exists in only one mixin, or in the base model, right-click the resource and select Customize.
- If the selected resource exists in multiple mixins, right-click the resource and select , where Model Name is the name of the model whose version of the resource you want to use.
The resource is now customized and available for changes. Customized resources appear in color with a starburst overlay on the resource icon. For example, a customized class looks like this: ![]() .
.
Updating mixin models
If you are working with a project that has mixins and you want to make changes to the mixed in model, you need to ensure your working model incorporates all the mixin updates.
The mixin model exists as a separate project that you can edit and save changes for. While developing this model, you may want to test the changes you have made by mixing your edited model into the parent project.
This is a simple process that can be used to test locally and also be deployed to remote testing environments. First, open the model you are using as the mixin in NexJ Studio. Then, use one of the following two ways to include your version of the model as a mixin for the parent project: a fuzzy/folder mixin or a published JAR mixin.
Troubleshooting mixin updates
When dealing with a project that has multiple mixins, ensure that the mixins are internally consistent across all projects. Consider the following scenario:
- Project A has two mixins: Project B and Project C
- Project B has one mixin: Project C
- Project C has no mixins
If you have made changes to Project C and wish to include them in Project A, there are a few additional steps beyond just mixing Project C into Project A. You mix your local version of Project C into both Project A and Project B. Then mix the updated version of Project B into Project A as well.
Mixing in models by pointing to the mixin folder
Use the fuzzy/folder mixin method to test your model changes locally. Any change you make in the mixin model is immediately reflected in the parent project. This is done by pointing the parent project to use your mixin model’s workspace folder.
To include a mixin model in your working model from a folder:
- In the main toolbar, click the Set Current Model button .
The Model Library dialog opens. - In the Model page of the Properties dialog, in the Mixin Models section, click the browse button .
The Edit Mixin Models dialog opens. On the right are the models currently mixed into your project, on the left are the models available to add.
The mixin model is now included in the working project. You can continue developing both the working model and the mixin model.Any changes you make in the mixin model will be reflected in the parent project any time you restart your server or hot swap changes.
Mixing in models from a published JAR file
You cannot use the fuzzy/folder mixin method to deploy your model. Instead, you must publish your mixin model and mix the published JAR file into the parent model.
Before you can update your working model with the changes from your mixin model, you must publish the mixin model to a JAR file. Note the location of the published JAR file.
To mix a published JAR file into your working model:
- In the main toolbar, click the Set Current Model button .
The Model Library dialog opens. - In the Model page of the Properties dialog, in the Mixin Models section, click the browse button .
The Edit Mixin Models dialog opens. On the right are the models currently mixed into your project, on the left are the models available to add.
The updated mixin model has been included in your working model.
You can now deploy your updated working model.
Mixing in models using an environment file
You may need to use an environment file to mix a published JAR file into your working model. This allows you to not incorporate the mixin until deployment time.
Before you can update your working model with the changes from your mixin model, you must publish the mixin model to a JAR file. Note the location of the published JAR file.
To mix a published JAR file into your working model:
- Click the browse button .
The Edit Mixin Models dialog opens. On the right are the models currently mixed into your project, on the left are the models available to add.
The mixin model has been included in your working model.
You can now deploy your updated working model.
Publishing models
Publish your model to create a JAR file that contains the contents of your model.
Models must validate with 0 errors in order to publish successfully.
Validation occurs automatically when you begin to publish. After publishing is complete, the published model can be used as a base or a mixin for other models.
To publish a model:
- In the toolbar, click the Set Current Model button .
The Model Library dialog opens.
NexJ Studio saves the model as a JAR file in the selected directory. This file can now be used as a base model or a mixin for other models.