
NexJ Studio
NexJ Studio is the (Eclipse-based) integrated development environment (IDE) for your applications. It provides familiar editors for concepts such as UML class diagrams and activity diagrams. It lets teams design, run, test, and deploy solutions on-premise and in the cloud. Multi-environment support allows you to easily manage QA, staging, integration, and production configurations. It also provides interactive debugging across all platforms. Design-time customization can be modularized to support best practices for customization and upgrades. NexJ Studio supports concurrent changes across large teams, improves designs and consistency, while increasing developer velocity.NexJ Studio is simply the editor for your applications along with tools to design, build, and run application services.
NexJ Studio is run from nexjstudio.exe, which has an associated file nexjstudio.ini that contains settings for Java and other things. NexJ Studio is an Eclipse plugin. For more information on Eclipse, see https://www.eclipse.org. For information on optional launch settings in nexjstudio.ini see https://wiki.eclipse.org/Eclipse.ini
The application designs, which you can create using NexJ Studio, are expressed in a set of Model Description Language (XML) files in your computer's file system. NexJ Studio opens an Eclipse workspace folder and maintains one or more models in that folder. You open one Eclipse workspace at a time (and usually stick with one for most of your development, for example, c:/work/models) and can select one model at a time in the navigator view as described below. The folder structure of a typical Eclipse workspace is illustrated at the end of this section.
Perspectives and views
NexJ Studio uses Perspectives and views. Views present a special purpose view into the model such as the outline view, properties view, or console view. A Perspective, such as the NexJ Studio perspective, or Java perspective, arranges views into useful configurations for a certain task. For example, NexJ Studio is for editing models. Perspectives and views can be managed from the Window > Show View or Window > Perspective menus.
You can rearrange the views and editors in any way that suits your work process. If you ever want to reset NexJ Studio back to its default settings, use the Window > Perspective > Reset Perspective menu option.
NexJ Studio tour
NexJ Studio provides a set of tools for working with your application and services' designs. These are called models.
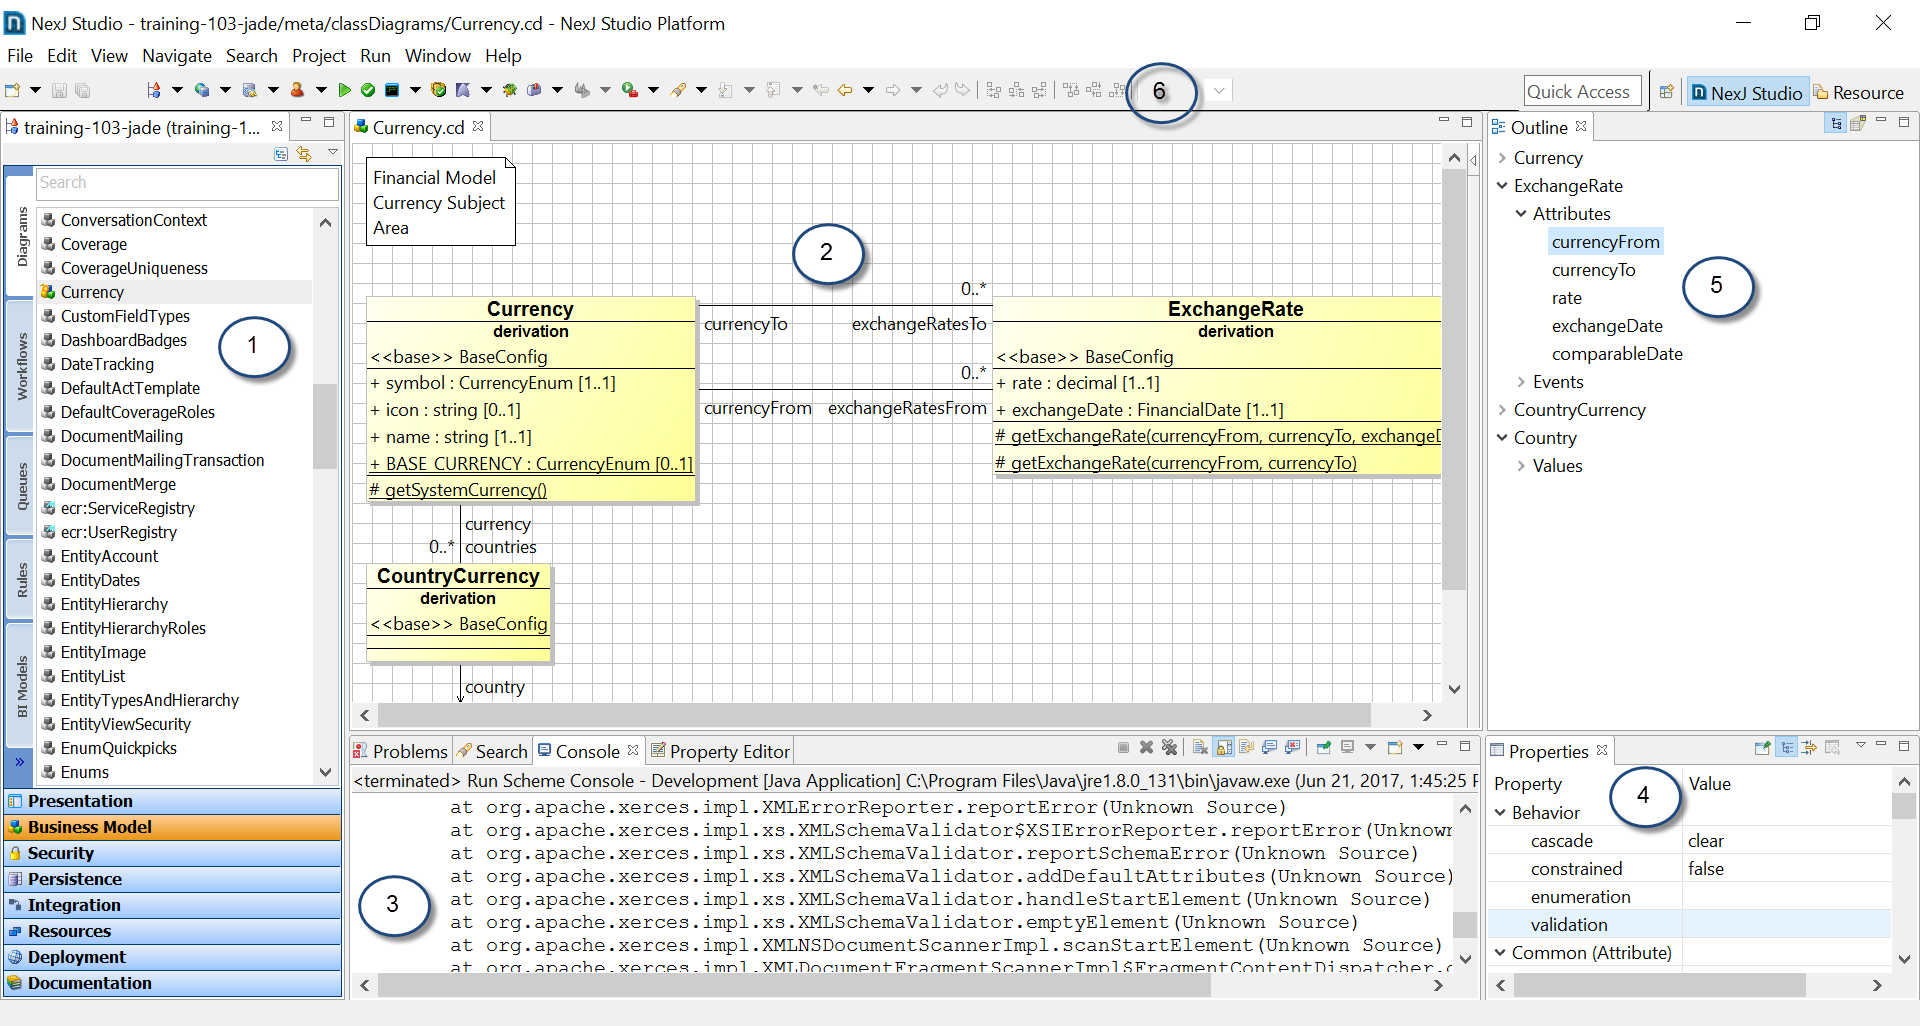
The above figure shows the main window for NexJ Studio. You can rearrange the views and editors in any way that suits your needs. If you want to reset NexJ Studio back to its default settings, select the Window > Perspective > Reset Perspective menu options.
- The Model Navigator is located in the left-hand side of the window and organizes the components of your model into architectural layers.
- Presentation
Design and test user interface components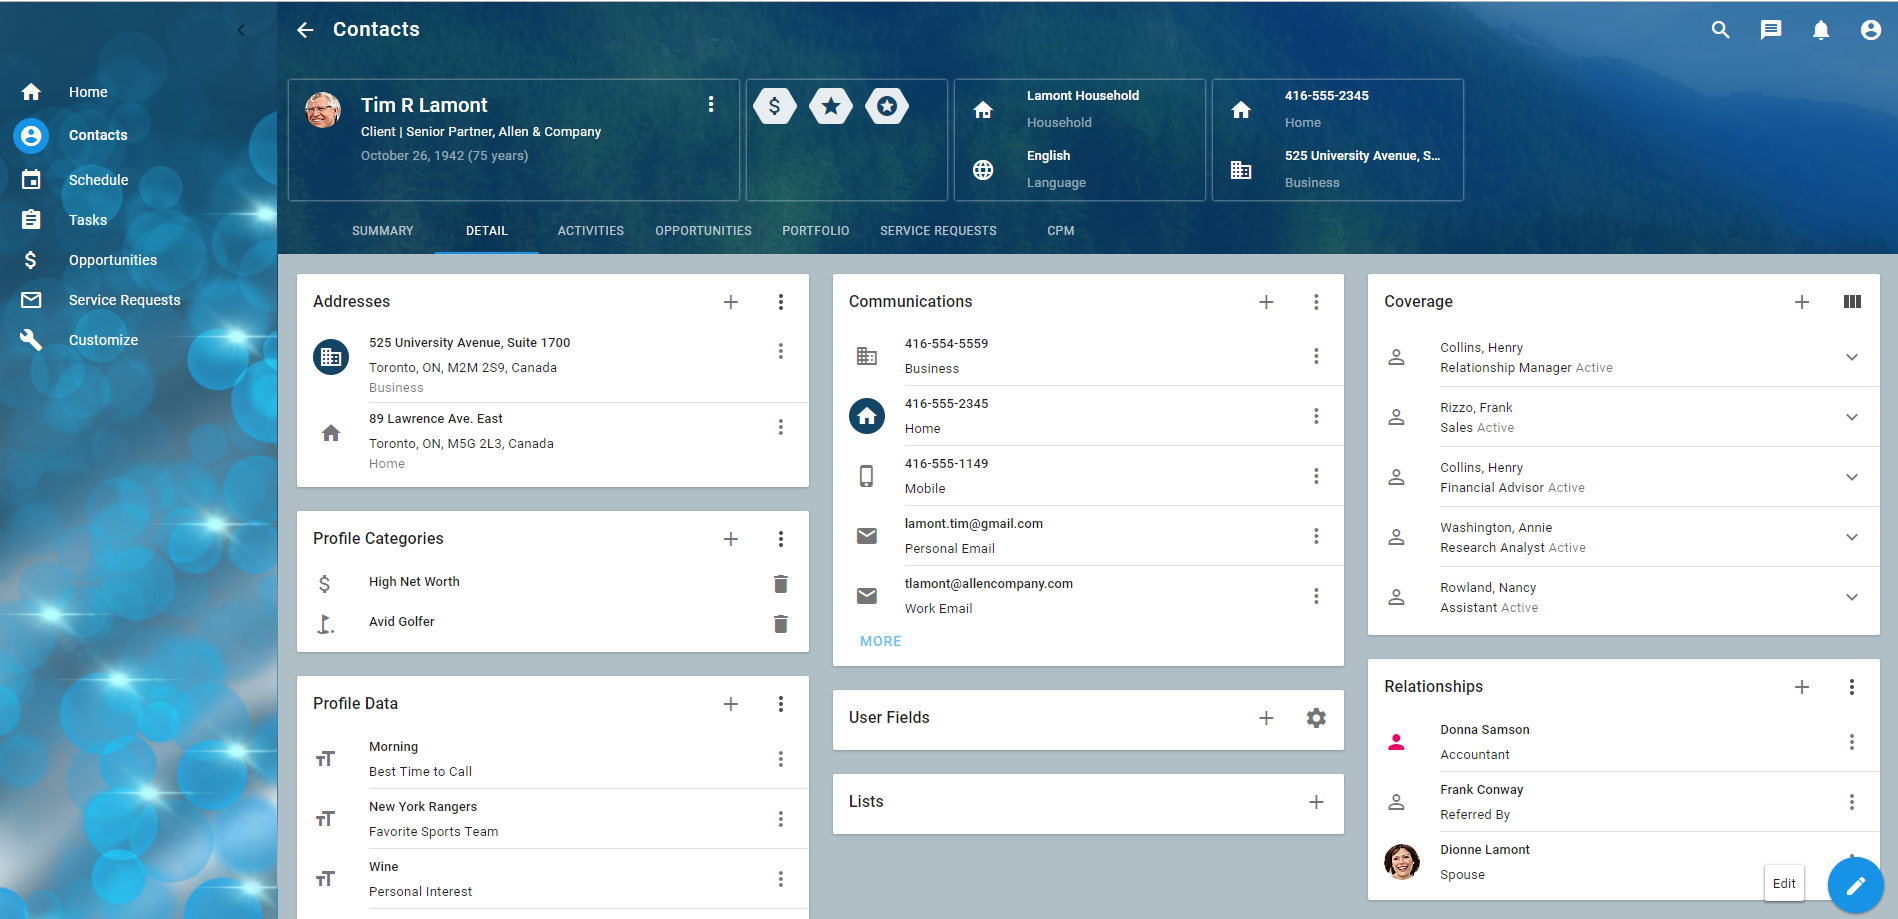
- Classic Presentation
Legacy user interface designs (deprecated)
- Business Model
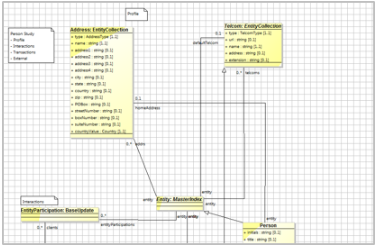
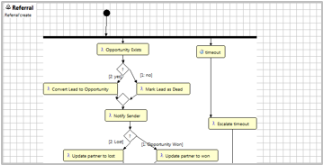
Model business concepts in classes, class relationships, business logic, persistence mapping, enumerations, and class diagrams; long-running business processes in workflows; and complex business rules in rule sets as well as support for unit testing.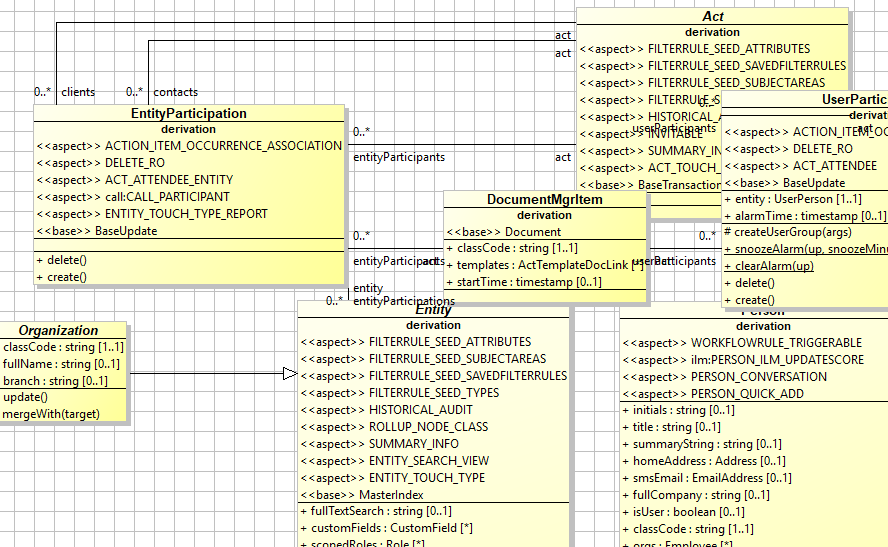
- Security
Model system privileges. - Persistence
Design physical storage including data sources, upgrades and data extracts (dumps).
- Integration
Model communication with external systems including messages, transformations, services, channels, and interfaces.
- Resources
Maintain common framework capabilities such as localization, translation and common code libraries.
- Deployment
Manage your deployment environments for servers and connections e.g. Staging, User Acceptance, Performance, Production... - Documentation
Manage books, chapters and images of solution documentation. This is for DITA documentation and is deprecated.
To toggle from Hierarchy mode to Layer mode, click the Show Hierarchy button
 at the top of the navigator. Items from base models or mixed-in models are displayed in the navigator as grey
  ; mixed-in items have a little "m" on them
  ; new items display in color
  ; and customized items display with color and a strike symbol
  .
.Although items from base or mixed-in models can be customized by using the Customize right mouse button menu item on selected elements, when possible, augments should be used.
The name of the currently open model is displayed at the top of the navigator. For example:

If you are managing more than one model, you can switch between models using the View Menu
 at the top of the navigator.
- You can restrict your view to only local items by selecting the Hide Base Elements menu item from the View Menu.
- You can include mixed in elements from your current environment file in the navigator by selecting the Show Environment Mixin Resources menu item from the View Menu.
- The model navigator can be docked by selecting its minimize button (at the top right of the navigator).
- Presentation
- Editors launch in the center of the screen for whatever items has been opened. They are typically opened from the model navigator or by using Ctrl+Shift+D to launch Open Model Entry or press Ctrl+Shift+R to select any resource in your model.
- Each of the model elements has a specialized editor. For example, there is a Class Diagram Editor for class diagrams and a Message Editor for messages.
- When the editor is open, it synchronizes with the outline view. You can choose the most efficient approach for you to locate or add/delete a sub-item. see 5.
- Most editors have a set of tabs across their bottom to group properties. e.g. Overview, Attributes, Events, Persistence, Source...
- The source tab in an editor allows you to edit the XML directly with copy/paste, ... This is very handy at times.
- You can also open files in the Java perspective with "Open with... text editor" to work directly with the XML
- Editors can be tiled or minimized.
- Help on the currently selected item in an editor automatically displays in the status bar in the bottom-left corner of the screen. Press Shift+F2 to show more help, if available.
- The Console view displays console output when you are testing your model with the Server Console or other tools.
- The Console view supports useful capabilities, such as scroll lock, show the console when a change occurs (or not), show the console only on errors, and pin the console.
- In this same area, there are views for problem reporting, search results, the upgrade editor and more.
- The Properties List view displays the properties of the currently selected item in the active editor.
- The Outline view displays a tree of all the parts of the current item being edited and can be used for navigation and editing.
- The toolbar provides quick access to tools for NexJ Studio, which include:
Set current model

Opens the Model Library and lets you select and manage all the models in your environment.Publishing a model
A model is simply your design represented in a set of .xml and .js files. This is usually on disk in a project folder in your workspace. In the Model Library, you may "publish" your model to a .jar file so it may then be referenced by other models or deployed to a server. You simply open the Model Library, select your model, and press the Publish button to output your published model to the output folder specified in Window/Preferences/NexJ Studio/Build Settings.
- Set current server

Select the current environment (or server) for deployment and execution from your environments. Set current connections

Select the current set of connections (for example, databases or message queues) from your environments.This is only used in conjunction with a
.serverfile. If you are using a.environmentfile, the connections are already included there.Set current user

Select and manage the user context under which to run your tests and consoles.Ensure that this setting is configured. If it is not, you will be running your local server without user privileges, potentially resulting in unexpected behavior.
- Deploy model

Publish and deploy your model into the current environment. - Validate model

Validates the model and places any warnings or errors in the Problems view. - Run Console

Starts a local, server, remote or client console for testing. - Run All Unit Tests

Run or debug all unit tests. To run specific unit tests, use the Unit Test View available by selecting Window > Show View > Other and in the Show View dialog selecting the NexJ Studio > Unit Test menu item. - Run application

Run any of the presentation applications on any of the client frameworks. - Debug current server

Start debugging the currently running server. - Run tool

Provides access to various tools, including:- Cipher Tool - Encrypt passwords and master password server files.
- Data Load Tool - Importing and export data to and from Object Representation to specific data sources.
- Database Schema Tool - Generate data source specific SQL statements for creation, upgrades, inserts, and so on.
- Generate BI Metadata - Generate BI metadata to support analytics and reporting.
- Local Scheme Console - Run an in-process version of the local Scheme Console.
- Strings Tool - Import and export string resources for internationalization.
- Metadata Hotswap

Hotswapping allows you to quickly test code changes without restarting your server. To hotswap your changes, press the "Metadata hotswap" button on NexJ Studio toolbar (or Alt + F5) when your local server is running. Refresh your browser to see your changes. Use the dropdown on the NexJ Studio toolbar to switch between "Reload UI" and "Reload All".- Reload UI
This option only swaps out MDA UI metadata, which includes layouts, portlets, and dialogs, ... This option takes less than 1 second and should be used in favor of "Reload All" when you're only making MDA UI changes. If you are changing raw AFL controls, hotswapping isn't needed to see your changes.
Reload All
This option swaps all metadata, including MDA UI metadata, business model, and integration changes.Tip
After hotswapping, your server console still uses the old metadata. Type (*repl*'reset) in the server console to pick up the model changes.
- Reload UI
Workspace/Model File Structure
To demystify things, a model is simply a set of XML files on your disk. NexJ Studio opens up an Eclipse workspace that contains a number of folders, including your design. A typical work folder structure is as follows:
root folder (e.g. c:/work)
→ databases (optionally specified as the data path property in the setup command of the database schema tool. You could also use your default Database Server folder if desired)
→ out (specified in NexJ Studio at Window/Preferences/NexJ Studio/Build Settings/Build output folder)
→ deploy (build output files get put here)
→ publish (folder for your published jars. Specified at Window/Preferences/NexJ Studio/Find published model/Destination directory)
→ sql (optionally specified as the Database Schema Tool's Output Directory)
→ models (Eclipse workspace - some prefer to use WS as the name)
→ .metadata (Eclipse workspace settings)
→ <model Name> (Your model project name. There can be many models in an Eclipse workspace. Your project may not have all the following folders.)
→ bin (java bin folder)
→ doc (often used for markdown documentation)
→ env (folder for environment files - Development, Testing, ...)
→ etc (general stuff)
→ lib (external java jars go here if needed)
→ meta (Model Description Language elements. The element folders can have subfolders which are used for name spacing content e.g. channels/xyz/MyChannel.channel results in a channel with a name of xyz:MyChannel)
→ .metadata (the model's metadata file with versioning and dependencies)
→ channels
→ classes
→ data sources
→ enumerations
→ messages
→ portlets
→ ...
→
→ mod (folder for AFL modules and supporting files)
→ app (standard AFL application folder)
→ themes (standard theme folder)
→ src (Java source folder)
.classpath (file for maintaining Java Classpath information)
.project (the Eclipse project file with the project name and natures)