Working with the console
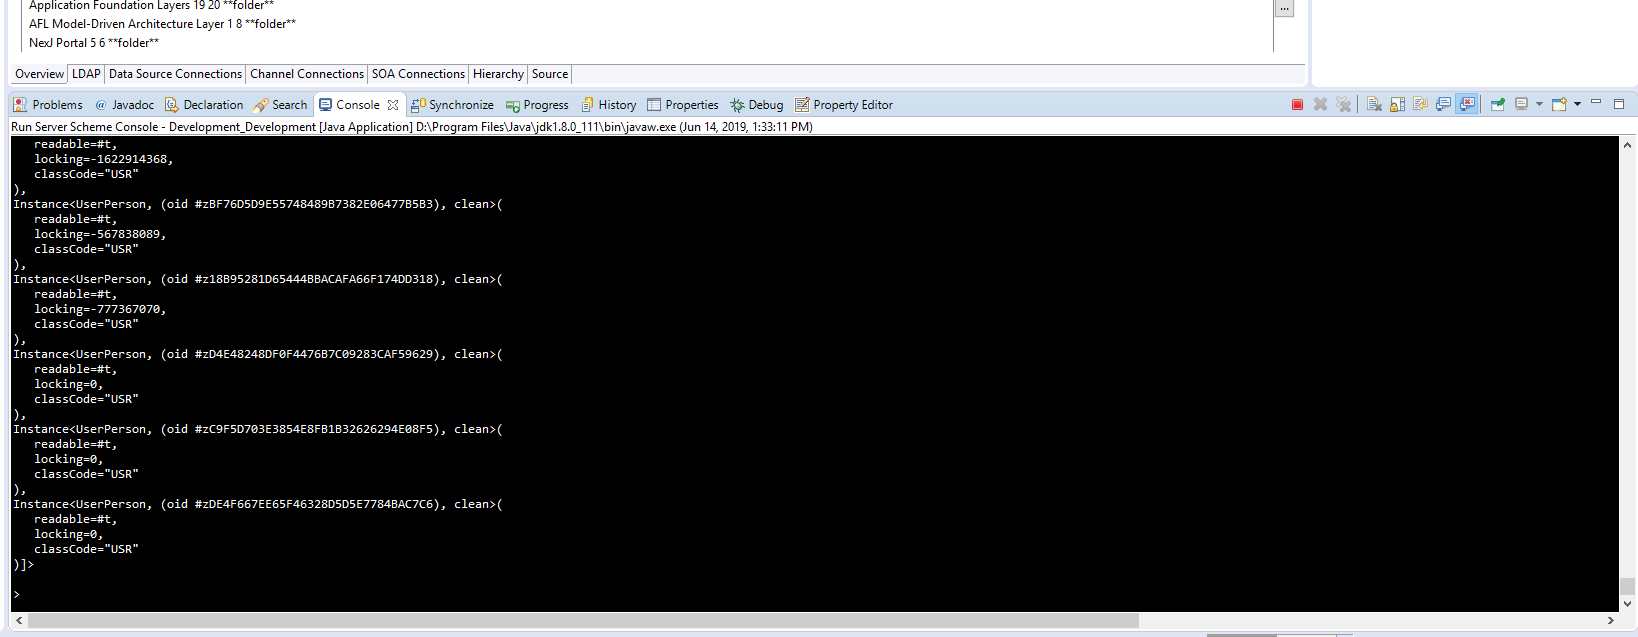
The console in NexJ Studio allows you to use a script to interact with a running server to test the business model or perform maintenance tasks in real time.
There are three types of consoles. For development, you will most often use the Server Console but the others are useful in certain situations.
- Server Console: Runs a local Model Server. It is a full server, with queues, workflows, UI, business model, and integration support. The script debugger can be used to debug scripts invoked from the console. This is often used for development testing.
- Minimal Console: Similar to the Server Console but only runs the business model and database connections. It starts up a bit faster than the Server Console if all you are doing is script testing against the business model.
- Remote Console: Runs against a server running elsewhere, such as a remote server or another process on your own machine. Requires a NexJ user with Debug and DebugEval privileges.
(begin ) block.Running a console
All the consoles use the current environment file to select which server to connect to. The console uses the server URL and client transport fields.
The console waits for input at the command prompt and executes a read-evaluate-print loop (REPL).
To run a console, you must have selected an environment with the Set Current Server button and a user with the Set Current User button
To run a console, use the Run > Run Scheme Console menu item or the Run Scheme Console toolbar button and select the console you want. The Console view will open and may prompt you for login credentials if running a remote or client console. Once the console is ready for input, a prompt like ; NexJ Scheme > will display. Enter the script and press Enter to execute it. You may also send highlighted script in a scratchpad to the console, by pressing Ctrl+U. You will see a response to your script in the console output.
NexJ Studio uses Scheme as the default scripting language. To change the default console scripting language to JavaScript, specify the-Dnexj.repl.language="js" VM argument when launching the console.
The console with launch with the following prompt:
; ====================================; NexJ Model Server : Startup complete; Language : JavaScript; ====================================; hit Enter twice to terminate statements.
js>
You can also specify JavaScript as the scripting language in certain scripted fields throughout the application. You can still use the Scheme language in the console when issuing commands. For more information about using JavaScript throughout the application, see Using JavaScript.
You will know if your console is accepting JavaScript or Scheme by the command prompt. ">" means Scheme and "js>" means JavaScript.
To switch between console language at runtime simply enter the following to change from JavaScript to Scheme:
#"*repl*".language = "scheme";
or the following to change from Scheme to JavaScript:
(*repl*'language "js")
Metadata Hotswap
Hotswapping allows you to quickly test code changes without restarting your server. To hotswap your changes, press the "Metadata hotswap" button on NexJ Studio toolbar (or Alt + F5) when your local server is running. Refresh your browser to see your changes. Use the dropdown on the NexJ Studio toolbar to switch between "Reload UI" and "Reload All".
- Reload UI
This option only swaps out MDA UI metadata, which includes layouts, portlets, and dialogs, ... This option takes less than 1 second and should be used in favor of "Reload All" when you're only making MDA UI changes. If you are changing raw AFL controls, hotswapping isn't needed to see your changes.
Reload All
This option swaps all metadata, including MDA UI metadata, business model, and integration changes.Tip
After hotswapping, your server console still uses the old metadata. Type (*repl*'reset) in the server console to pick up the model changes.
Console settings
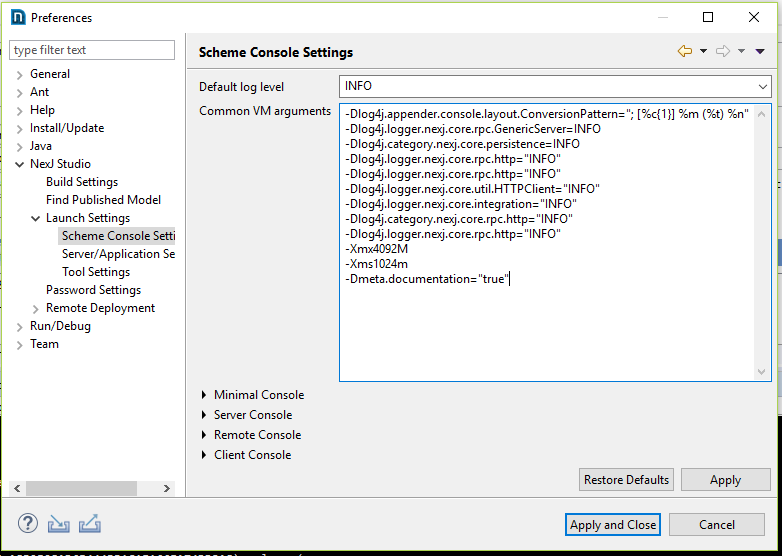
Set the console logging level, as well as startup VM arguments, in the Scheme Console Settings dialog. Access the dialog from the Window > Preferences > NexJ Studio > Launch Settings menu item.
You can set the log level and VM arguments either at a global level or specifically for each type of console. NexJ-specific arguments are specified in the -Dnexj.<propertyName>=<value> format.
Some supported arguments include the following:
-Dnexj.notification.enabled=false-Duser.timezone=etc/UTC-Dnexj.repl.language="js"or-Dnexj.repl.language="scheme"
For more information about logging levels and setting other logging criteria, see Monitoring Model Server.
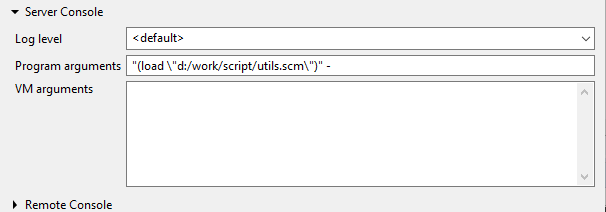
You may also pre-load a library of your own utility functions using the Server Console Program Arguments.
e.g. "(load \"d:/work/script/utils.scm\")" -
Note: the '-' above is important.  You may run any scheme command in the Program arguments, but end your entry with -.
Other console approaches
These approaches are not commonly used, but are available.
Running a standalone console
This approach is very specialized, technical, and not required in most situations.
You can run a local console on a database from outside of NexJ Studio on either Windows or Unix operating system. The following steps create a script that launches a local console that runs against the repository you configure in your build environment.
Prerequisites
- Apache Ant must be installed.
- You must have a working build.xml file which references the .jar files from plugin.zip.
Steps
- Open a console.
- Go to your build directory.
- Ensure your
build.propertiesfile has all the correct properties set to run the Scheme Console. You will need the server, connections, and user information. The Ant call will need to be updated for each environment. - Type
ant REPL.scriptin the console. Hit Enter. A script file will automatically be generated in your deploy directory, for exampleC:/work/out/deploy/REPL.batorC:/work/out/deploy/REPL.sh. - In Unix, you will have to make this script file executable by typing
chmod 777 REPL.sh.
This script will run the console in a console window.
Execute code directly
To connect to the Scheme Console in non-interactive mode and execute the code directly in the script, set the app.REPL.script variable to desired code. For example, use the -Dapp.REPL.script="('test)" attribute when you call app.REPL.
Sample Windows .bat file
call E:\Deploy\util\ant\org.apache.ant_1.8.4.v201303080030\bin\ant.bat ^
   -f "E:\Deploy\base\201606080000_Jade_LAR_Phase_2_HF4\plugin_extracted\plugins\com.nexjsystems.nexjstudio_11.0.539.7\build\build.xml" ^
   -Dplugin.dir="E:\Deploy\base\201606080000_Jade_LAR_Phase_2_HF4\plugin_extracted\plugins\com.nexjsystems.nexjstudio_11.0.539.7" ^
   -Dpublish.dir="E:\Deploy\base\201606080000_Jade_LAR_Phase_2_HF4\mixin\finance" ^
   -Dbase.jar="E:\Deploy\results\201607061100\out\model\nexj-meta-anz-7.0.2.0-16.0.3_BAU_475.684.1305.140.45-dc58f55d.jar" ^
   -Dout.dir="E:\Deploy\temp" ^
   -Dproject=".tmp" ^
   -Dserver="E:\Deploy\results\201607061100\project\anz\env\Internal_DEV2.environment" ^
   -Dcipher.master.url="E:\Java\modelD\security\master.pwd" ^
   -Dbuild.jnlp="false" ^
   -Dapp.REPL.script="'test" ^
   app.REPL
Sample Unix .sh file
$ANT_HOME/bin/ant \
    -f "$NEXJ_PLUGIN/build/build.xml" \
    -Dplugin.dir="$NEXJ_PLUGIN" \
    -Dpublish.dir="$DIR_MIXINS" \
    -Dbase.jar="$MODEL_JAR" \
    -Dout.dir="$DIR_TEMP" \
    -Dproject=".tmp" \
    -Dserver="$ENVIRONMENT_FILE" \
    -Dcipher.master.url="$MASTER_PASSWORD_FILE" \
    -Dbuild.jnlp="false" \
    -Dapp.REPL.script="'test" \
    app.REPL
Call a Scheme script
To connect to the Scheme Console in non-interactive mode and call a Scheme script named scheme.scm, set the app.REPL.script variable to load \\""path/to/scheme.scm\\""". For example, use the -Dapp.REPL.script="(load \\""c:/scheme.scm\\""") attribute when you call app.REPL.
Sample Windows .bat file
call E:\Deploy\util\ant\org.apache.ant_1.8.4.v201303080030\bin\ant.bat ^
   -f "E:\Deploy\base\201606080000_Jade_LAR_Phase_2_HF4\plugin_extracted\plugins\com.nexjsystems.nexjstudio_11.0.539.7\build\build.xml" ^
   -Dplugin.dir="E:\Deploy\base\201606080000_Jade_LAR_Phase_2_HF4\plugin_extracted\plugins\com.nexjsystems.nexjstudio_11.0.539.7" ^
   -Dpublish.dir="E:\Deploy\base\201606080000_Jade_LAR_Phase_2_HF4\mixin\finance" ^
   -Dbase.jar="E:\Deploy\results\201607061100\out\model\nexj-meta-anz-7.0.2.0-16.0.3_BAU_475.684.1305.140.45-dc58f55d.jar" ^
   -Dout.dir="E:\Deploy\temp" ^
   -Dproject=".tmp" ^
   -Dserver="E:\Deploy\results\201607061100\project\anz\env\Internal_DEV2.environment" ^
   -Dcipher.master.url="E:\Java\modelD\security\master.pwd" ^
   -Dbuild.jnlp="false" ^
   -Dapp.REPL.script="(load \\""c:/scheme.scm\\""") ^
   app.REPL
Sample Unix .sh file
$ANT_HOME/bin/ant \
    -f "$NEXJ_PLUGIN/build/build.xml" \
    -Dplugin.dir="$NEXJ_PLUGIN" \
    -Dpublish.dir="$DIR_MIXINS" \
    -Dbase.jar="$MODEL_JAR" \
    -Dout.dir="$DIR_TEMP" \
    -Dproject=".tmp" \
    -Dserver="$ENVIRONMENT_FILE" \
    -Dcipher.master.url="$MASTER_PASSWORD_FILE" \
    -Dbuild.jnlp="false" \
    -Dapp.REPL.script='(load \"/appvol/nexj/deploy/scheme.txt\")' \
    app.REPL
Interactive mode
To connect to the Scheme Console in interactive mode, set the app.REPL.script variable to blank. For example, use the -Dapp.REPL.script="-" attribute when you call app.REPL.
Sample Windows .bat file
call E:\Deploy\util\ant\org.apache.ant_1.8.4.v201303080030\bin\ant.bat ^
   -f "E:\Deploy\base\201606080000_Jade_LAR_Phase_2_HF4\plugin_extracted\plugins\com.nexjsystems.nexjstudio_11.0.539.7\build\build.xml" ^
   -Dplugin.dir="E:\Deploy\base\201606080000_Jade_LAR_Phase_2_HF4\plugin_extracted\plugins\com.nexjsystems.nexjstudio_11.0.539.7" ^
   -Dpublish.dir="E:\Deploy\base\201606080000_Jade_LAR_Phase_2_HF4\mixin\finance" ^
   -Dbase.jar="E:\Deploy\results\201607061100\out\model\nexj-meta-anz-7.0.2.0-16.0.3_BAU_475.684.1305.140.45-dc58f55d.jar" ^
   -Dout.dir="E:\Deploy\temp" ^
   -Dproject=".tmp" ^
   -Dserver="E:\Deploy\results\201607061100\project\anz\env\Internal_DEV2.environment" ^
   -Dcipher.master.url="E:\Java\modelD\security\master.pwd" ^
   -Dbuild.jnlp="false" ^
   -Dapp.REPL.script="-" ^
   app.REPL
Web-based console
If you do not have access to NexJ Studio, you can use the web-based Scheme Console to evaluate Scheme scripts.
Only administrators with AdminSchemeExecute privilege can access the web-based Scheme Console.
The web-based Scheme Console can be accessed separately by changing the URL used for accessing your application. Replace ui/portal in the URL with SysPortletServer/SchemeConsole.html. For example, if the application is normally accessed from http://server.example.com:port/nexj/ui/portal, enter http://server.example.com:port/nexj/SysPortletServer/SchemeConsole.html in the browser's address bar.
In the web-based Scheme Console, enter your script in the Scheme Expression field and click Evaluate Expression. Results display in the Return Value field.
JavaScript is not supported in the web-based Scheme Console.
The web-based Scheme Console also logs all requests, results, and execution times. You can access these logs from NexJ Admin Console by navigating to the Audit Trail page. All requests are logged in the application log at the INFO level of logging information.


