
Orientation
NexJ Studio is a powerful development environment allowing the creation of software through model-driven engineering . The following activities will give you hands-on experience with various aspects of the NexJ Studio, and its underlying concepts, and will help you develop important working skills.
During these orientation activities, you will learn about NexJ Studio and some of its key platform concepts such as View Paths, the @ symbol, and where clauses.
Running your server
In this training module, you will run the full Model Server on your local machine.
- In NexJ Studio, click Run > Run Scheme Console > Server Console.
This starts an instance of Model Server, and opens a console output, which should display the following:

While it is running, you can interact with the server through any of its URLs for UX and APIs as described below. You can also interact with the server directly through the console. The scripting languages used are Scheme and JavaScript. The Console is an Eclipse view that provides a read-evaluate-print loop (REPL) for the commands you enter. This REPL interacts directly with the model's business logic and persisted data.
As you build out your model during this course, you will be using scripts to check your model's behavior, gather information about the data store, define unit tests, and even define some aspects of your model's behavior.
For more information about Scheme, see the NexJ Scripting Reference PDF which can be generated by using the Run Tool > Generate NexJDoc function in NexJ Studio. Information on NexJ's support of JavaScript can be found in the scripting section. To make your default console language JavaScript, see Using the Minimal Console.
You will know if your console is accepting JavaScript or Scheme by the command prompt. ">" means Scheme and "js>" means JavaScript.
To default to either, use the VM arguments as described in working with the console of -Dnexj.repl.language="js" or -Dnexj.repl.language="scheme"
To switch between them at runtime simply enter the following to change from JavaScript to Scheme:
#"*repl*".language = "scheme";
or the following to change from Scheme to JavaScript:
(*repl*'language "js")
Get familiar with the console by entering a few commands. For example:
- Type
"Hello World", including quotes, in the Console. - Press Enter.
The Console echos the string in response:
> "Hello World"
; "Hello World"
Using a scratchpad
You can type directly into the console, or you can use a scratchpad to write and save your scripts. Scratchpads are part of the Resources layer of NexJ Studio.
In this lesson, you will create a scratchpad and use it to create and persist a new user instance.
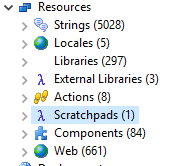
- In the model navigator, ensure you are using the Hierarchy view. The following image shows the model navigator in hierarchy view.
If you need to switch to this view, click the Show Hierarchy button

- In the Training tab, click Resources > Scratchpads.
Right-click Scratchpads and select New Scratchpad .
You can also create new items such as scratchpads by pressing Ctrl+N, which opens a Select a wizard window. Type the filter text (for example, Scratchpad, Class, or Layout), click Next, and complete the set up.
- In the Name field, enter one that is meaningful to you. For example, enter your name.
- Click Finish.
Try the following examples with the Scratchpad editor:
Read the nexjsa user into the variable
u. Read the instance of theUserclass where theloginNameattribute has a value ofnexjsa, and bind it to the variableufor the remainder of the session. Copy or type the following code into your Scratchpad editor window.Scheme(define u (read-instance User '() '(= loginName "nexjsa") '()))
JavaScriptvar u = #"read-instance"(User, null, scm("'(= loginName \"nexjsa\")"), null);NexJ Javascript
Note in the Javascript above that any function names that aren't compatible with javascript (e.g. one that includes a "-") need to be escaped with a #"<name>" syntax.
Also note that some syntax, such as where clauses or attribute lists need to wrapped in the scm(...) function. We will add more javascript capabilities for these over time and will update the documentation when it is available.
- Right-click in your Scratchpad and select Execute in Scheme Console.
This returns the user instance. It should look similar to#<Instance<LocalUser, (oid #z00000000000010008000BEEF0000000C), cl... To display the instance's
firstNameattribute, run the following code.(u'firstName)
u.firstName;

Select this new command by highlighting it in the scratchpad. Right-click the selection and click Execute in Scheme Console. You should see
nexjsa.To return the
lastNameattribute, enter(u'lastName) or u.lastName;, depending on the language that your console is running.The last name is alsonexjsa. The Execute in Scheme Console command can also be accessed by pressing Ctrl+U, which runs the selected text or the whole file if nothing is selected.Copy the following code into your scratchpad, select it, and press Ctrl+U.
(u'lastName)
u.lastName;
It just so happens that the nexjsa user has the same first and last name.
To retrieve the
fullNameattribute (a concatenation of the last and first names separated with a comma), enter the following code into your scratchpad, select it, and Execute in Scheme Console.(u'fullName)
u.fullName;
After running all the above commands, the Console should contain output similar to the following (if you ran scheme):
> (define u (read-instance User '() '(= loginName "nexjsa") '()))
; #<Instance<User, OID:1:V32:00000000000010008000BEEF0000000C,
CLEAN>(classCode="U", locking=0)>
> (u'firstName)
; "nexjsa"
> (u'lastName)
; "nexjsa"
> (u'fullName)
; "nexjsa, nexjsa"
>
Now, continue by defining a new instance of the Person class for Betty Baker:
Enter the following code in your scratchpad:
(define b (Person'new (: firstName "Betty") (: lastName "Baker")))
(b'fullName)
var b = new Person({firstName : "Betty", lastName : "Baker"});
b.fullName;
The this code defines a new person with
firstName=Betty, lastName=and assigns that new instance to the objectBakerb. The second line displays Betty'sfullName.In the scheme code above, the
(:syntax produces name/value pairs that the'newmethod uses to create the new object. We will learn more about scripting syntax in upcoming lessons.Select the code, right-click the selection, and select Execute in Scheme Console. This runs the selected lines in the Console as if you had typed them directly. The Console should now display the following code:
> (define b (Person'new (: :class "ExternalUser") (: firstName "Betty") (: lastName "Baker") (: loginName "bbaker")))
; #<Instance<Person, null, new>(
   createTime=#m2019-01-21T20:55:35.313000000,
   createUserAlias="nexjsa",
   createAuthorAlias="nexjsa",
   editTime=#m2019-01-21T20:55:35.313000000,
   editUserAlias="nexjsa",
   editAuthorAlias="nexjsa",


> (b'fullName)
; "Baker, Betty"
At this point, the new object exists only in the Console's memory. To persist this change to the database, issue the scheme
(commit)or js commit() command to the Console, remembering to include the brackets. To undo uncommitted model changes that you've carried out in the Console, issue the scheme(rollback) or js rollback()command.To stop the Scheme Console, press Ctrl+Z or click the Terminate button
 on the Console toolbar. It is not necessary to stop the Scheme Console at this point.
Occasionally, you may find that the Execute in Scheme Console command cannot be selected. This is typically because there are multiple Console windows running at the same time. To determine if this is the case, click the drop-down arrow next to the Display Selected Console button
 to see a list of all open Consoles, and whether they are running.
Scratchpads and Content Assist
Scratchpads benefit from NexJ Studio's Content Assist. The following functionality is available when using scratchpads. Try using the following commands in the script:
| Command name | Function | How to invoke | Available in right-click menu |
|---|---|---|---|
| Not applicable | Automatic Scheme syntax highlighting. | None required. | Not applicable |
| Execute in Scheme Console | Run blocks of code directly from the scratchpad. | Highlight the code that you want to run in the console, and press Ctrl+U. | Yes |
| Format | Automatically format your code for ease of reading. | Highlight the code that you want to format, and press Ctrl+Shift+F. | Yes |
| Generate Element Comment | Automatically create comment blocks for statements and function declarations. | Highlight the function or declaration that you want to comment on, and press Alt+Shift+J. | Yes |
| Toggle Comment | Toggle the comment prefix across multiple lines. Toggle comment prefix of highlighted lines. | Highlight the lines that you want to comment or If a mix of commented and uncommented lines are selected, then a comment prefix is added to all lines. | Yes |
| Open Declaration | Locate the declaration of any symbol in the code. | Select the symbol and press Ctrl while you click it, or press F3. | Yes |
| Not applicable | Content assist (shows available code completions). | Press Ctrl+Space while typing. | Not applicable |
| Not applicable | Context sensitive code help to compliment the content assist. | Hover your mouse over any part of the code to see the available help. Press F2 to open a resizable window to view longer help information. | Not applicable |
| Quick Fix | Quick fix (apply type hint to current symbol, insert definitions for undefined variables); press Ctrl+1. | Highlight the symbol to fix, and press Ctrl+1. | Yes |
Quick application tour
- Look at the running application and its structure (portals, workspaces,portlets, and layouts).
Make sure your server is started and open the following link in a new browser tab.
http://localhost:7080/training/ui/portal- Log in with
User: wm1, Password: nexjYou should see something similar to the following.
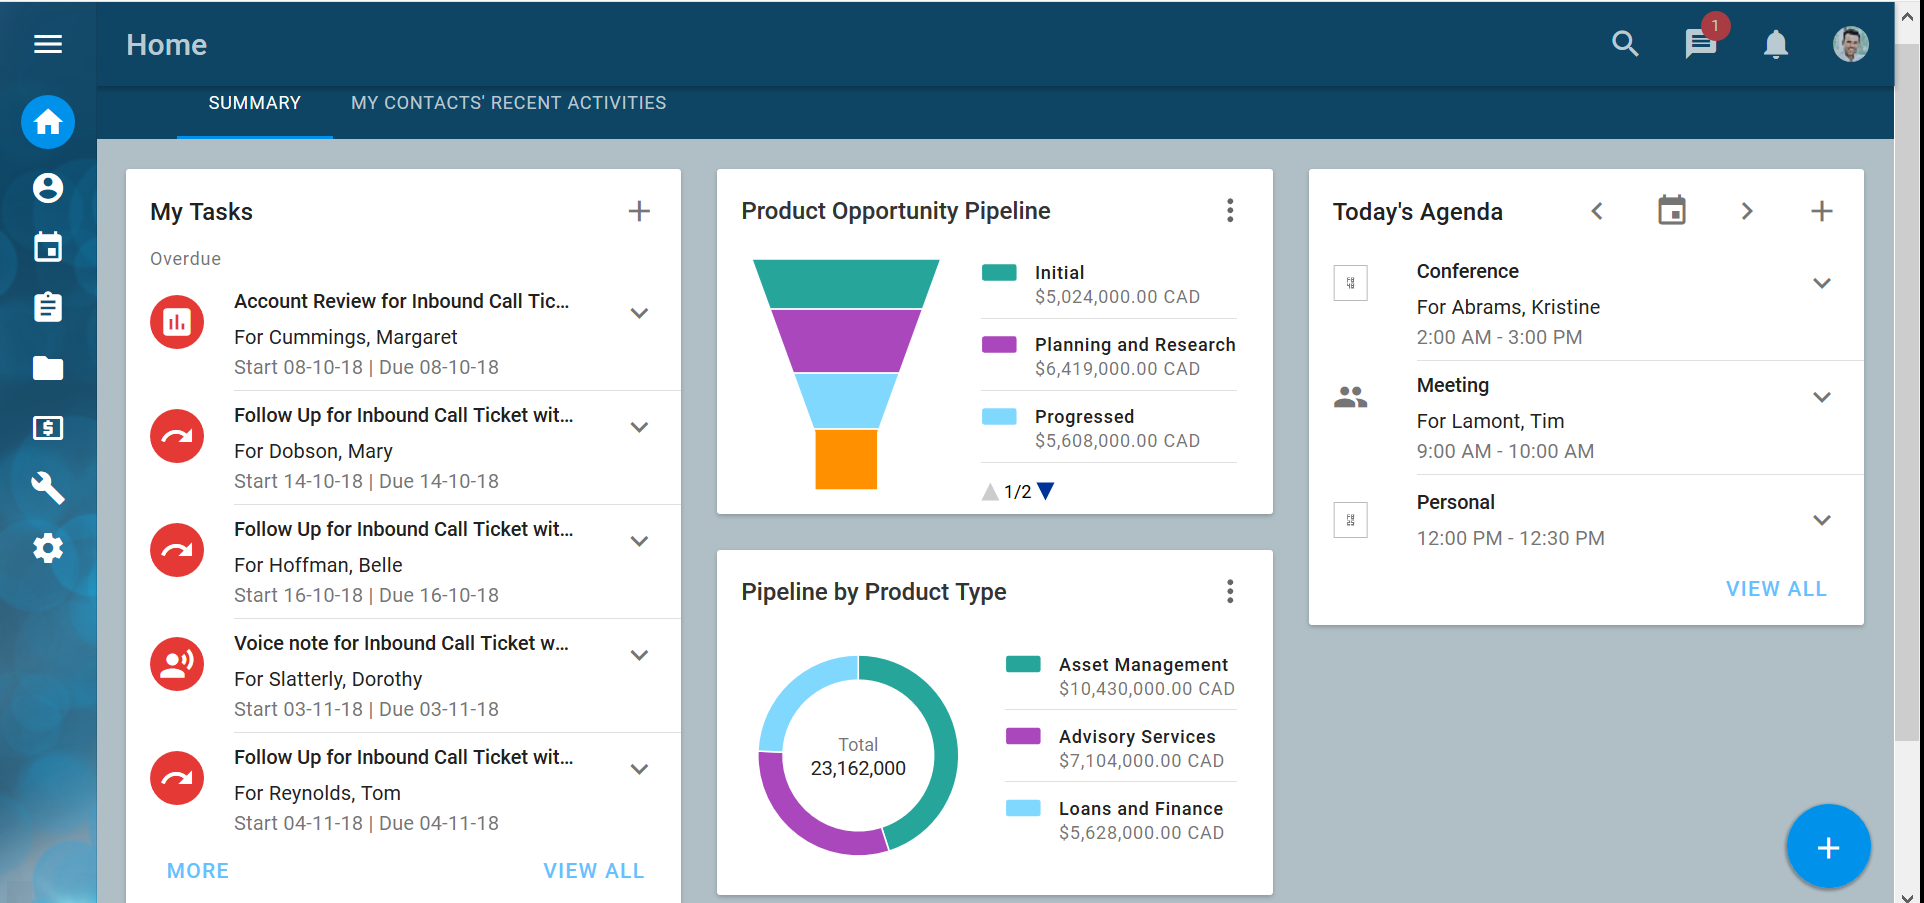
Explore the application. If the alarm dialog opens, choose to snooze all or dismiss all. If you are looking for an interesting money record in the contact list, search for Lamont and select Tim.
Once you have looked around, get an overview of the application structural components with the Model Description Language's Presentation Layer discussion.
When working in your development environment, you experience development performance. Keep in mind:
- Your environment likely has the debug="true" setting turned on. This slows things down but is better for development. Debug is turned off in production.
- You will be restarting your server often and that will clear out all the caches - both in the UI and in the business model. Once caching is done for the UI, you should see sub-second response.
- The performance statistics functionality (and the Performance statistics workspace) are often used in development which adds overhead.
For example, when you restart your server, launch the application, and load the Opportunities workspace, it can take about 10 seconds to load in the browser. This is because you are the first person to use that workspace after server restart, and it is being built and cached. As you, or other users continue to use the application, it will only take a few milliseconds to reload in the same browser and about one second to load in a new browser. In production, the load times would be even faster.
While we want you to consider performance and take the information that the performance statistics provide seriously, it is helpful to understand these factors.
URLs
You may find it more convenient to right-click on the following links and choose "Open in new tab" or "Open in new window" to keep this page open as well.
API URL
Raw data can be accessed over the REST API. This is useful if you are looking for context values to pass to portlets for testing. For information about the structure of the API URL, see http://localhost:7080/training/openAPI.html
Use the example above and use Tim Lamont's oid.
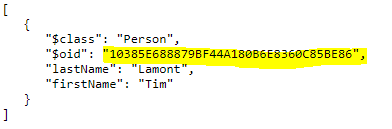
Place it somewhere convenient, such as the training scratchpad, as it will be used as a querystring parameter in some of the following lessons.
When we loaded our database, a great deal of sample data was generated, including Tim Lamont. All the unique identifiers are randomly generated when we load sample data for a new environment. Tim's oid is specific to your training environment. His oid will be different in other databases and will change if you ever recreate your database or re-seed from scratch.
Portal application URL
This is the URL used to run the application. The application is made up of individual portlets. These can be MDA (model-driven architecture) portlets, AFL portlets, and Remote portlets.
The URL to access the entire application is structured as: <serverRoot>/ui/portal/<portalName>?theme=<themeName>
where:serverRoot is the host and context root of the server (for example, http://localhost:7080/training). This is defined in your environment file as the httpURL.
/ui/portal is the endpoint to run portal applications. This endpoint, without a portalName, runs the default portal (currently the first one alphabetically).
<portalName> optionally specifies the name of the portal application you want to run. The portal name of CRM for Finance is .mda:Contact
?theme=<themeName> optionally sets the theme. If not set, the default theme is used. You can also specify the theme in the environment file as theme="<themeName>" in the server element. In the training environment, the theme is specified as training. For more information on themes, see UX Themes and CSS.
MDA portlet URL
MDA portlets are defined in the model using portlet and layout elements. At times, you may want to to view them on their own for testing and development. They may be accessed at: <serverRoot>/ui/portlet/<portletName>?<contextName>=<contextValue> where:
serverRoot is the host and context root of the server (for example, http://localhost:7080/training). This is defined in your environment file.
/ui/portlet is the endpoint for running and testing individual portlets.
<portletlName> is the name of the portlet as defined in your model (for example, mda:EntityNavigator).
?<contextName>=<contextValue> sets the context variable that the portlet may need. When the portlet is hosted in the application (or portal server), this value is provided by the context bus. When testing, you can manually provide a value as a querystring parameter.
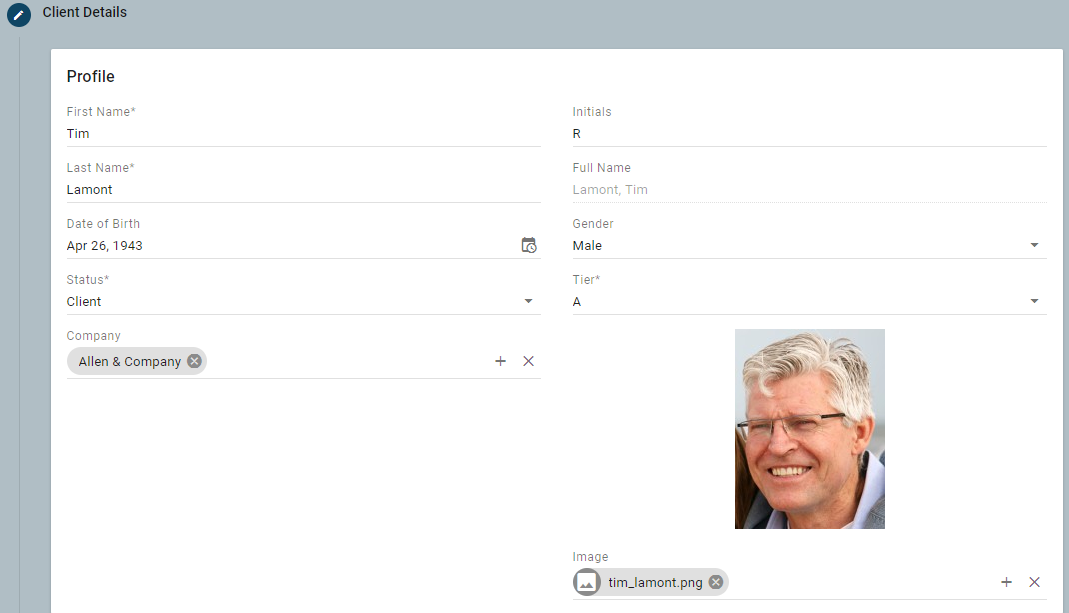
Substitute the OID for Tim Lamont that you got from the API URL, into this example URL:
http://localhost:7080/training/ui/portlet/mda:EntityDashboard?EntityId=10660...replace.me...23350D0
A banner similar to the following should display:

AFL portlet URL
AFL portlets are defined with AFL javascript libraries/modules and are placed in the model's mod/app folder. They may be accessed at <serverRoot>/ui/<portletName> where:
serverRoot is the host and context root of the server (for example, http://localhost:7080/training). This is defined in your environment file./ui/ is the endpoint for AFL portlets.portletName is the name of the AFL module (the filename without the JS extension).
Example
All of the demo AFL portlets are loaded in the training model. You should be able to access the following examples:
- The radio button control demo - http://localhost:7080/training/ui/radio
- The range control demo - http://localhost:7080/training/ui/range
- The demo app - http://localhost:7080/training/ui/demo
Administration URL
<serverRoot>/Admin.html
Load the sample data and work with user permissions.
If you are already logged in as wm1 in your browser and you try to open NexJ Admin Console, you may get an insufficient privileges message (wm1 is cached in your browser). To log in as another user in Chrome, open an incognito browser. Navigate to NexJ Admin Console and use user: nexjsa, password: nexj. This also works if you are testing with multiple different users.
Example:
http://localhost:7080/training/Admin.html
CPM URL
You can access a sample CPM process at http://localhost:7080/training/ui/bp?mode=bind.
Scripting
During application development, you may need to implement some business logic with scripting. Scripting is a combination of the scripting language that expresses the logic and the data structures on which it works. To learn more about the scripting language capabilities, see the Scheme Library Reference in NexJ Studio Help. Script is used in many places; from validation in classes to the definition of CPM forms, from class methods and calculated attributes to UX calculations and behaviours. The structures vary; class structures in the business model, simple transfer objects in the integration layer, and views in the UX. The following are a few important data structures to know when scripting.
Paths
Use paths to navigate the business model and to access the content you want to include in your UI or report. Start a path from a particular point of view, for example, a class in the business model, or a view in the UI (that can also be bound to a business model class). The following class diagram shows examples of paths between classes (also known as associations), and are represented by the connecting lines. For example, one path shows how a
Person
class can have multiple addresses that have multiple address types (for example, home address, business address, and so on). The diagram also shows that a person can have many telcoms that each have types.
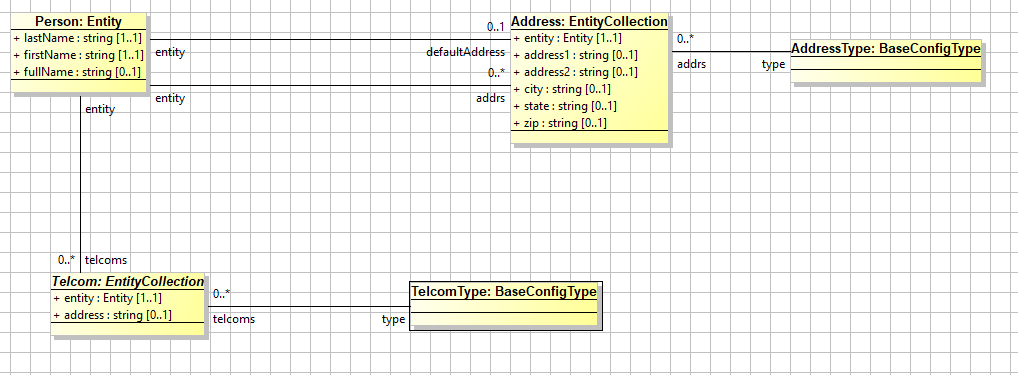
Primitive Attribute: an attribute of an Object Instance that refers to a primitive value (one of string, integer, date, boolean, and so on). Typically, primitive attributes are stored right on the object.
Complex Attribute (or Association Attribute): an attribute that refers to another object. Think of this as a foreign key in database terminology.
In the above case, if there is a Person object, we can display some of its primitive attributes as (myPerson'lastName) or (myPerson'fullName) in Scheme or as myPerson.lastName or myPerson.fullName in JavaScript. To find the type of the default address for the person (which is a primitive attribute name, of complex attribute type, of a complex attribute defaultAddress), you would use (((myPerson'defaultAddress)'type)'name) in Scheme or myPerson.defaultAddress.type.name in JavaScript. We will revisit these examples in the following discussions.
Attribute lists
Attribute lists are used in selecting the attributes to return in a request in script. Attribute lists are a form of path. Always start from the perspective of the Class being read. For example, if reading a Person object, you might want some attributes with a structure like ' (firstName lastName fullName (addrs city state zip (type name)). Here, we ask for the primitive attributes firstName and lastName and the calculated attribute fullName. We then traverse from the Person to the addrs association (addrs is of type Address) to get the primitive attributes city, state, and zip for each address. Finally, traverse from each address to its type name (another association). This is discussed more in UX Fundamentals and Business Model Fundamentals.
Association paths
Association paths are related to Attribute lists, but are used in more places. These are typically where clauses and scripting expressions that start from the currently selected instance (for example, Person, Opportunity, Account, and so on) and traverse to a piece of associated data. Often, but not always, the starting point (the current instance) in these paths is referred to as @, for example, @ defaultAddress city. For instance, in a UX control's value, you can ignore the @ and just enter value="defaultAddress city".
View paths
View paths connect the UX and the business model. Sometimes, to access a piece of data, you need to start with UI components (views) and navigate through them into the underlying model and beyond.
For example, somePortal someLayoutRef someGridSelection defaultAddress city.
Where clauses
Requesting data from the business model is more than just stating which attributes you are interested in. A key part of working with the business model, UX, reporting, or processes, is selecting or filtering the information to get the exact objects (read "instances") you need. An example of a where clause is '(= (@ defaultAddress city) "Milan"). Here, we look for all instances of Person with a defaultAddress containing the city of Milan.
The @ symbol
The @ symbol in where clauses typically refers to the current instance. It is often equivalent to 'this'. Some good background information about the @ symbol can be found in this article. When writing script in UX in a layout or portlet, the @ sign refers to the controller and its API.
The quasiquote
The quasiquote uses the grave accent symbol `, which is located on the same key as the tilde ~ at the top left of English keyboards. It is also the Alt-096 key. It allows you to substitute values into an otherwise static symbol by using the quasiquote up front and then escaping your variable values with a comma. The following code example uses the quasiquote to substitute the value of the first variable, "Joe", into a where clause.
(define frst "Joe")
`(= (@ firstName) ,frst)
TransferObjects
Start up your server and try the following example:
(define psn (Person'read () '(and (= (@ lastName) "Lamont") (= (@ firstName) "Tim")) () () () ()))
Notice the structure that is returned. It is called a TransferObject. In a TransferObject's header, you will see a :class, :oid, and :event. This structure is used to represent most objects in the server, including classes, integration messages, rpc structures, and more. This makes for some interesting possibilities in interoperability. After running the script above if you run (psn':oid) you will get something like #<[(oid #zE4C8CD2FD0AB4F529DBDD7FED5F5CE88)]>
Try and run some examples found in this article.
Transfer objects and instance collections
Transfer objects are very important, so we will investigate a bit further. To create a TransferObject in memory, use the message function, as shown in the following code:
(define msg
   (message
      (: part1 "part1value")
      (: part2 "part2value")
      (: part3 (message (: subpart1 "subpart1value") (: subpart2 "subpart2value")))
   )
)
You can then refer to its parts with statements like (msg'part1).
If you read instances, as done above with Tim Lamont in the psn variable, you get a collection of Instances. These are very similar to simple TransferObjects, but are also associated with the create, read, update, delete object lifecycle. Underneath all that, there are simple TransferObjects whose properties can be set with the following code:
; get
(msg'part1)
;"part1"


;set
(msg'part1 "newValue")
A TransferObject's class and oid can be inspected as the :class and :oid parts.
(define msg
   (message
      (: part1 "part1value")
      (: part2 "part2value")
      (: part3 (message (: subpart1 "subpart1value") (: subpart2 "subpart2value")))
   )
)

(msg':class "MyClass")
(msg':oid (oid #z123))

msg
OIDs
Each instance of a class has an object identifier (OID). It is the unique internal name for the object and is represented as (oid #z00000000000010008000BEEF0000000C). OIDs are often automatically generated by the system, but if you need to work with one, you can use various functions. The following code shows some examples:
(define id (oid (guid))) ; the guid function generates a random globally unique id
(define sid (oid->string id))
(string->oid sid)

(define mpid (oid "I" "am" "a" "guid" 2)) ; a multi-part oid
(format "The second part is '{0}'." (mpid'getValue 1)) ; accessing internal parts of oids
You will frequently see and work with data structures like these.