
Importing contacts
You can import contacts into NexJ CRM.
Import data is typically prepared by a business administrator, who loads it into a staging area in the system. Advisors can then review and correct the information, check to see if it matches any existing contacts, and complete the import.
Before business administrators can import contact records from outside data sources onto a staging area in NexJ CRM, they must prepare the information for import.
Creating import packages
To import contacts into your existing database, you must create an import package, which contains the contact data that you want to import into NexJ CRM.
An import package is a ZIP archive that contains the following files:
- One or more CSV files containing the contacts data that you want to import into NexJ CRM.
- A target definition file that you generate using NexJ CRM, and that is specific to the user who will be importing the information.
- One mapping file for each CSV file. You create the mapping files using the NexJ Data Mapping Tool. The mapping file allows NexJ CRM to map your CSV file columns to contact attributes in your database.
The creation of an import package involves the following steps:
- Creating import package CSV files. For more information see, Creating import package CSV files.
- Creating target definition files. For more information see, Creating target definition files.
Creating mapping files and generating import packages. For more information, see Creating mapping files and generating import packages.
Creating import package CSV files
Your legacy contacts data must be in CSV format before it can be imported into NexJ CRM. Depending on your legacy contact-management system, you might have one large CSV file containing all the data or several CSV files, one CSV file for each table you export. The first row in each file must be a header row, which contains the names of the columns.
Using your old contact management system, export the data from existing legacy system into CSV format. The exact directions for creating the CSV files vary depending on your legacy contact-management system.
Before you generate CSV files, verify that you have an empty directory for storing these files on your file system and note its location.
Example CSV file for importing contacts
Use a format similar to the one shown in the following CSV file: CONTACT.csv
Creating target definition files
When you are importing contacts, and before you can create mapping files that match your data to the target data stored in NexJ CRM, you need to create a definition file that describes the structure of the contact data.
To create a target definition file:
- Navigate to the Import workspace and click the More Actions button
 in the data table toolbar.
 By default, your user name is specified in the Create Target Definition File dialog. Because categories, custom fields, and user fields in NexJ CRM are user-specific, and if you are preparing the target definition file for a different user, specify the user's name by clicking the Select button
 and selecting a different user.The specified user must have ImportProcessView and ImportProcessManage privileges.
Creating mapping files and generating import packages
Once you have obtained a set of CSV files containing the contacts data you want to import and the target definition file, you must create mapping files. The mapping files allow NexJ CRM to load contacts data into the appropriate columns in the database. You need one field mapping file for each CSV file and one file mapping file that lists all the CSV and XML files included in the package.
Use the NexJ Data Mapping Tool to generate the file mapping and field mapping files and to create the import package containing all the files used by NexJ CRM during the import process.
To create the mapping files using the NexJ Data Mapping Tool:
- Open the NexJ Data Mapping Tool.
- Click Create/Modify Mapping.
- In the dialog that appears, browse to find the following information:
Data Location
The directory where the CSV files containing your data are stored.
Target Definition File
The definition file you generated in NexJ CRM using the Contact Import > Generate Definition File command.
Mapping Template
If you have been provided with a mapping template file or if you are continuing work on an existing mapping file, specify the name and location of the file. Otherwise, leave this field blank. To ensure the mapping template file appears in the drop-down list, place the file in the directory specified in the Data Location field. Otherwise, use the Browse button to navigate to the mapping template location. - Click OK. All CSV files you generated are listed in the Source Files in Data Location column and all possible target field categories are listed in the Type of Data in File column. The number of columns in each CSV file is listed in the Mapping Fields column.
- For each CSV file, select the target field category in the Type of Data in File drop-down. If you only have one source file or if there is no likely equivalence between a CSV file and any target category, assign the All field category. Assigning a field category limits which fields are displayed when you are assigning a source field to a target field. After you have selected the target field category, the Source Field drop-downs and Target Field names display.
- Specify how null fields are treated. By default, any null field is converted into a null field. If you want to specify a different value for null fields, select Use Null Converter. The Null Converter column appears below. You can specify the default value which will be used for all null fields in the Value field and click the Apply Null Converter button. Otherwise, you can specify the value to be used for each field in the Null Converter column. To remove the default value from all fields, click the Erase Null Converter button.
Using the drop-down lists, map a column name from the Source Fields column to a field in the Target Fields column. When a source column has been assigned to a target field, a green check mark appears next to the column name in the drop-down list. In addition, the plug icon next to the field name appears plugged in. For details, see Mapping one-to-one fields and Mapping many-to-one fields.
The drop-down lists contain the column name as well as a sample value for that column. The sample value is populated with an available value from within the first 1,000 records in the import package.For any field in your legacy data that has no equivalent in the NexJ CRM data structure, create a new User Field subcollection attribute. Assign the source field to this new User Field. To unmap a source field, click the Unmap Field button. You do not need to map every column in a source file to a target field. However, any columns not mapped to a field will not be imported into NexJ CRM.
- If you want to save the mapping information, either to share it with other users or to continue working later, click Save Mapping Template. In the Create Mapping Template dialog, specify where you want to save the mapping file and click Save.
- When you have completed all mapping work, click Generate Import Package. In the Create Import Package dialog, specify where you want to save the package and click Save.
After creating your import package, verify its size and contents.
The import package must be less than 10MB. If it is greater than 10MB, you will not be able to import the package. If this is the case, you should split the data into multiple data sets and rerun the package generation for each data set separately.
The generated package should contain the following files:
- One or more CSV files containing your legacy data.
One file mappings file called
fileMappings.xml. It lists all the CSV files containing the legacy data and the related XML field mapping files.You can specify the encoding character set to be used for the import process in
fileMappings.xmlby adding theencodingTypeproperty to the source code:<mapping encodingType="<characterSet>"><fileMappings>...</mapping>where
<characterSet>is the value you provide for the encoding character set. For example, specify CP-1252 to indicate that the import package data is using the CP-1252 encoding. By default, the UFT-8 encoding is used. The character set for the generated package must match the character set you specified.- One field mapping file for each CSV file. The mapping file names are based on the names of the CSV files. For example, if the CSV file is called
TBL_CONTACT.csv, then the mapping file is calledTBL_CONTACT_mappings.xml.
Mapping one-to-one fields
Most columns in the source CSV files are associated with a single field in NexJ CRM. Mapping a source field to a target field depends on the format of the target field.
- For fields in string format, choose whether text in Rich Text Format (RTF) should be converted to plain text. NexJ CRM currently supports only plain text in all fields. In the Text Converter field, if you select rtf2plain, then all RTF formatting codes will be removed during import. Otherwise, the RTF formatting codes will be included in the field.
- For fields in date format, specify the date format in the Format field. Choose one of the formats available in the drop-down list or enter a new format by typing it in the field.
- For fields in the timestamp (date and time) format, specify the format in the Format field. Choose one of the formats available in the drop-down list or enter a new format by typing it in the field. Specify the location for determining the time zone in the Unit field.
- For fields in the Boolean format, the complete list of values in the column appears below the source field name. For each possible value, specify whether it should be imported as
Trueor asFalse. - For other fields with a limited set of possible values, such as Activity Type or Gender, the complete list of values in the column appears below the source field name. For each possible source field value, specify the equivalent target field value.
Mapping many-to-one fields
Several fields in NexJ CRM are actually subcollections of information.
For example, your legacy contact information system might have the following fields:
- Business Address Line 1
- Business Address Line 2
- Business City
- Business Zip Code
- Home Address Line 1
- Home Address Line 2
- Home City
- Home Zip Code
- Vacation Address Line 1
- Vacation Address Line 2
- Vacation City
- Vacation Zip Code
However, in NexJ CRM, there are only fields for Address Line 1, Address Line 2, City, and Zip Code. You can create as many addresses as required. Each complete address becomes a subcollection of fields. For each address, you would indicate whether it is a business, home, or vacation address.
Addresses, Telcoms, Categories, Custom Fields, and User Fields are all subcollections. These subcollections have a Copy Row button and a Delete Row button in the Target Field column. Rather than a one-to-one correspondence between a column in a source CSV file and a field in the target definition file, you can create any number of subcollections for each of these fields.
To map a column to a subcollection:
- Select a source field (such as BUSINESSPHONE) for the target subcollection. For example, Telcom.
- Select a target field name in the Sub Collection Attribute column. For example, Communication Value.
- Select the Type Name to indicate which subcollection the field belongs to. For example, Business.
- Depending on the Sub Collection Attribute value, specify the Type/Text Converter details.
- If you want to add another field to the subcollection or if you want to add another subcollection, click the Copy Row button.
Importing packages
Once you have obtained an import package containing the CSV files and mapping files, import it to the staging server using the Import workspace.
An example of the Import workspace is shown in the following screen capture:
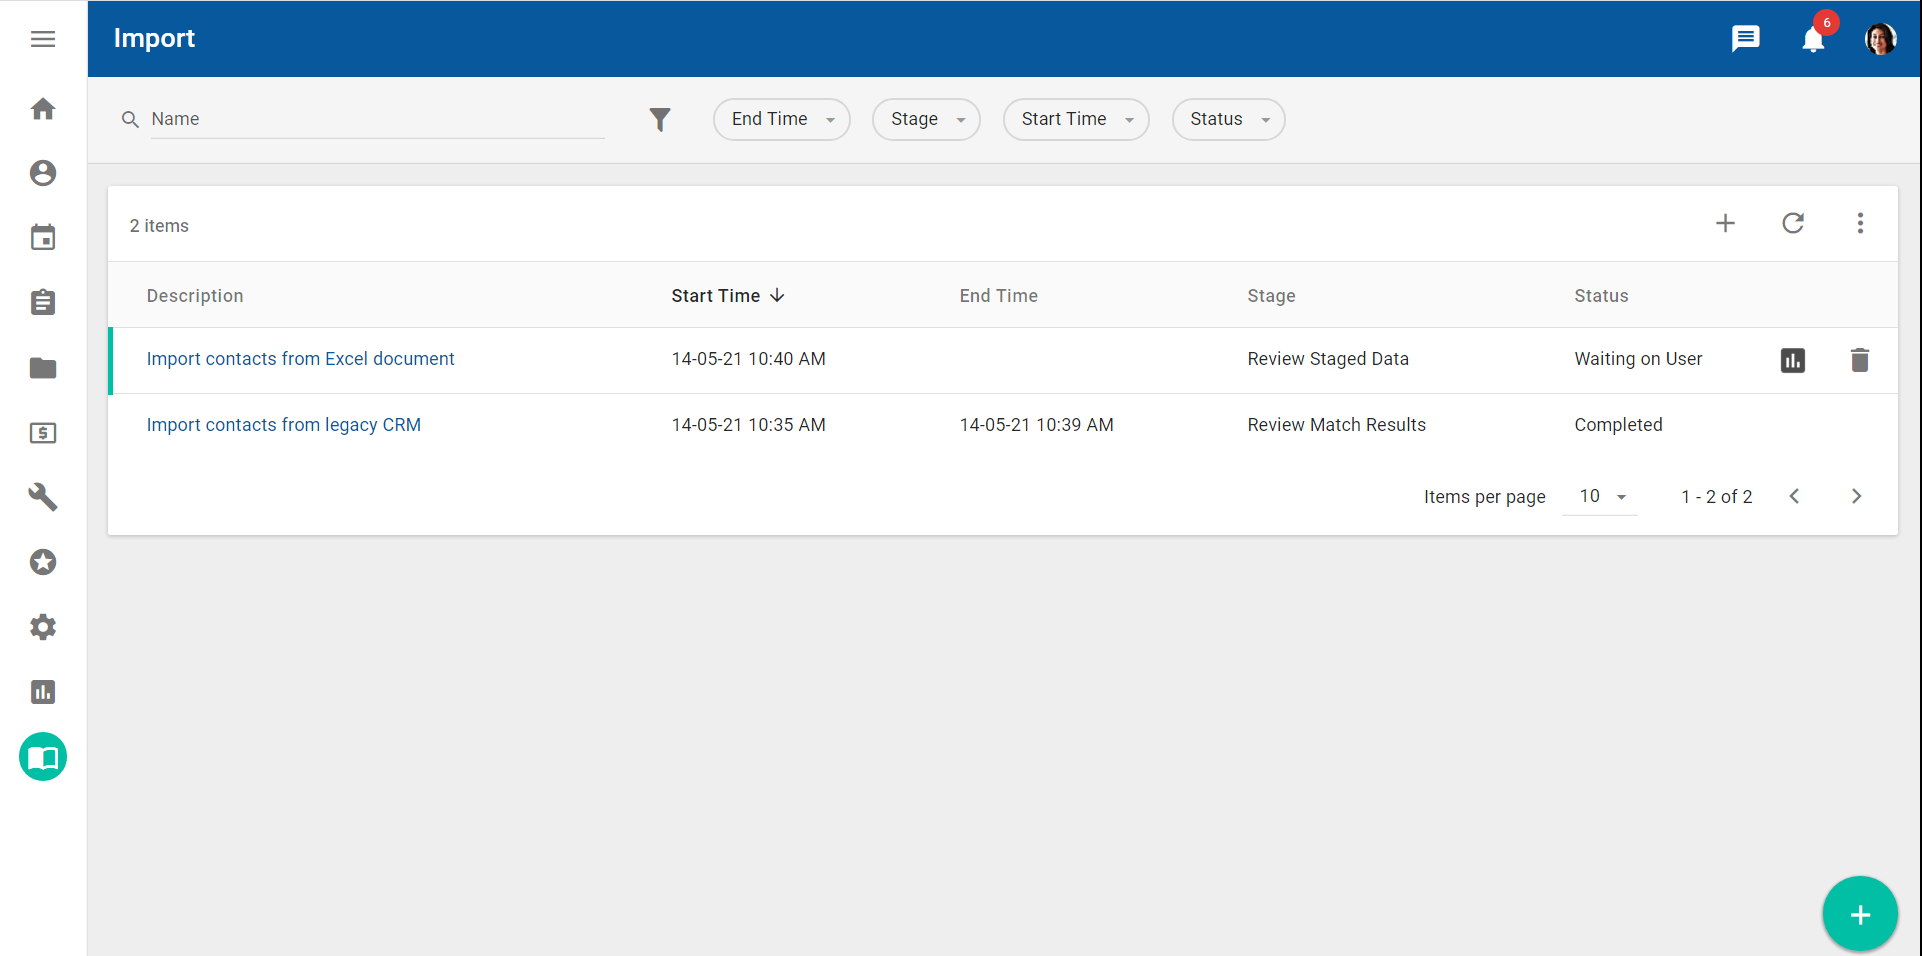
To import the package on the Import workspace:
- Navigate to the Import workspace and click the Import button in the Import data table toolbar.
- In the Import Package field, click the Select button , browse to find the required import package on your system, and click Open.
If the import job fails, the status of the import job changes to "Failed" in the Import data table.
To see the error log for a failed job, select the job in the data table on the Import workspace, click the View reports button ![]() , select View Error Report, and open the report or save it locally.
, select View Error Report, and open the report or save it locally.
Searching for import jobs and filtering the data table
To find your import job in the Import data table on the Import workspace, you can enter your job's name in the search field or use the following filter chips that are provided by NexJ:
- End Time - The end date and time for your job.
- Import Type - The type of import (for example, contact import or lead import).
- Stage - The stage for your job (for example, Review Match Results).
- Start Time - The start date and time for your job.
- Status - The status of your job (for example, Failed, Completed, or Waiting on User).
You can also add additional filter chips. For more information about searching for and filtering records, see Searching and filtering in NexJ CRM.
Deleting import jobs
You can delete an import job before it is completed from the Import workspace and if it has one of the following statuses: Failed, Completed, or Waiting on User. Select the job that you want to delete and click the Delete button ![]() .
.
The following table describes what happens when you delete an import a different stages:
| Import into Staging | All data from the import package is deleted. |
| Review Staged Data | All data from the import package is deleted. |
| Review Match Results | All unprocessed records are deleted and will not be processed further. Any processed records remain in your database. |
Reviewing imported data
Business administrators and end users can review the imported data to verify that all data is provided and accurate, and then complete the import. For more information about this process, see Import contacts and leads data.