
Service level management
Use the Service Level Management feature to define and track the level of support that you provide to your clients, based on touches and touch types.
- A touch type is a form of communication or interaction with a contact that can be scheduled to build a relationship with the contact.
- A touch is an interaction of the specified type with an individual client. For each client, you determine how often to contact them and review their accounts and create a service model accordingly. The level of support is usually based on your firm's best practices or customer loyalty programs.
Service models are created by assigning service levels to contacts. Tiers can be configured to map to a service level such that setting the tier on a contact will also set their service level. For example, tier "A" contacts may be given the "Gold" service level by default. This mapping is configured by your administrator using NexJ Admin Console; however, service models can be customized at the contact level by changing touch type intervals.
The Service Level Management workspace ![]() provides a list of all touches by touch type, which can be further filtered by contact, service level, tier, period, and so on. Use this workspace to generate the SLM Touches report.
provides a list of all touches by touch type, which can be further filtered by contact, service level, tier, period, and so on. Use this workspace to generate the SLM Touches report.
You can also access service level management information on the Contacts workspace ![]() . Use the contact data table to:
. Use the contact data table to:
- Search for contacts based on their Service Level.
- Update the service level for multiple contacts at the same time.
- Generate the SLM Touches report.
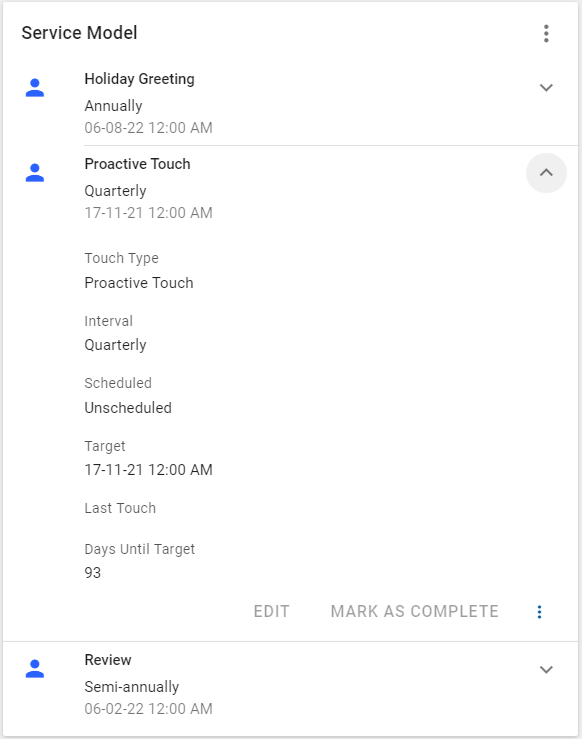
In Summary tab in the detail view for an individual contact, use the Service Model card to:
- View all the touch types that apply to the contact, including their frequency, target date, and last time they occured.
- Schedule an activity for each touch type.
- Reset the touch target date for a touch type.
- Update activity details for the last time that touch occured.
- Change or reset the interval for each touch type.
- Reset the intervals for all touch types.
After an activity has been scheduled for a touch, you can also use Service Model card to edit the activity details or mark the activity as complete.
For more information about the predefined SLM Touches Report, see SLM Touches Report.
In addition to the SLM Touches report, you can also generate additional reports related to service level management on the Reports workspace ![]() . Generate additional reports based on the Touch Activities subject area or the Contact Touches subject area. For more information about ad hoc reports, see .Ad hoc reports v9.8.
. Generate additional reports based on the Touch Activities subject area or the Contact Touches subject area. For more information about ad hoc reports, see .Ad hoc reports v9.8.
Service level management process
NexJ Service Level Management functionality allows firms to segment their clients by any criteria, and design programs that address the unique service needs of each segment. Users can apply service models and define frequencies to manage key client activities based on defined service levels and monitor their progress in real time within these segments.
The following diagram shows the high-level workflow for service level management.

The Service Level Management process consists of the following major steps:
- Apply a service level to a contact, based on one of the following: their tier, by default; individually for each contact; in batch based on any available search criteria. This generates a list of touches with touch target dates.
- Schedule a touch by creating an activity to be associated with that touch type. If necessary, can defer a touch by changing its target date.
- Complete the touch by completing its associated activity. The next target date is then set for the touch type.
You can monitor touches using the Service Level Management worspace and the SLM Touches Report.
Service Level Management workspace
The Service Level Management workspace displays all unscheduled, scheduled, deferred, or completed touches, for any contact for whom you are on the coverage team. This information can be helpful when planning future meetings with contacts, and should be checked frequently to ensure that you stay on schedule with your service level commitments.
Touches are displayed by touch type, and can be further filtered by contact name, period, service level, tier, and touch status.
For each touch, you can do the following:
If the touch status is Unscheduled, select the Schedule Touch button
 to create an activity associated with this touch. Select the activity type you want to create and complete the New Schedule Item or New Task dialog as required.
 - If the touch status is Unscheduled, select the Set Touch Target button
 to defer the touch target date to a later date.
 - If the touch status is Scheduled, click the overflow menu button
 and select Touch Properties to update the activity information for this touch.
 If the last touch date is specified, click the overflow menu button
and select Last Touch Properties to update the activity information for the previous touch of this type.
To view or edit the activity associated with a scheduled or completed touch, click the link in the Touch Status column in the data table.
Managing service models
A service model is a collection of touch types assigned to a contact. The service model is based on the contact's service level by default, but can also be customized for an individual contact.
The Service Model card, located in a contact's Summary tab in the Contacts workspace, shows which touch types are associated with the selected contact. It also contains the interval, next scheduled touch, next target date, and last touch date for each touch type.
When the tier or service level is updated for a contact, any intervals that were previously set to "Prevent automatic updates" for the contact remain unchanged.
Modifying a contact's tier or service level
You can modify the tier or service level for a contact. Modifying the tier will also update the service level if your administrator has mapped tiers to service levels.
To modify a contact's tier or service level, navigate to the contact's profile. In the banner, click the menu button ![]() and select
and select ![]() Edit. In the Edit dialog that appears, update one or both of the following fields and click OK to save your changes.
Edit. In the Edit dialog that appears, update one or both of the following fields and click OK to save your changes.
| Field name | Description | Required field |
|---|---|---|
| Service Level | A service level is a set of touches that occur with a contact at a predefined interval or frequency. For example, a Gold service level can specify quarterly reviews and monthly interactions with the contact. When a user applies the Gold service level to a contact, the contact's service model includes the quarterly review and monthly interactions with the contact. Info You can clear service levels by setting the service level of a contact to None. | Yes |
| Tier | A tier is a property assigned to contacts or companies to determine what kind of service plan they will receive. Administrators can map tiers to service levels in the NexJ Admin Console so selecting a tier can also change the value in the Service Level field. The Tier field does not display in the Detail tab if regionalized tier functionality has been enabled. | No |
Batch updating contact tiers
If you want to update the tier for several contacts at once, you may do so in a batch update. Modifying the tier will also update the service level for contacts if your administrator has mapped tiers to service levels.
To batch update the tier of a set of contacts:
- On the top of the data table, click the menu button, select

 Tier, and then select a tier.
The tiers are updated for the selected contacts.
Batch updating contact service levels
If you want to update the service level for several contacts at once, you may do so in a batch update.
Info
Changes to service levels will not be applied to any existing contact that already has the service level you are modifying.
To batch update the service level for a set of contacts:
- On the top of the data table, click the menu button, select
 Service Level, and then select a service level.
 - After updating all touch type details as required, click OK in the Service Level Properties dialog.
- In the confirmation dialog that opens, confirm that the number of contacts that will be updated is correct and click OK.
The service levels are updated for the selected contacts that do not already have this service level.
Managing touches
You can manage individual touches from the Service Level Management workspace ![]() or the Service Model card on the Summary tab in the Contacts workspace
or the Service Model card on the Summary tab in the Contacts workspace ![]() .
.
Scheduling touches
If the touch status is Unscheduled, you can schedule a touch by creating an activity associated with the touch type.
For example, your client Tim Lamont's service model might require that you have a proactive touch every three months. When the service model is assigned to Tim, it creates a touch with Proactive Touch type, Unscheduled status, Quarterly interval, and Touch Target Date in three months.
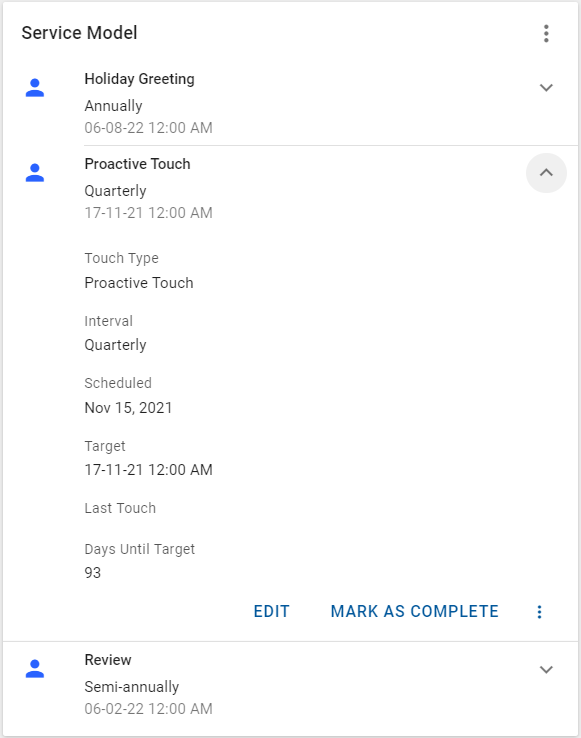
When you schedule a touch, you create a new schedule item or new task of the same touch type for the same contact. For example, if you create an activity with Proactive Touch touch type, the status of the touch changes to Scheduled and the Scheduled field indicates when the activity is planned for.
You can schedule touches from two locations in NexJ CRM:
- To schedule a touch from the Service Level Management workspace
 , select the Schedule Touch button , choose the activity type you want to create, and then complete the New Schedule Item or New Task dialog as required.
 - To schedule a touch from the Service Model card on the Summary tab in the Contacts workspace
 , expand the touch type tile. From the overflow menu, select Schedule Touch, choose the activity type you want to create, and then complete the New Schedule Item or New Task dialog as required.
For more information about creating new activities, see .Schedule v9.8 and .Tasks v9.8.
Deferring touch targets
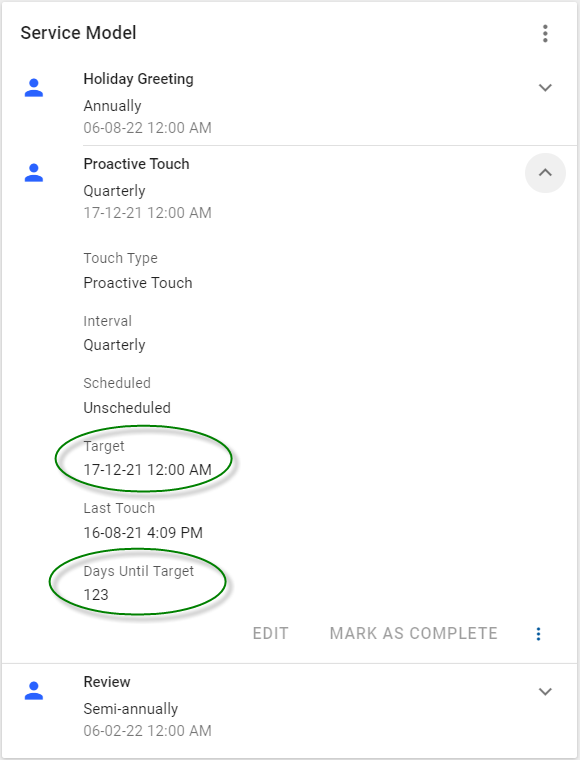
There may be situations where you are unable to complete a touch by the target date. In these cases you can set a touch target to a later date.
For example, your client Tim Lamont's service model might require that you have a proactive touch every three months. When a proactive touch for this quarter is complete, the service model creates a new touch with Proactive Touch type, Unscheduled status, Quarterly interval, and Touch Target Date in three months.

However, you might find out that the contact will be unavailable that month, because he is on vacation. In this case, you may want to defer the touch target date until the contact is available, the following month. When you defer the touch, the touch target date changes as required and the touch status changes to Deferred.
You can set a touch target date from either the Service Level Management workspace ![]() or the Service Model card on the Summary tab in the Contacts workspace
or the Service Model card on the Summary tab in the Contacts workspace ![]() .
.
- To set a new touch target date from the Service Level Management workspace, select the Set Touch Target button . In the Set Touch Target dialog that appears, specify a date in the Next Touch Target field and click OK.
- To set a new touch target date from the Service Model card on the Summary tab in the Contacts workspace, expand the touch type tile. From the overflow menu, select Set Touch Target. In the Set Touch Target dialog that appears, specify a date in the Next Touch Target field and click OK.
Reviewing and updating last touch information
Info
Touches must be completed before they can be counted towards the service model and considered the "last touch".
If a last touch of the specified touch type exists for a contact, you can view or edit its properties from either the Service Level Management workspace ![]() or the Service Model card on the Summary tab in the Contacts workspace
or the Service Model card on the Summary tab in the Contacts workspace ![]() .
.
- To review a contact's last touch of the specified type from the Service Level Management workspace, open the overflow menu and select Last Touch Properties. In the Edit Schedule Item or Edit Task dialog that appears, review or update the activity information and click OK.
For more information about editing activities, see .Schedule v9.8 and .Tasks v9.8.
Reviewing and updating scheduled or completed touch properties
You can view or edit the properties of a scheduled touch from either the Service Level Management workspace ![]() or the Service Model card on the Summary tab in the Contacts workspace
or the Service Model card on the Summary tab in the Contacts workspace ![]() .
.
- To review a scheduled or completed touch from the Service Level Management workspace , open the overflow menu and select Touch Properties. In the Edit Schedule Item or Edit Task dialog that appears, review or update the activity information and click OK.
For more information about editing activities, see .Schedule v9.8 and .Tasks v9.8.
Completing touches
After the touch is completed, the last touch date and the touch target date for the touch type are updated. You can see the updated dates on the Service Level Management workspace ![]() and the Service Model card on the Summary tab in the Contacts workspace
and the Service Model card on the Summary tab in the Contacts workspace ![]() .
.
For schedule items, the last touch date is the end date for the item. For tasks, the last touch date is the date when they are marked complete.
The next touch target date is generated based on the interval defined for the touch type.
To complete the touch from the Service Model card on the Summary tab in the Contacts workspace, expand the touch type tile and click Mark as Complete. The touch status changed to Unscheduled and the last touch date is updated.
For more information about editing activities, see .Schedule v9.8 and .Tasks v9.8.
Updating touch type intervals
Intervals determine the next touch target date. They are specified for each touch type as part of the service model definition for the service level. You can update the interval for a touch type for an individual contact from the Service Model card on the Summary tab on the Contacts workspace.
To update the interval for a touch type, expand the touch type tile. From the overflow menu, select Update Interval. In the Touch Type Interval Properties dialog that appears, specify a frequency in the Interval field and click OK.
Resetting touch type intervals
You can reset the intervals to reflect the service model for the contact's service level.
- To reset the interval for a touch type, expand the touch type tile. From the overflow menu on the tile, select Reset Interval.
- To reset the intervals for all touch types for the contact, open the overflow menu
 on the top of the Service Model card and select Reset all Intervals.