
Using NexJ CRM: An introductory experience
The following information enables you to experience features that are available in NexJ CRM.
Before you try these examples, log in to NexJ CRM as an end user, and select ![]() in the navigation sidebar on the left to open the Contacts workspace, shown in the following screenshot:
in the navigation sidebar on the left to open the Contacts workspace, shown in the following screenshot:
Using data tables
The majority of the workspaces in NexJ CRM contain data tables that display records. You can search for data records or filter a data table using the search and filter functionality that is available on the workspace. When your search returns many records, use the Items per page drop-down or cycle through the pages using the chevron buttons ![]()
![]() at the bottom of the table. These buttons are disabled when no additional records are available.
at the bottom of the table. These buttons are disabled when no additional records are available.
Data tables contain links that enable you to open records or send emails directly from the data table. Using a link to open a record, redirects you to the workspace that contains the record. For example, if you click on a link for a company record in the data table, you will open the details page for the company.
The back arrow button on a details page, takes you to the workspace that contains the record you are viewing.
As the information for a record grows, the record can be associated with records from other workspaces. For example, a company record can be associated with an opportunity record. This information is available from the Opportunities tab for a company record on the Contacts workspace and from the Opportunities workspace.
Using the data table toolbar
From the data table toolbar, you can click the:
- Add button
 and select the type of entity or object that you want to add
- Reports button
 to generate reports
- More Actions
 button and select additional actions (for example, exporting contact records)
Displaying and viewing data table columns
Data table columns vary by workspace and display the most relevant columns by default. You can modify the information that displays in a data table by adding or removing columns. Click the More Actions button![]() in a data table toolbar and select the Select columns option. In the Select columns to display dialog, select checkboxes for the columns you want to add to the data table. To remove columns from a data table, clear the checkboxes. The following image shows the Select columns option.
in a data table toolbar and select the Select columns option. In the Select columns to display dialog, select checkboxes for the columns you want to add to the data table. To remove columns from a data table, clear the checkboxes. The following image shows the Select columns option.

Sorting data tables by columns
You can sort records in a data table in ascending or descending order. When you hover over a header of a column that can be used to sort the records, an arrow displays beside the column header. To sort the records in the data table by a sortable column , click the column header. A sorted column displays a n up or down arrow beside the header to indicate the sort order . To reverse the sort order, click the column header again.
W hen no records are selected, y ou can also use the data table toolbar to sort a table. Click the More Actions button, select Sort by, and select the column you would like to sort by.
Searching for contacts and filtering the contacts data table
Most workspaces and some selection dialogs in NexJ CRM have tools that enable you to search for data records or filter information using predefined filters that are provided by default or filters you have created (user-defined filters).
A filter is a query that displays a list of data records based on specified search criteria. Filters have a rectangular shape and display at the top of a workspace in the search and filter area. When you select a filter, it is highlighted with an accent color and the data table reflects your search criteria. For example, you can select the Companies predefined filter to display company records in a data table.
Filter chips allow you to specify additional search criteria or fields in combination with an existing filter in NexJ CRM. Filter chips have an oval shape and display beside the text search field in the search and filter area. You can select a filter and then use filter chips to create a user-defined filter.
Example 1: Using the search field to find a contact record
For example, to find the contact record for a contact named Tim Lamont:
- Enter
Lamontin the text search field and press Enter. Tim Lamont's contact record displays in the data table.
- To clear the search field, click the Clear button
 .
.
Example 2: Using the search field and filtering using the City filter chip
For example, to create your own filter to find all contacts with Lamont as their last name who are living in Abbotsford:
- Enter
Lamontin the text search field and press Enter. - Select the City filter chip and select equals in the Operator field.
- In the Text value field, select Toronto or type
Toronto.
- Click Save.
The records for contacts living in Toronto display in the data table. - To clear the filter chip, click
 .
.
Example 3: Filtering using the Country and City filter chips
For example, to display the records for all contacts living in Toronto Canada:
The Contacts filter is selected by default.
- Select the Country filter chip, enter
cain the text search field, and select the checkbox for Canada.
- Click Save.
The filter chip now displays Country equals Canada. The Contacts filter displays an asterisk because the filter has been modified.
The records for all contacts that live in Canada display in the data table. - Select the City filter chip, select equals in the Operator field, and enter
Torontoin the Text value field. - Click Save.
The filter chip now displays City equals Toronto.
The records for all contacts that live in Toronto Canada display in the data table. - To clear each filter chip, click
 .
.
Example 4: Selecting filters as favorites
You can select filters that you frequently use and display them automatically on a workspace.
For example, to select the My Contacts filter as a favorite filter:
- Click the Select favorites button
 .
.
- Enter
myin the text search field and select the checkbox for My Contacts.
- Click OK.
The My Contacts filter displays in the search and filter area.
Your favorite filters also display in the Filters and lists page. To open the Filters and lists page, click the Manage filters and lists button ![]() beside the Select favorites button.
beside the Select favorites button.
Editing a contact
You can modify a contact's information.
Example 1: Modifying address information for a contact
For example, to modify the address information for Dionne Lamont:
Enter
Lamontin the text search field and press Enter.Click her name in the data table.
Select the Detail tab.
On the Addresses card, click the Add button
, select Vacation and fill in the required address information. 
Click OK.
The address displays on the Addresses card.
Example 2: Adding a custom field for a contact
For example, to add a custom field for an accountant to the contact record for Dionne Lamont:
- Enter
Lamontin the text search field and press Enter. - Click her name in the data table.
- Select the Detail tab.
- On the Custom Fields card, click the Add button
 .
. - Select the radio button for Accountant.

- Click OK.
- In the New Accountant dialog, type
Ahin the Value field and select Ahmed, Zineea. - Click OK.
The Accountant field information displays on the Custom Fields card. To perform actions on the Accountant field (for example, edit or delete), click the More Actions button.
Example 3: Adding a note for a contact
For example, to add a note for Dionne Lamont:
- Click her name in the data table.
- In the Summary tab, enter a note on the Notes card in the Type new note here field. For example, enter:
My note.
- Click the Save button
 .
.
To modify your note, click the More Actions button ![]() for the note and select Edit.
for the note and select Edit.
Exporting entity data records
You can export data records from the data table on the Contacts workspace. The export runs against either a single record, or against all of the search results in the data table, regardless of which record is selected.
To export data for a single entity, click the entity record row, so that it is highlighted by an accent color line on the left to select it, and verify that the checkbox for the record is cleared. The following image shows the accent color line.
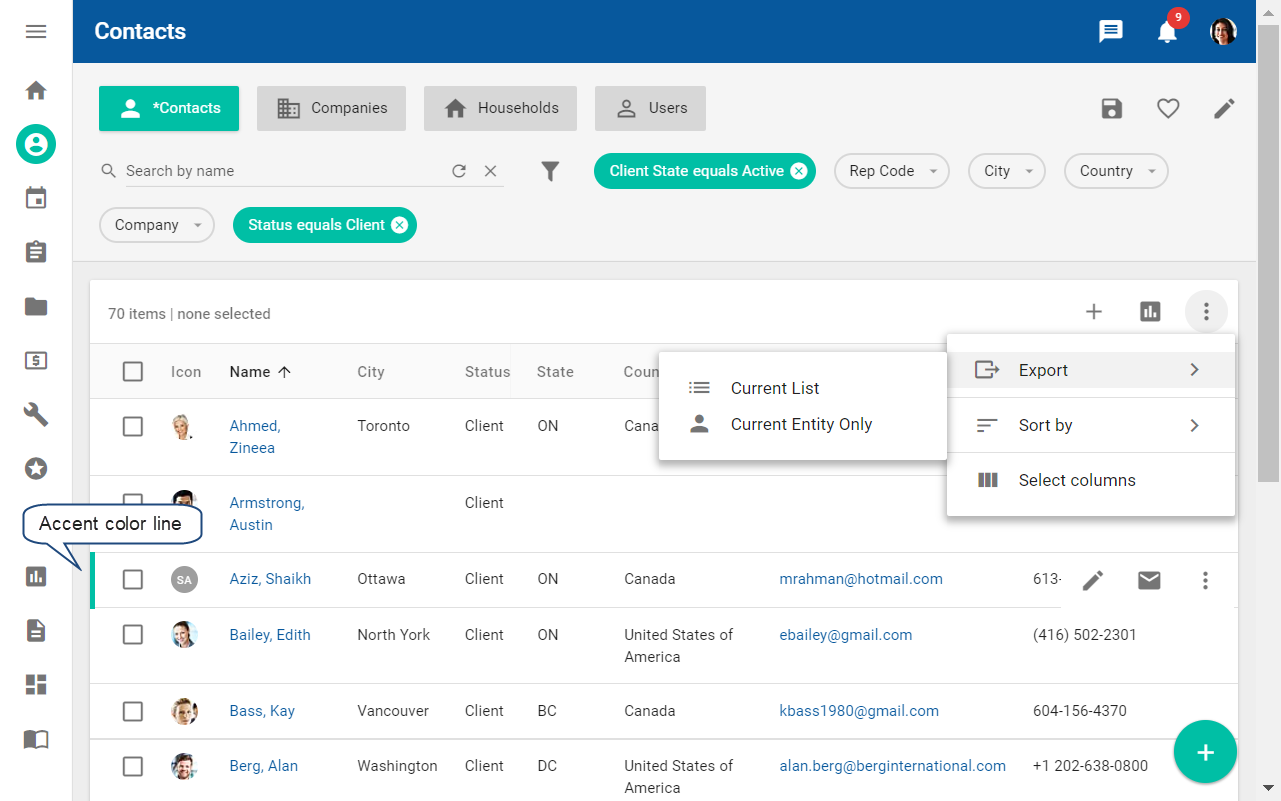
To export data records for multiple entities, filter the data table to contain only the records that you want to export.
Click the More Actions button in the data table toolbar, select Export, and then select one of the following:
- Current List
Exports all the records in the data table to Microsoft Excel. - Current Entity Only
Exports the selected individual record to Microsoft Excel.
Sending an email to a contact
You can send an email to a contact or multiple contacts.
For example, to send an email to Zineea Ahmed:
- Select the checkbox for Zineea Ahmed in the data table.
- Click the Email button in the data table toolbar.
- Enter the following text in the Subject field:
My answers to your questions. - Enter the following text in the body field:
My answers. - Click Send Email.
Sending and saving outgoing emails in Microsoft Outlook
When your NexJ CRM client is synchronized with Microsoft Outlook, and you are replying to an email, you can use Outlook to send your email and save it to NexJ CRM by clicking Send & Save.

Your email is saved to NexJ CRM immediately after you click Send & Save . Depending on how your administrator has configured your email system, if it includes additional functionality before sending (such as encryption or email address validation), it may be possible for you to edit the email between saving it and sending it, or to cancel sending the email. In this case, the email is still saved to NexJ CRM . To ensure the latest version of the email is included in NexJ CRM , select the email in the Sent Items folder and click Save to NexJ CRM .
Creating a task and delegating it to a team member
For example, to create a To Do task from the Home workspace for a contact and delegate it to Cheryl Elms:
Tasks can also be created on the Tasks workspace.
- Click
 in the navigation sidebar to open the Home workspace.
 - On the My Tasks card, click the Add button and select the required task. For example, select To Do.

The For field in the New Task dialog displays the name of the last contact who's details you have viewed. You can delete the existing contact and select a new one if required. - In the Assign To field, perform one of the following actions:
- Enter the name of team member who is also responsible for the record. For example, enter:
Cheryl Elms. - Click the Select button and select the checkbox for Cheryl Elms. Her name displays in the Assign To field.

- Enter the name of team member who is also responsible for the record. For example, enter:
- Click OK.