
Developing CPM forms
Creating and storing forms
Create NexJ Customer Process Management (CPM) forms using the concise, specialized, definition language described in this topic.
Forms are stored as libraries in the Resources layer of your model. Within the library each form is defined as a flow. Each form (or flow) should be defined in its own library, and each flow library must use the following naming convention:
bp:<formname>
Where <formname> is a unique identifier for the form, and composed of all lower-case letters.
Simple forms
A simple form collects information in a single page and single section. A simple form can bind to a single class in the underlying business model. This means that you can use the attributes of the underlying model to provide form values, and for form calculations and validation.
Depending on the process using the form, you can save form information and use it to update underlying model information
Creating a simple form
To illustrate the creation of such a form, assume that you are creating a flow to capture a contact's basic information in your system.
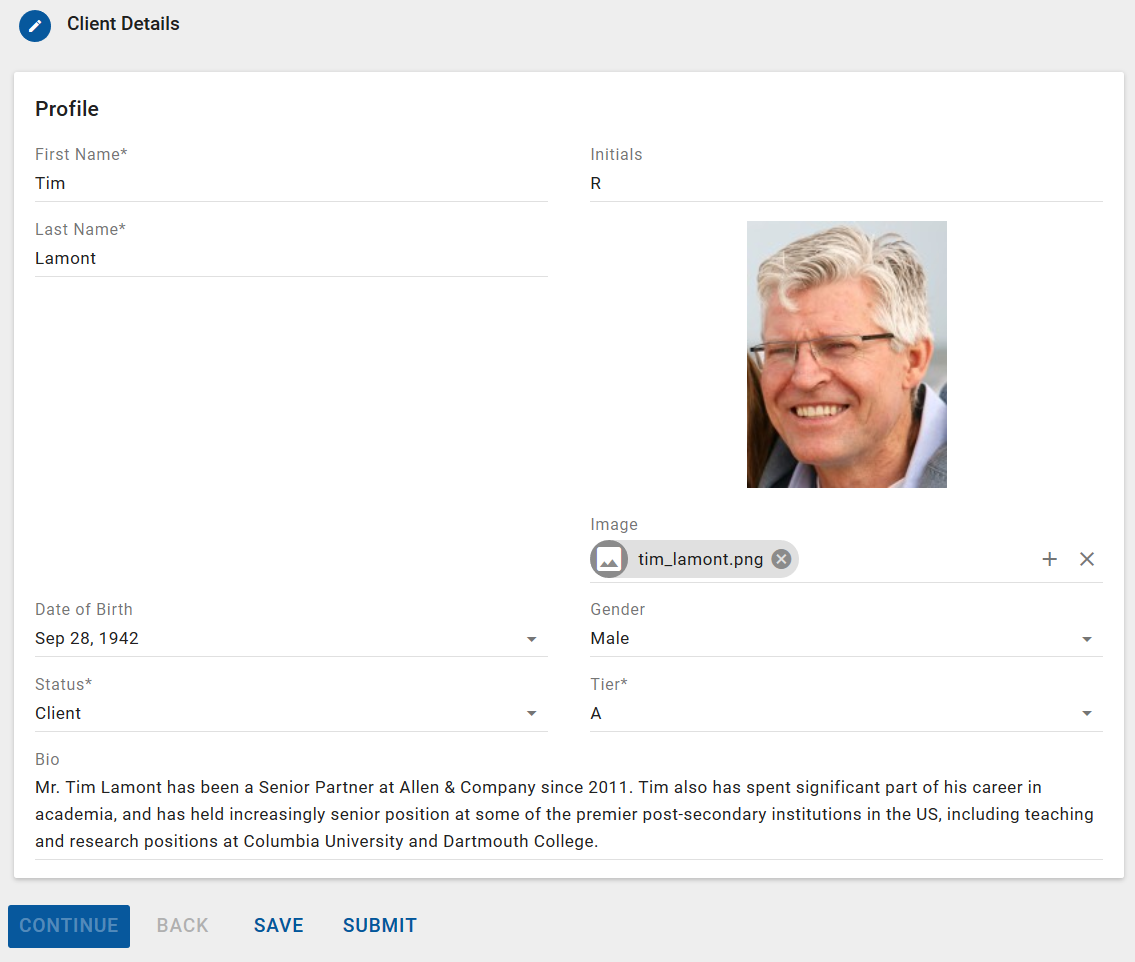
The following example builds such a form. It creates a page with an ID of Client_Details, captioned with the title "Client Details." This page contains a single section labeled Profile. On the page are fields to capture the following information about a client:
- First name
- Initials
- Last Name
- Full Name
- Image of the client
- Birthdate
- Gender
- Service tier
- Notes
When you create the form, define a question for each of these client attributes. These questions become fields on the form. Each question has the following mandatory parts:
- The type of question. The question type affects the control used to obtain the answer.
The ID of the question (optional). If this ID matches an attribute in the class that the form section binds to, the value of that attribute becomes the initial answer to that question on the form. Additionally, if you want to refer to the question's answer from elsewhere in the form, you must give it an ID.
Questions of type "label" do not have IDs.
For example:
(bp:flow                          ; Defines the beginning of the flow. The element closes on the last line of the code (after the bind declaration).
 (bp:page Client_Details          ; Declares the start of the page and provides the ID Client_Details, which can be used as a reference in more advanced forms.
                                  ; Additionally provides a title (caption) for the page, and declares the page number.
   (: caption "Client Details")
   (: number "1")
     (bp:section profile          ; Declares a single "section" to contain the entry fields (questions) for the form, and then defines each question.
       (: caption "Profile")
       (bp:text firstName)
       (bp:text initials)
       (bp:text lastName)
       (bp:image image)
       (bp:date birthTime)
       (bp:combo genderCode)
       (bp:combo entityStatus)
       (bp:combo tier)
       (bp:textarea notes)
      )
    )
    (: bind Person)              ; Binds the results to the Person class.
  )
The accompanying image shows an example of this simple form in the product. The labels on the form come from the caption values of the Person class that the form binds to. Likewise, the indication that a field is mandatory also comes from the model and reflects whether the attribute's |
|
Adding field captions and ghost text
If the attribute caption taken from the model is not sufficient, or unclear in the context of your form, you can change what displays by adding a (: caption "caption_text") statement. You can also use this to provide labels for questions that do not bind to a model attribute.
Additionally, for text fields, you can provide instructional text by adding a (: hint "hint_text") statement. Text in this statement will appear underneath the entry field.
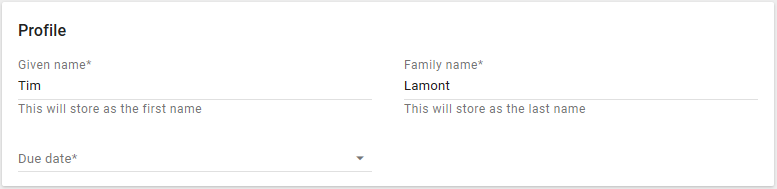
For example, the following code creates a form that gets first and last name information from the Person class, but overrides the captions with "Given name" and "Family name." It also includes a date field that has no mapping to the underlying model and the caption for this question comes directly from the form definition.
(bp:flow
    (bp:page example_page
      (: caption "Personal Details")
      (: number "1")
      (bp:section profile
        (: caption "Profile")
        (bp:text firstName
          (: caption "Given name")
          (: hint "This will store as the first name")
         )
        (bp:text lastName
          (: caption "Family name")
          (: hint "This will store as the last name")
         )
        (bp:date dueDate
          (: caption "Due date")
          )
        )

   )
   (: bind Person)
  )
|
|

Mandatory and optional fields
By default, answers to questions are optional. The end-user of the form does not have to provide a value for every question field on the form. In a bound field, if the underlying attribute is marked as required, an answer to that question is also mandatory. If you want to mark other questions as mandatory, use the (: required #t) attribute statement.
For example, in the previous example, if you want to make the Due date field mandatory, you would code the following:
(bp:flow
    (bp:page example_page
      (: caption "Personal Details")
      (: number "1")
      (bp:section profile
        (: caption "Profile")
        (bp:text firstName
          (: caption "Given name")                       ; Required by the underlying model
          (: hint "This will store as the first name")
         )
        (bp:text lastName                                ; Required by the underlying model
          (: caption "Family name")
          (: hint "This will store as the last name")
         )
        (bp:date dueDate                                 ; Not a bound attribute
          (: caption "Due date")                         ;
          (: required #t)                                ; Marked as required explicitly
          )
        )

   )
   (: bind Person)
  )
|
|
Setting initial values
You can set an initial value for a field using the (: initialize "value") option. For example, if you want to default the value of "tier" to "A", you would specify the following:
(bp:combo tier
  (:initialize "A")
)
Remember to validate that the field allows the initialization value.
If a value for a given question already exists in the underlying model, that value becomes the initial value, regardless of what is set by Initialize.
Setting calculated values
In some cases, you may want to display a calculated field to either summarize information from elsewhere in the form, or retrieve information to reference from the system data. Calculated fields are defined using the (:value (value-calculation)) option.
For example, the following code snippet takes the values of the firstName, middleName, and lastName fields, concatenates them, and displays them as a fullName value:
(bp:text firstName)
(bp:text lastName)
(bp:text fName
  (: caption "Full Name")
  (: value (string-append (@ question firstName) " " (@ question initials) " " (@ question lastName)))
 )
Multi-step and multi-section forms
Defining a multi-step form
All forms appear on a single screen. However, a multi-step form organizes related questions together into expandable steps on a single screen. You are always able to navigate to steps within a form to review and change answers.
You can also use multi-step forms to to control the flow of information gathering by making appearance of later steps on a form dependent on answers provided earlier.
The following code defines a simple two-step form. The resulting form is also included.
Note the following:
- Each step is defined in the code as a "page".
- You can provide a caption for every step to help users navigate longer forms. Step (page) captions are always visible.
- You can provide section captions, which provide guidance within a given step. Section captions are only visible when a step is open.
- You can provide a number for each step, which can be up to two characters, and which appears to the side of the form navigation.
- Step and section captions are not required, but are recommended as a way to help users navigate the form.
(bp:flow
    (bp:page Personal_Details
      (: caption "Personal Details")
      (: number "1")
      (bp:section profile
        (: caption "Profile")
        (bp:text firstName)
        (bp:text initials)
        (bp:text lastName)
        (bp:text fullName)
        (bp:date birthTime)
        (bp:combo genderCode)
        (bp:combo entityStatus)
        (bp:combo tier)
        (bp:textarea notes)
        (bp:object company)
      )
    )
    (bp:page Home_Address
      (: caption "Home Address")
      (: number "2")
        (bp:section homeAddress
          (bp:combo type)
          (bp:text address1)
          (bp:text address2)
          (bp:combo countryValue)
          (bp:text zip)
          (bp:text attention)
          (bp:textarea deliveryInstructions)
         )
   )
   (: bind Person)
  )
| Page 1
 |

Defining a multi-section form
You can additionally divide each step of the form into multiple sections. Like steps, sections help you to group related questions together visually to help with navigating and filling out the form. Unlike steps, however, sections do not expand and collapse as you move between them. The following example code displays the same information as for the multi-step example, but groups it into two section instead of two steps.
Note the following:
- Each section within a step displays as a separate card.
- All of the sections within the step display at the same time. You cannot expand and collapse sections.
- If you plan to bind your form to the underlying data, sections can help you access information stored in associated class attributes. For more information on this, see Binding forms and navigating attributes.
(bp:flow
    (bp:page Personal_Details
      (: caption "Personal Details")
      (: number "1")
      (bp:section profile
        (: caption "Profile")
        (bp:text firstName)
        (bp:text initials)
        (bp:text lastName)
        (bp:text fullName)
        (bp:date birthTime)
        (bp:combo genderCode)
        (bp:combo entityStatus)
        (bp:combo tier)
        (bp:textarea notes)
        (bp:object company)
      )
        (bp:section homeAddress
          (bp:combo type)
          (bp:text address1)
          (bp:text address2)
          (bp:combo countryValue)
          (bp:text zip)
          (bp:text attention)
          (bp:textarea deliveryInstructions)
         )
   )
   (: bind Person)
  )
|
|

Forms with conditions and validation
You can add conditions to forms to control the behavior of fields, sections, and pages. The two primary uses of conditions are to control visibility and requirement. That is, whether or not questions, sections, or steps are visible to users, and whether or not questions are mandatory.
In determining these conditions, you can make use of any number of the following:
- Answers given to preceding questions in the form
- Values from the underlying data that could be included as questions in the form
- Operators such as
exists, equals, starts with,orcontains
Referencing other questions
When you add a condition that is based on the value provided by another question, you must explicitly reference that question in your condition. The referenced question, therefore, must have an ID in its definition.A question's conditions can reference any other question in the same section, or any question in an earlier section or step.
The syntax for making these references is:
For referencing a question within the same section:
@ question <questionID>
For referencing a question in a previous section of the same step
@ section <sectionID questionID>
For referencing a question on a previous step:
@ page <pageID sectionID questionID>
Where:
<questionID> is the ID of the of the question you want to reference
<sectionID> is the ID of the section containing the question you want to reference
<pageID> is the ID of the step containing the question you want to reference
Referencing other values in the underlying model
Any value that can be accessed by a question can be used in another question's condition. The basic method for accessing this information is to create a question earlier in the form to access that data you want, and then to use the syntax for referencing other questions to access the resulting value.
The best practice for making the data available is as follows:
- Create a question earlier in the model that accesses the data that you want to use in a later question.
- If you do not want to show the question in that earlier section, set the visibility of either the question or the entire section to #f.
- Access the question value through an @ question, @ section, or @ page reference as appropriate, later in the form.
Controlling whether a question is mandatory
If you want to make a question mandatory only under certain conditions, specify an expression that evaluates to a Boolean value for the required attribute on the field.
For a simple illustration, assume you have created a form that asks the following questions:
- Does the person have equity in a house?
- If so, what is the estimated value of the house and what is the total outstanding in debts against the house (mortgages etc.)?
Also assume that you want to make the answer to the second question mandatory only if the answer to the first question is "Yes".
To accomplish this, you can code the following:
(bp:section s2
  (bp:radio hasRealEsstateEquity
    (: caption "Does the client have any real estate equity?")
    (: options YesNoEnum)
    (: required #t)
    (: initialize "Y")
  )
  (bp:number realEstateValue
    (: caption "Estimated value of real estate")
    (: required (= "Y" (@ question hasRealEstateEquity))) ; Question is required if the person has real estate equity.
  )
  (bp:number realEstateDebt
    (: caption "Estimated debts against the real estate")
    (: required (= "Y" (@ question hasRealEstateEquity))) ; Question is required if the person has real estate equity.
  )
)
Controlling whether a question is enabled
You can conditionally enable questions in the same way that you conditionally set whether they are required. The only difference is that rather than using the (: required (expr)) statement, you use the (: enabled (expr)) statement.
Using the (: enabled #f) statement allows you to create an effectively read-only field within the form. This can be useful for calculated fields, or for showing information that you want the person filling the form to see, but not change.
Controlling the visibility of questions, section, and pages
You can control the visibility of a step, section, or control, using the (: visible (expr)) expression.
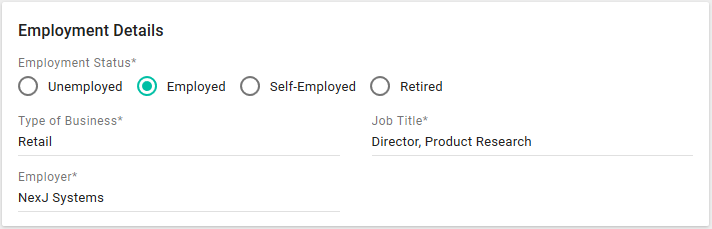
For example, in the following code, the answer to the first question controls the the visibility of the final three. See the accompanying pictures for an illustration:
(bp:section employment (: caption "Employment Details")
   (bp:radio status (: caption "Employment Status") (: required #t)
     (: options (collection "Unemployed" "Employed" "Self-Employed" "Retired"))
     (: initialize "Employed")
   )
   (bp:text type (: caption "Type of Business") (: required #t)
     (: visible (in? (@ question status) "Employed" "Self-Employed")) ; Visible only if employed or self-employed
     (: initialize "Retail")
     )
   (bp:text job (: caption "Job Title") (: required #t)
     (: visible (in? (@ question status) "Employed" "Self-Employed")) ; Visible only if employed or self-employed
     (: initialize "Director, Product Research")
   )
   (bp:text employer (: caption "Employer") (: required #t)  ; Visible only if employed
      (: visible (= (@ question status) "Employed"))
      (: initialize "NexJ Systems")
   )
)
| In the first instance, the Employment Status is Employed, and so all three follow-on questions appear.
In the second instance, the answer to the first question is Self-Employed, so no information about the employer is shown. However, because the field was initialized to NexJ Systems, this is the value that will be stored in the form, though likely ignored by future processing down the line.
In this case, the person has indicated they are retired, and so no additional employment questions are asked. However, as with the second instance, the initialization values mean that the form will, in fact, store that the type of business is Retail, the position held was Director, Product Research, and that the employer was NexJ Systems. Again, a well-designed workflow making use of this form will later ignore these values.
|


Constructing conditional statements
Form definition is based on the Scheme programming language, which is a functional language related to Lisp. The basic syntax structure when creating your validation expressions, therefore, follows the following general pattern:
operator first_operand second_operand
If any of the operands themselves are expressions, those expressions are embedded in parentheses that contain the same three-part structure.
So, for example, the expression
(= "Y" (@ question hasRealEstateEquity))
tests whether the value of the answer to the question hasRealEstateEquity evaluates to Y. If it does, then the overall expression will give a value of #t (true). Otherwise, it will evaluate to #f (false).
Any logical, comparison, or other formula allowed by Scheme can be used in your conditions.
Details about the these and other functions, and about their syntax, can be found in the NexJ Studio help system under the NexJ Scheme Library Reference information.
National language considerations
Forms support the UTF-8 character set. However, when composing forms in libraries, you cannot enter non-ASCII characters directly; they will not display properly in the form. To display unicode characters, you must use their escaped unicode values. For example, if you are composing a form in French, and want to include a section label that reads "connaître votre client", enter conna\u00EEtre votre client in your form definition.
If you are composing a form in a bi-directional language, enter the character symbols in a left-to-right manner. The rendering engine will correct the display to right-to-left as appropriate. For example, to write "أَلِف بَاء", (the names of the first two letters of the Arabic alphabet) enter \u0623\u064E\u0644\u0650\u0641 \u0628\u064E\u0627\u0621.
To aid in conversion of strings to escaped unicode, you can use an online tool such as the one available at https://r12a.github.io/app-conversion (use the JavaScript output if you are using this converter).
Binding forms and navigating attributes
Each form is bound to a single class in the business model. By default, the attributes that questions collect data from are the attributes of that class.
Complications arise, however, if the values that you want to access are actually within an associated class. In this case, you must create a section specifically for accessing those attributes. Additionally, the ID of that section must match the name of the non-primary attribute whose information you want to access.
For example, consider gathering the home information address for an instance of the Person class:
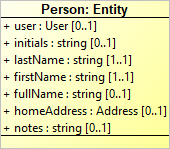
As shown in this reduced class diagram, the homeAddress attribute is a non-primitive attribute.
Expanded, you can see more clearly that the homeAddress attribute is an instance of the associated Address class.
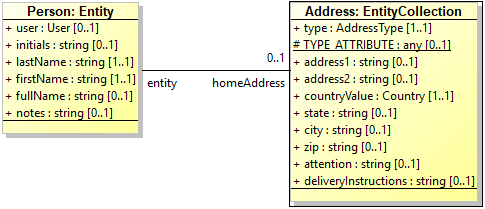
In order to access and update the homeAddress data for the person, you must create a section in your form that explicitly references the homeAddress attribute. That section will then give you access to the attributes of the Address class. The following code illustrates this example:
 (bp:flow
    (bp:page Personal_Details
      (: caption "Personal Details")
      (: number "1")
      (bp:section profile
        (: caption "Profile")
        (bp:text firstName)
        (bp:text initials)
        (bp:text lastName)
        (bp:text fullName)
        (bp:date birthTime)
        (bp:textarea notes)
        (bp:object company)
      )
        (bp:section homeAddress   ; The section ID matches the non-primitive attribute name in the Person class.
          (bp:combo type)
          (bp:text address1)
          (bp:text address2)
          (bp:combo countryValue)
		  (bp:text: state)
          (bp:text city)
          (bp:text zip)
          (bp:text attention)
          (bp:textarea deliveryInstructions)
         )
   )
   (: bind Person)
  )
Line 27 binds the form as a whole to the Person class. However, as illustrated in the class diagram, the homeAddress attribute is an associated class. To access the attributes within homeAddress, the section ID is specified to match the complex attribute.
The level to which you can traverse the class model is currently limited to one level out. That is, given the class that you bind your form to, you can name any of its associated classes in a section and then access their primitive attributes. You cannot, however, access the associated classes of an associated class.
There is one exception to the forgoing limitation, and it is illustrated in the preceding example: the homeAddress attribute type is, strictly speaking, a second-level associated class to the Person class. However, because of its use of UI_COMPONENT_OBJECT_AS_ENUM aspect, it behaves as if it is an enumeration, and is treated as such for the purposes of form definition.
Multi-section and multi-step forms
Sometimes, you may want to allow a section or step to repeat multiple times in order to collect data sets of variable size. To accomplish this, add the (: collection #t) attribute to the form element you want to repeat.
Most commonly this is done on a section by section basis, but entire steps can also be defined as collections.
Collections of sections
For example, assume you are creating a form in which part of the information you want to gather is a list of major assets belonging to a client.
For each entry, you want to include a text field with the description of the asset, and another with the estimated value. You could code something such as:
(bp:flow
    (bp:page example_page
      (: caption "Assets")
      (: number "1")
      (bp:section profile
        (: caption "Assets listing")
        (: captions (@ question asset)  ; Provides caption for each entry in the collection
          )
        (: collection #t)
        (bp:text asset
          (: caption "Asset")
          (: hint "Breif description of asset. e.g. Car, house")
         )
        (bp:currency assetvalue
          (: caption "Asset value")

         )
        )

   )
   (: bind Person)
  )
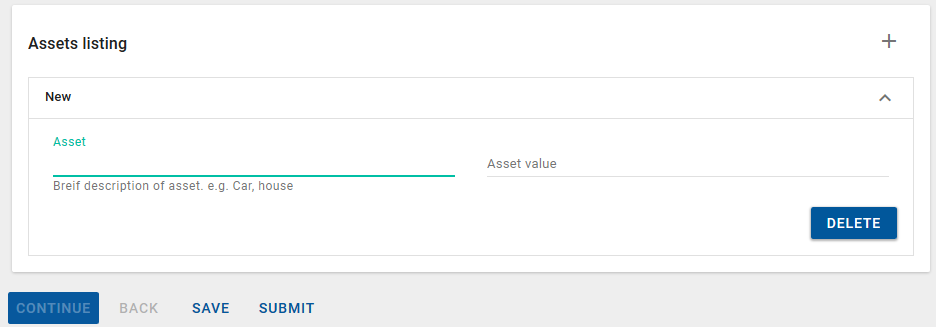
When this section first opens, it looks like the following picture:

When you click on the + sign, the first entry opens:
After filling out a couple of entries, the form looks like this:
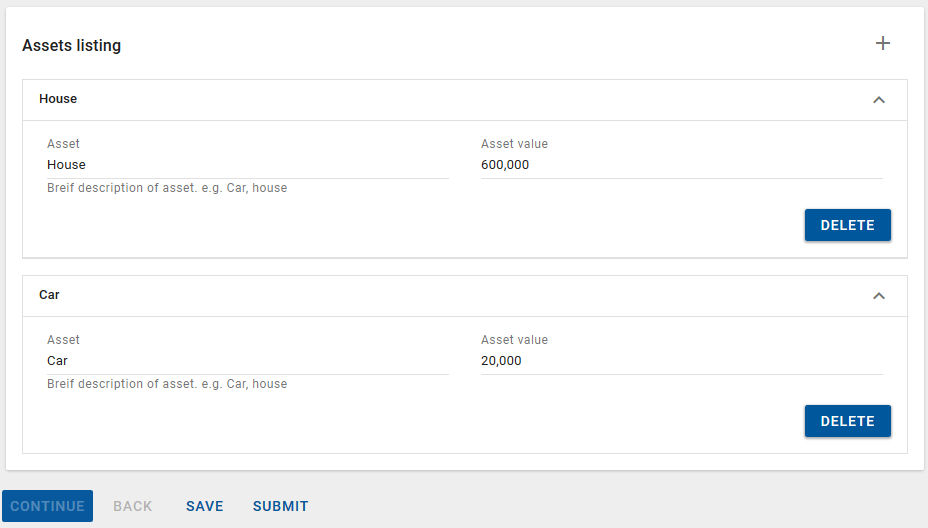
Each section can be collapsed by the user without losing data:

Collection of steps
In most cases, sections are used to create collections. However, for comparison, the following code defines the collection at the step level:
(bp:register-flow "docsamplecollection" #f
(bp:flow
    (bp:page example_page
      (: caption "Assets")
      (: collection #t)                      ; Note that the collection is now on the page
        (: captions (@ question asset)       ; The captions still take their values from the answers in each collection entry
          )
      (: number "1")
      (bp:section profile
        (: caption "Assets listing")
        (bp:text asset
          (: caption "Asset")
          (: hint "Breif description of asset. e.g. Car, house")
         )
        (bp:currency assetvalue
          (: caption "Asset value")

         )
        )

   )
   (: bind Person)
  )

)
In this example, the initial state seen by the user will be:

The user filling out the form can click Save and Add Another to create each entry in the collection. When it is completed as in the previous example, it will look like this:
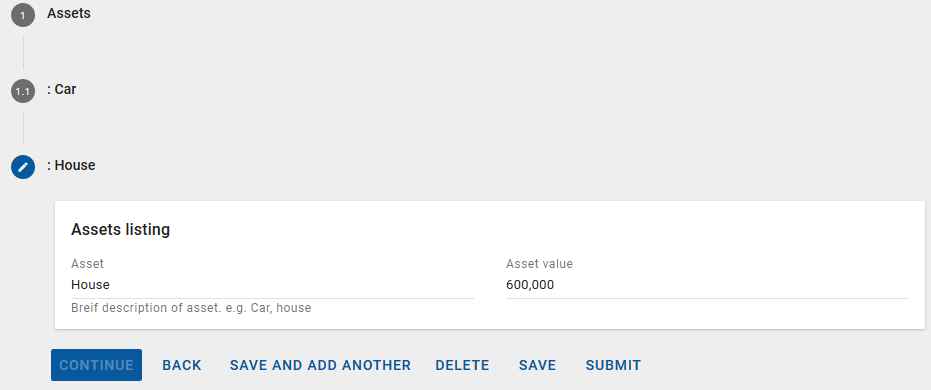
Only one entry in the collection can be open at any time. This is consistent with the general step behavior.
Related links
Configuring business process forms