
Households
A household is an entity that represents a group of contacts who belong to the same family. Out of the box, only three household roles are available: Head of household, spouse, and dependent. These roles can be enabled by your system administrator in NexJ Admin Console.
Given the complex nature of wealth management and private banking clients, this functionality lists all products for which a household has any full or partial ownership, and also determines and maintains householding for multiple clients living at the same address or extended households, and manages relationships for multiple clients living at different addresses. In addition, it allows Relationship Managers to better understand all members in a household across generations. By creating strong relationships early on, this understanding is strong when wealth is transferred.
To provide added flexibility, NexJ supports both hierarchical and ad hoc groupings, such as associations or professional affiliations.
Householding can assign an unlimited number of parent-child and arbitrary relationships for a contact, such as those between spouses, joint account owners, a customer and accountant, and more.
Householding provides the following advantages. You can:
- Aggregate information along defined hierarchies.
- Segment assigned accounts into multiple “portfolios” by creating multiple hierarchies as required.
Provide information for a household on its detail page on the Contacts workspace in the tabs listed below:
- Summary
- Detail
- Activities
- Conversations
- Opportunities
- Calendar
- Service Requests
- Hierarchy
- Audit trail
For more information about these tabs, see Viewing entity records.
Searching and filtering for households
You can use the text search field and Households filter to find household records in the data table on the Contacts workspace. By default, NexJ provides the following filter chips that enable you to quickly find records that match the filter criteria:
- Client state
- Status
- Household members
- Rep code (only when the Hierarchical Access Model (HAM) is enabled)
For more information about searching and filtering functionality, see Searching and filtering in NexJ CRM.
For more information about sorting data tables and selecting data table columns, see Navigating the NexJ CRM user interface.
Viewing household records in the data table
The households data table displays the following information:
- Status - Whether a household is a prospect, client, or ex-client.
- Head of Household - Tax filing status available to individuals who provide more than half of the financial support to their household during the tax year. Heads of household can be married or single as long as they support dependent children or grandchildren, parents, or other close relatives living at home.
- Other Members - Members of the household who are not the head of the household.
Household roles (for example, head of household) are enabled by system administrators using NexJ Admin Console. For more information, see "Configuring hierarchy roles" in the technical documentation.
Adding households
When adding a new household record to the system, the New Household dialog includes the following fields:
| Field name | Description | Required field |
|---|---|---|
| Bio | Additional biographical information about the household. | No |
| Dear | The preferred name to be used in salutations. | No |
| Rep Code | The Rep Code field is available only if the Hierarchical Access Model is enabled. A rep code is assigned to a contact, company, or household to make it accessible only to the user and to other users higher in the hierarchy. Rep codes make it easier to share data access if required. For example, an advisor may be temporarily assigned another advisor's rep code, so they can manage their colleague's contacts while they are on vacation. Contacts do not inherit rep codes from companies or households. Users need to assign rep codes to contacts individually when adding new contacts. All users can access contacts, companies, or households that do not contain rep codes. If the Hierarchical Access Model is enabled and you provide Rep Codes for your new households, you can filter the data table of contacts by Rep Code on the Contacts workspace. To select the alphanumeric code for restricting access to the household, click the Add button | No |
| Status | Household's status. For example, Prospect, Client, or Ex-Client. | Yes |
| Tier | A tier is a property assigned to households to determine what kind of service plan they will receive. If regionalized tier functionality has been enabled, the Tier field does not display in the Detail tab. A Tier & Rank tab displays instead. | Yes |
Managing household members
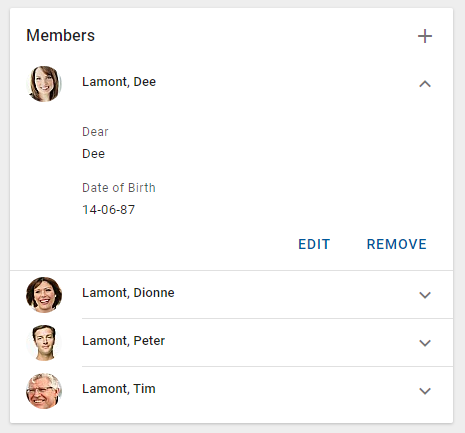
The members of each household are listed on the Members card in the Summary tab.
To add a member, select the Add button ![]() . In the Add a Household Member dialog that appears, specify the member and their household role. You can start typing the name in the Name field or you can click the Select button
. In the Add a Household Member dialog that appears, specify the member and their household role. You can start typing the name in the Name field or you can click the Select button ![]() to open the Select a contact dialog and search for an existing contact. The selected contact is included in the Name field in the Add a Household Member dialog.
to open the Select a contact dialog and search for an existing contact. The selected contact is included in the Name field in the Add a Household Member dialog.
To view additional details about the member, including their date of birth and preferred salutation, expand the record using the down chevron button ![]() .
.
To remove a member from the household, expand the record and select Delete.
To change the member's household role, expand the record and select Edit.
To edit any other information about individual household members, you need to navigate to the member's contact profile.
You can navigate directly to the member's profile from the Hierarchy tab in the household profile. Select the Household subtab and click the household member's name. For more information about the Hierarchy tab, see Relationship hierarchy.
Editing households
Depending on where you access the specific household information, you may be able to edit it in two places.
If the information is available on the cards in the Detail tab, edit it directly on the corresponding cards.
To edit other information, open the edit dialog in one of the following ways:
- Double-click the entity record in the data table.
- Click the Edit button
 in the data table.
 - Open the detail page for the entity, click the More Actions button
 in the banner, and select Edit.
Filtering the audit trail
NexJ CRM retains a history of actions that users have performed on records in the system. When you complete an action, such as viewing or modifying a household record, the action is logged in the record's audit trail. Users with the appropriate privileges can view the history and details of these actions in a record's Audit Trail tab.
When modifying a household, you can filter the data table on the Audit Trail tab to display specific event records.
NexJ provides the following filter chips that you can use to filter the audit trail:
- Action
Select an operator and an audit action; for example, Read (view a record) or Create (create a new object). - Date
Select an operator and a date. - User
Select an operator and the required user or users.
To add additional filter chips, click the Filter options button ![]() and select Add filter fields. For more information, see Filter chips and Using operators.
and select Add filter fields. For more information, see Filter chips and Using operators.
In the data table, select the action whose details you want to view. Depending on the type of action, additional details might be available. The details for the selected action display in the data table at the bottom of the tab. Each row represents a field that was updated as part of the action. The field's name, old value, and new value are displayed. If a field did not have a value originally, the value in the Old Value column will be blank.
To change which columns display in the data tables, click the Select columns button ![]() .
.
Related links
- Managing addresses - Set address defaults, select preferred addresses, and add, edit, or delete an entity's addresses.
- Managing communication methods - Set communication defaults, select a preferred communication type, and add, edit, or delete communication methods for an entity.
- Selecting entities and using data table actions - Perform actions for selected entity records from the data table.
- Viewing entity records - Use the entity banner and use tabs provided in an entity's detail page.
- Predefined reports - Generate reports that contain information that you provide in entity records.
- Coverage - Assign and remove coverage for entities.
- Managing custom fields - Add user-defined fields that store information not otherwise provided in an entity's Detail tab on the Contacts workspace.
- Activities - Manage activities for entities.
- Adding contacts and companies - Add a new entity by copying an existing entity. Delete an entity to permanently delete its information and any documents associated with it.
- Merging entities - Merging duplicate entity data records to create a single record.
- Exporting entity data records - Export data records from the data table on the Contacts workspace.
- Relationship hierarchy - Display the organizational structure that a selected entity is a part of and its relationships with other entities, using a tree-type view.
- Conversations - Manage conversations for entities.
- Opportunities - Manage opportunities for entities.
- Service requests - Manage service requests for entities and use the email-to-service-request feature.
- Batch operations - Batch print Microsoft Word and PDF documents for one or more entities and send batch emails.
- Saved lists - Create saved lists and add them to your favorites. Add a favorite saved list to the Contacts workspace to display only the entities that are members of the list in the data table.