NexJ CRM has two ways of managing leads, Classic Leads and Integrated Lead Management. Only one method can be enabled at one time.
In the Classic Leads feature, a lead operates as a separate object that can be linked to a contact. Classic Leads uses a separate workspace for working with leads and has a reduced ability to leverage activity types. When a lead progresses to a prospect or a client, it is converted to a contact. For more information about using the Classic Leads feature, see Managing leads (Classic Leads feature).
In Integrated Lead Management, a lead is an entity similar to a contact, which can be managed through a list within the Contacts workspace. The experience working with a lead is identical to that of working with any other contact. For example, any activity type can be created for a lead. Creating a lead and progressing it to a prospect or client is a seamless process. This topic contains information about using the Integrated Lead Management feature.
You can manage leads on the Contacts workspace , using the predefined Leads filter.
The Leads data table includes the following columns unique to leads:
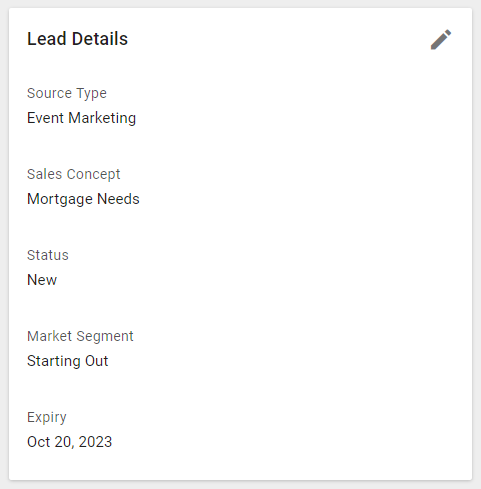
Lead Status Status indicating where the lead is in the process (for example New, Qualifying, Qualified, or Archived).
Market Segment Target market that the lead belongs to (for example, Starting Out, Pre-Retirement, Retirement).
Sales Concept Type of products or services that the lead is interested in (for example, General Interest, Retirement Income, or Mortgage Needs).
Source Type The type of source that generated the lead (for example, a conference, event marketing, or a vendor list).
Owner The user who is considered responsible to working with the lead. By default, the user who created the lead record is the lead owner, but a new owner can be assigned from the Leads data table.
The Leads data table on the Contacts workspace enables you to:
Add new leads by clicking the Add button in the data table. In the menu that appears, select Contact and then ensure that the Status field is set to Lead in the New Contact dialog. For more information, see Adding leads.
Export all leads into a CSV file for analysis outside of NexJ CRM by clicking the Export button in the data table.
To export the information available in the default columns in the leads list, select Visible Columns in the Export Options dialog. To export the information in all columns available with the Set List Columns option, select All Columns.
The search and filter area enables you to use a text search field, filters, and filter chips to search for lead records using different search criteria. In the text search field, you can enter a lead's first name or last name. In addition to common search filters, you can use the following filters to find leads:
Lead Status
Market Segment
Sales Concept
Source Type
Owner
You can perform the following actions for a selected lead record by clicking a button in the table row or clicking the More Actions button in the table row and selecting a menu option:
Edit Edit the lead's properties, including the name and description.
Email Send an email to the selected lead.
Detail Report Run a report showing detailed information about the lead.
Add to Add the lead to a saved list or a campaign.
Merge Into Merge lead details into another existing contact
Update Lead > Lead Status Updating the lead status allows you to convert a lead and progress their contact status to be a prospect or to archive the lead if they will no longer be pursued.
Update Lead > Assign Owner Assign the lead to another user.
Copy Copy the address and communication detail into a new contact record.
Print Document Print a document related to the lead.
Delete Delete the selected lead record.
Qualified leads cannot be deleted.
Viewing lead details
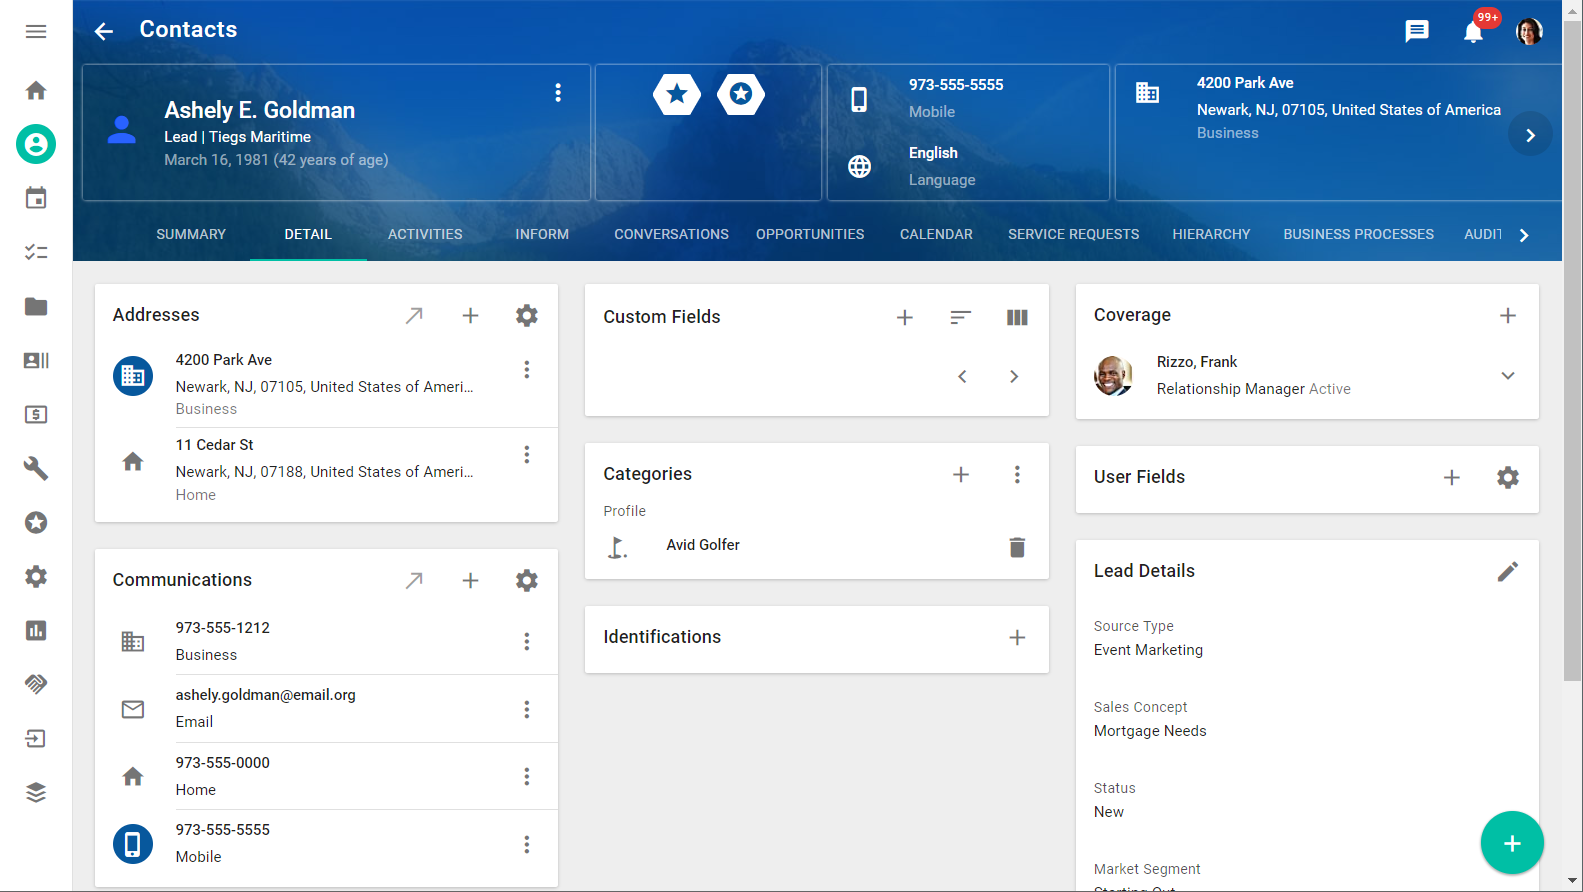
To view information for a selected lead, click the link in the Name column of the data table to navigate to the detail page. The detail page enables you to build the profile of the lead and perform the same actions as for any other type of contact including:
View and update the complete information about the lead.
View, add, update, or delete activities related to the selected lead. For more information, see Activities.
Create, view, and edit notes for the lead. For more information, see Adding notes.
View an audit trail that displays a history of actions performed on the lead. For more information about audit trails, see Audit trail tab.
An additional card on the Detail tab displays the attributes of the specific lead:
The detail page contains a banner at the top with overview information and tabs below the banner that provide access to more detailed information. The banner contains:
A summary of the selected lead's personal and contact information, including badge icons which visually indicate information about the lead. Hover over a badge in an entity's banner to see what information it represents.
The More Actions button that you can click to perform quick actions, including edit the record, send email, copy the contact details, and add the lead to a saved list.
To return to the leads data table on the Contacts workspace, click the back arrow in the toolbar.
Adding leads
To add a lead, add a contact and set the Status value to Lead. For detailed information about adding a contact, see Adding contacts and companies.
When adding a lead, you must include a first name, last name, sales concept, lead status, source type, and either an email address or a phone number.
When you add a lead, the New Contact dialog includes the following fields specific to leads:
Field or checkbox
Description
Required field
Market Segment
The target market that the lead belongs to (for example, Starting Out, Pre-Retirement, or Retirement).
No
Sales Concept
The type of products or services that the lead is interested in (for example, General Interest, Retirement Income, or Mortgage Needs).
Yes
Lead Status
The status of the lead, such as whether they are new or already qualifying. You can also use this field to convert the lead to qualified or archive the lead.
Yes
Source Type
The type of source that generated the lead (for example, Conference, Event Marketing, or a Vendor List).
Yes
Expiry
Information about when the lead should no longer be considered active.
No
You can add multiple leads at once by importing a list of leads. If Intergrated Lead Management is enabled in your deployment, leads are imported as contacts with Status value of Lead. The Lead Status for imported leads in set to New automatically.
After a lead has advanced through your qualifying process, you can convert a lead to a prospect by changing the lead status to Qualified. When the lead status is changed to Qualified, the contact status changes from Lead to Prospect by default. When the contact no longer has the Lead status, all lead-specific information is no longer displayed on the contact's record.
If you decide to associate an opportunity with the selected lead, this can be added from the Opportunity tab of the lead.
Using the Leads data table on the Contacts workspace, you can change the lead status for a selected lead by clicking the More Actions button on the row, selecting Update Lead > Lead Status, and then selecting the desired lead status. You can also change the status for multiple selected leads at once, by clicking the More Actions button at the top of the data table, selecting Lead Status, and then selecting the desired lead status.
You cannot change the lead status for Archived or Qualified leads. The Update Status option is disabled for individual Archived or Qualified leads. For batch changing the lead status, the status does not change for any Archived or Qualified leads included in the selected list.
After changing the lead status from the data table for one or multiple leads, you can see the resulting success or error information in the Batch Processes workspace .
You can also change the lead status by opening the Edit Contact dialog and changing the value in the Lead Status field.
Archiving leads
If a lead should no longer be included in your qualifying process, you can change the lead status to Archived. When the lead status is changed to Archived, the contact status changes from Lead to Other by default. When the contact no longer has the Lead status, all lead-specific information is no longer displayed on the contact's record.
Using the Leads data table on the Contacts workspace, you can change the lead status for a selected lead by clicking the More Actions button on the row, selecting Update Lead > Lead Status, and then selecting the desired lead status. You can also change the status for multiple selected leads at once, by clicking the More Actions button at the top of the data table, selecting Lead Status, and then selecting the desired lead status.
You cannot change the lead status for Archived or Qualified leads. The Update Status option is disabled for individual Archived or Qualified leads. For batch changing the lead status, the status does not change for any Archived or Qualified leads included in the selected list.
After changing the lead status from the data table for one or multiple leads, you can see the resulting success or error information in the Batch Processes workspace .
You can also change the lead status by opening the Edit Contact dialog and changing the value in the Lead Status field.
Assigning owners to leads
An owner is the user who is responsible for managing a lead. Each lead can only have one owner.
The user who creates a lead in NexJ CRM is automatically assigned to the lead as its owner. If you want to change who is responsible for managing the lead, you can assign a different owner.
Using the Leads data table on the Contacts workspace, you can assign an owner to a selected lead by clicking the More Actions button on the row, selecting Update Lead > Assign Owner, and then selecting a user. You can also assign an owner to multiple selected leads at once, by clicking the More Actions button at the top of the data table, selecting Assign Owner and specifying a user.
You cannot assign an owner for Archived or Qualified leads. The Assign Owner option is disabled for individual Archived or Qualified leads. For batch assigning an owner, the new owner is not assigned to any Archived or Qualified leads included in the selected list.
After assigning an owner from the data table for one or multiple leads, you can see the resulting success or error information in the Batch Processes workspace .
Sending batch emails to leads
You can send batch emails to deliver personalized emails and documents to multiple selected leads by clicking the Email button in the data table toolbar and providing the required information in the New batch email dialog.
You can include multiple Microsoft Word, PDF, and CSV documents as attachments in batch emails. You can use tokens in merge fields to personalize documents and emails so that you do not need to create unique versions of each for individual recipients. The following list shows the available lead-specific tokens:
company - Company name for the lead
marketSegment - Target market that the lead belongs to
salesConcept - Type of products or services that the lead is interested in
source - The name of the source for the lead
sourceType - The type of source from which the lead was obtained
emailAddress - Email address for the lead
phoneBusiness - Business phone number for the lead
address - Street address where the lead resides
addressCity - City where the lead resides
addressState - State where the lead resides
addressCountry - Country where the lead resides
addressZip - Zip code for the lead
You can also use the following tokens that are not categorized for leads:
nameFirst - First name
nameLast - Last name
position - Position within a company or organization
Documents created outside of NexJ CRM containing merge fields are populated during batch processes or when they are associated with a contact.
Only PDF, DOC, and DOCX external files can contain merge fields. If you use merge fields in an unsupported file type, merge field names display in emailed documents, rather than merge field values.


 To export the information available in the default columns in the leads list, select Visible Columns in the Export Options dialog. To export the information in all columns available with the Set List Columns option, select All Columns.