
Learning objectives
In this learning module, you will be introduced to associated classes which are attributes of one class that reference another class. By completing this module, you will learn:
- How classes can relate to each other through associations.
- How to model those associations in NexJ Studio and use the reverse property to establish a two-way association.
- How to use key indexes to capture those associations in the data store.

Key concepts
- Primitive types - Simple attribute types, such as string, integer, timestamp, and decimal.
- Complex attribute - Attribute based on another class in the business model.
- Reverse property - Set on a complex attribute in order to identify how the class specified by the attribute refers back to the class containing the attribute.
Creating associated classes
In the previous lesson, Persisted classes, you created a training:Entity class, which models the people and companies that your business has contact with. It contains a single attribute, lastName defined as a string. You often need more complex data, such as a mailing address, to be stored in an attribute. In this case, you can define the attribute to be based on another class in the business model, referred to as a complex type or a complex attribute.
When you define a complex attribute, you establish an association between the classes that you are modeling. This association can be one-way, or two-way.
In a one-way association, ClassA uses ClassB as an attribute, allowing access to instances of ClassB through instances of ClassA. However, ClassB instances have no way of directly accessing the ClassA instances with which they are associated. For example, if a class Person has a one-way association to a class ContactInformation, an instance of Person can access its related ContactInformation instances, but a given ContactInformation instance cannot access any information about the Person instances with which it is associated.
By contrast, if these classes have a two-way association, both sets of class instances can access each other. The instances of the Person class can access related ContactInformation instances and the instances of the ContactInformation class can access their related Person instances, allowing you, for example, to find out who lives at an address or the owners of a given telephone number.
To specify a two-way association in NexJ Studio, you can use the reverse property.
In this lesson you will expand the business model to include the ways in which a person or business can be contacted. You will add two classes to the model: training:Telcom and training:TelcomType. training:Telcom models the different ways that an entity can be contacted. training:TelcomType models the different types of telecommunication channels available.
For example, Thing2 might have a home address and a business address. These would each be training:Telcom instances with a training:TelcomType of Address. However, Thing2 might also have a phone number, which would be a training:Telcom instance with a training:TelcomType of PhoneNumber. The training:Telcom class will have a two-way association with the training:TelcomType class and another one with the training:Entity class.
Learning activity
Create the training:Telcom and training:TelcomType classes. You can create both classes simultaneously so that in one class, you can refer to the other class while defining the class's properties.
-
Open the training:Fundamentals class diagram from the Busuness Model/Diagrams layer.
-
Right-click in the diagram and select New > Class.
-
Name the class
training:TelcomTypeand click Finish. -
Right-click in the diagram again and select New > Class.
-
Name the class
training:Telcomand click Finish
You should see something like the following diagram.
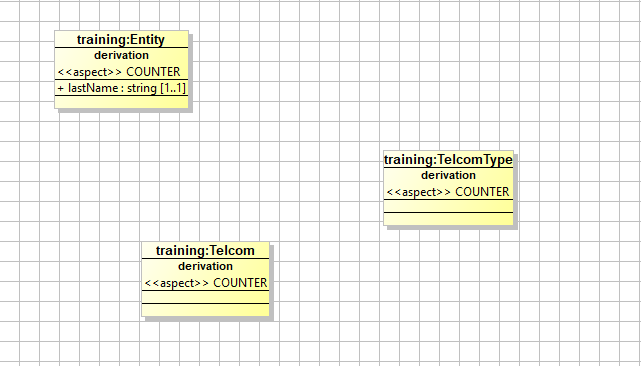
Right mouse click on the title of training:Entity and "Unhide Derivation > training:Locking"
In the top, right corner of the diagram editor, expose the palette 
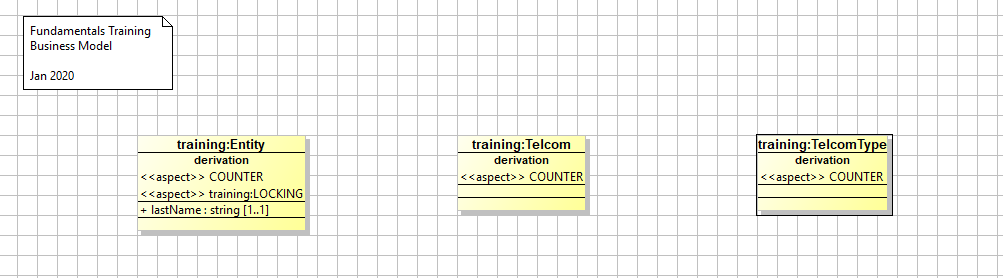
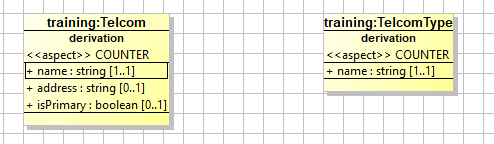
Adding the primitive attributes
Right mouse click and select Create Attribute on the training:Telcom class then the training:TelcomType class and add the following attributes.
Adding the association attributes
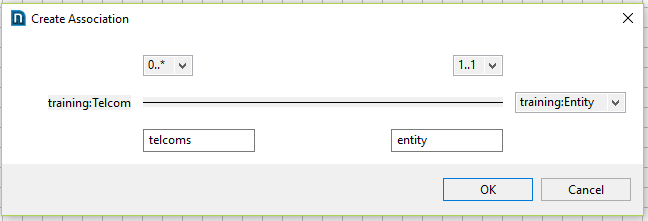
Right mouse click on the training:Telcom class and select Create Association... Fill the resulting dialog out as follows and press OK.
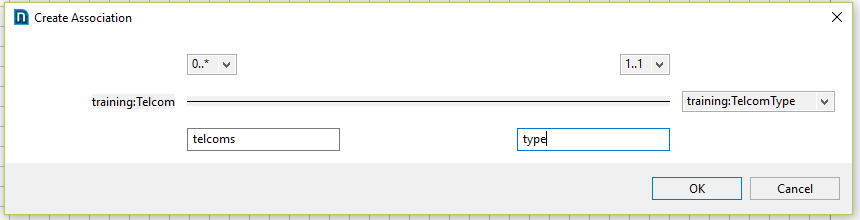
Right mouse click training:Telcom and select Create Association again. This time fill the Create Association dialog as follows and press OK.
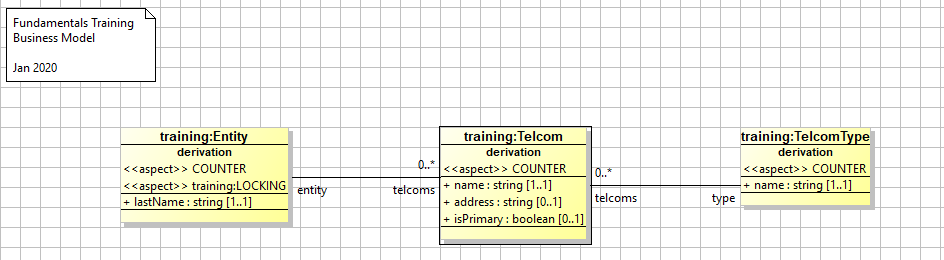
Your diagram should now look something like...
Of course, creating the model visually is just an option. You can create the classes as well in the Classes tab of the Business Model layer. If you didn't use the diagram editor, you would do something like...
-
In the Business Model layer, click the Classes tab.
-
Right-click in the navigator and select New Class.
-
Name the class
training:TelcomTypeand click Finish. -
Right-click in the navigator again and select New Class.
-
Name the class
training:Telcomand click Finish -
Then you would set all of the properties of the class using the Overview and Attributes tab as follows.
Open the class editor for the training:TelcomType class. If your in the diagram editor, you can get to the class editor by double-clicking on the class. From the work we've already done in the diagram editor, the class should have two attributes: name, a primitive type, and telcoms, a complex type that refers to the training:Telcom class. There are a couple of other settings we will want to add to the class.
-
In the navigator or diagram editor, double-click the
training:TelcomTypeclass to open it. -
In the Overview tab, set the Caption property using a string resource, as you did with the training:
Entityclass. Set the en value toTelcom Type. and call the string idsc.training.telcomType. -
In the Description field, enter
Types of telcoms such as Home, Business, and Mobile. -
In the Aspects field, click the Select button

LOCKING. -
In the Attributes tab, you should see two attributes - name and telcoms. Complete the properties as follows. Things that you will need to add are highlighted in yellow.
Attribute descriptions for TelcomTypeAttribute
Property
Value
Notes
name
Type
string
Required
true
Caption
idsc.training.telcomType.name
Set the caption on the Common tab. Use the selection tool to create this ID and give it an en value of
Telcom name.telcoms
Type
training:Telcom
This is a complex type referring to the
training:Telcomclass.Collection
true
Reverse
type
typeis the name of the corresponding attribute in theTelcomsclass.Cascade
cancel
Set the cascade property on the Validation tab.
Property definitions:
Collection - specifies that its attribute can hold multiple possible values. In the case of thetraining:TelcomTypeclass, it indicates that for each instance of atraining:TelcomType, there could be multiple different telecommunication channels (telcoms) of that type. For example, if there is atraining:TelcomTypeinstance ofHomePhone, there can be multiple instances of telecommunication channels that are home phone numbers.
Cascade - determines the deletion logic for the instances associated to the class through the attribute on which the property is set. In this case, setting it tocancelensures that atraining:TelcomTypeinstance can only be deleted if there are no instances of thetraining:Telcomclass associated with it. Other options are to delete the associated instances, or to clean the association between the instances.
Reverse - establishes two-way associations between classes. In this case, setting theReverseproperty on the telcoms enables you to access thetraining:Telcominstances related to a giventraining:TelcomTypeinstance through the attribute relationship. In almost every case, the reverse property values will be reciprocal. IfClassA:AttributeAhas a reverse that points toClassB:AttributeB, thenClassB:AttributeBwill also have a reverse toClassA:AttributeA. In this lesson, because the telcoms attribute has a reverse toTelcom:type, when you define thetraining:Telcomclass, itstypeattribute should have a reverse toTelcomType:telcoms. -
Save your changes.
Open the class editor for the training:Telcom class. This class has five attributes, two of which are complex.
-
In the navigator or diagram editor, double-click the
training:Telcomclass to open it. -
In the Overview tab, use the Select button
idsc.training.TrainingTelcom.caption, with an en value ofTelcom. -
In the Description field, enter a value of
Telecommunications such as telephone number, email address, website address. -
In the Aspects field, click the Select button
LOCKING. -
You should see the following attributes with the specified properties on the
training:Telcomclass. Complete the properties as follows. Things that you will need to add are highlighted in yellow.
Attributes to add to the Telcom classAttribute
Property
Value
Notes
name
Type
string
Required
true
address
Type
string
Required
true
type
Type
training:TelcomType
Required
true
Enforces that every telecommunication channel must have an associated
training:TelcomType.Reverse
telcoms
Completes the reciprocal relationship by indicating that the telcoms attribute of the
training:TelcomTypeclass is itself of typetraining:Telcom, and has a reverse value of type.entity
Type
training:Entity
Another complex type, creating an association with the
Entityclass.Required
true
Every
Telecomchannel must be associated with an entity-specificEntityinstance.Reverse
telcoms
Later, to complete the reciprocal relationship, add the telcoms attribute of type
training:Telcomto theEntityclass.isPrimary
Type
boolean
Initializer
#f
Set this property on the Value tab.
#fis the Scheme symbol for “false”. If you set the language to "js" for the initializer script's properties, then simply use false.
-
Save your changes.
At this point you have completed setting up the association between the training:Telcom and the training:TelcomType classes. However, the training:Telcom class also has a two-way association with the training:Entity class, so you must update the training:Entity class as well to complete your work on the Business Model for this lesson.
Complete the relationship between the training:Telcoms and training:Entity classes:
-
Open the
training:Entityclass. -
In the Attributes tab, ensure the telcoms attribute has the following properties set:
Attribute to add to the Entity classAttribute
Property
Value
Notes
telcoms
Type
training:Telcom
Collection
true
Reverse
entity
Cascade
delete
Set the cascade property on the Validation tab.
Setting the
Cascadeproperty to delete causes all the associatedtraining:Telcominstances for atraining:Entityinstance to be deleted when thetraining:Entityinstance is deleted.
-
Click the Save button

Update the class diagram
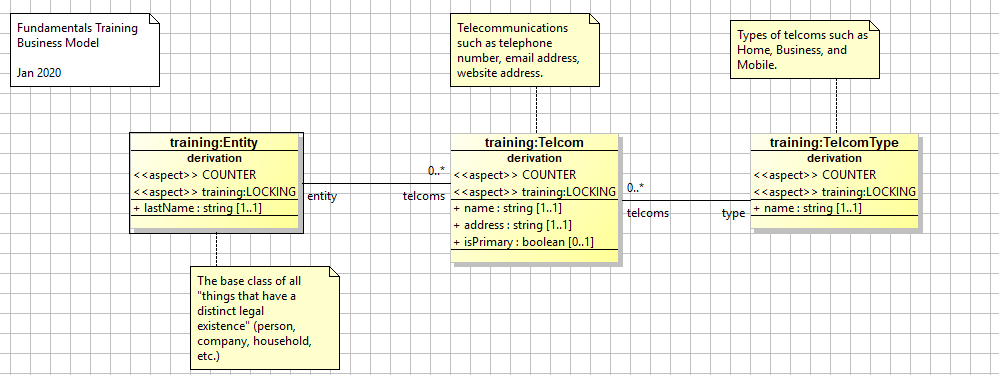
As you've seen, you can create UML class diagrams of your business model in NexJ Studio. You can then use the diagram to drill down into the model details and make model changes. If you then add attributes, derivations, or descriptions, to classes, they aren't automatically added to existing diagrams. In this section, we want to update the diagram to end up looking like the image below.
You can see an association in a type diagram in two ways:
-
Class with an attribute whose type is another class (e.g.
+ type :training:TelcomType). -
Both classes are in the diagram, connected with a line labelled with the attribute or attributes by which the classes are associated, the cardinality of those attributes, and the direction of the association.
-
The only thing missing from the diagram are the training:LOCKING aspects that we added to the training:Telcom and training:TelcomType classes.
-
Right mouse click on each class and select "Unhide Derivations" to expose the aspects we added.
-
You could also unhide the descriptions for the classes if you want. Your diagram should then look something like...
-
Save your work.
-

Test the model logic
Now you test the model logic to ensure it behaves as expected.
In a scratchpad, we will create a training:Entity instance, define a training:TelcomType instance, and then create a training:Telcom instance that has associations to both of them.
The steps in this lesson assume that you have carried out the steps in Test your work, in the previous module which persists some data to the model. If you did not run those steps, or if you have subsequently carried out an action that erases the data store, such as using the Data Load Tool to reset or recreate the database, then you should rerun the code from that lesson in a console before proceeding.
-
Use an existing or create a new scratchpad. (Resources → Scratchpads). Add the following commands to the scratchpad:
; read an entity that you created in the previous lesson and assign it to the
; variable "anEntity". read-instance is used here to find the Entity instance
; that has a lastName value of "Thing1"
(define anEntity (read-instance training:Entity '() '(= lastName "Thing1") '()))

; ensure that Thing1 existed, if not create it
(when (null? anEntity) (set! anEntity (training:Entity'new (: lastName "Thing1"))))

; create a new TelcomType of Home
(define aTelcomType (training:TelcomType'new (: name "Home")))

; create a new Telcom instance associated with the Thing1 entity and the
; Home telcomtype
(define aTelcom
   (training:Telcom'new
      (: entity anEntity)
      (: type aTelcomType)
      (: name (aTelcomType'name))
      (: address "(416) 555-1234")
   )
)
JavaScript; If you are running your console in javascript with the read -Dnexj.repl.language="js" flag, then use the following script ; read an entity that you created in the previous lesson and assign it to the ; variable "anEntity". read-instance is used here to find the Entity instance ; that has a lastName value of "Thing1" ; notice that any non-standard javascript syntax (like "-" and ":" in identifiers) is quoted with #"<expression>" var anEntity = #"read-instance"(#"training:Entity", null, #"'()", null); ; ensure that Thing1 existed, if not create it if (null?(anEntity)) { anEntity = new #"training:Entity"({lastName: "Thing1"}); } ; create a new TelcomType of Home var aTelcomType = new #"training:TelcomType"({name: "Home"}); ; create a new Telcom instance associated with the Thing1 entity and the ; Home telcomtype var aTelcom = new #"training:Telcom"({entity: anEntity, type: aTelcomType, name: aTelcomType.name, address: "(416) 555-1234"});
-
Run the Server Console using

The console automatically validates the model when it starts.
-
Select the statements you entered in the scratchpad and press Ctrl+U to run them in the console. You should see output similar to the following:
; 12:16:17,507 DEBUG [SQLAdapter] select A.id, A.locking from NJEntity A where
 A.lastName = ?
; 12:16:17,508 DEBUG [SQLAdapter] Bind[0] = 'Thing1'
; 12:16:17,512 DEBUG [<default>] Activated
 SQLConnection@1317264939(pool=RelationalDatabaseConnectionPool(fragment=RelationalDatabaseFragment
 DefaultRelationalDatabase.<default>))
; 12:16:17,579 DEBUG [SQLAdapter] SQL execution time: 67 ms
; 12:16:17,580 DEBUG [SQLAdapter] Retrieved 1 instance(s) of Entity in 1 ms

; #<Instance<Entity, OID:1:V32:D2F82A01DE0A44FCB5807316DFCEB65F,
CLEAN>(locking=0)>

> ; 12:16:17,583 DEBUG [TelcomType] Invoking Event TelcomType.new(values)
; 12:16:17,588 DEBUG [GenericTransactionManager] Starting new transaction
 Tx(00000000000000005A1438C0B5F97552370ADC03C577DE56)
; 12:16:17,588 DEBUG [InvocationContext] Started new transaction
 Tx(00000000000000005A1438C0B5F97552370ADC03C577DE56)
; 12:16:17,589 DEBUG [<default>] Deactivating
 SQLConnection@1317264939(pool=RelationalDatabaseConnectionPool(fragment=RelationalDatabaseFragment
 DefaultRelationalDatabase.<default>))
; 12:16:17,591 DEBUG [TelcomType] Invoking Event TelcomType.create()

; #<Instance<TelcomType, null, NEW>(name="Home")>

> ; 12:16:17,592 DEBUG [Telcom] Invoking Event Telcom.new(values)
; 12:16:17,595 DEBUG [Telcom] Invoking Event Telcom.create()

; #<Instance<Telcom, null, NEW>(name="Home", address="(416) 555-1234",
 type=Instance<TelcomType, null, NEW>, entity=Instance<Entity,
 OID:1:V32:D2F82A01DE0A44FCB5807316DFCEB65F, CLEAN>)>

>
Stop the Console by clicking the Terminate button

Create the class persistence mapping
Now, use the Persistence Mapping tab to manage the persistence of the class attributes to the data sources that you have defined.
To enable persistence for the Telcom class:
-
Open the
training:Fundamentalsclass diagram (Business Model → Diagrams). -
Double-click the title of the training:
Telcomclass. The training:Telcomclass opens in the editor. -
Click the Persistence Mapping tab at the bottom of the editor.
-
Set the Data Source property to
training:DB. -
Set the Primary Table to
Telcom.Because the training:DB datasource has a prefix of "TRN" (set on the datasource editor's advanced tab), the actual physical table will be TRNTelcom.
-
In the Key Generator field, select KeyGenerator.GUIDGen (GUID key generator).
-
To define which attributes have their data stored in the database, click the Select Attribute Mappings button
and select the following attributes:
-
name
-
address
-
type
-
entity
-
isPrimary
Thename,address, andisPrimaryattributes appear in the Primitive Attributes list. Thetypeandentityattributes appear in the Association Attributes list.
-
-
To complete defining the associations between the
training:Telcomclass and the associated classes, set the Source Key, and Destination Key values for the Association Attributes according to the following table.
Association attribute mapping for the Telcom classAttribute
Source Key
Destination Key
type
Telcom.FK_TelcomType
entity
Telcom.FK_Entity
Leave the key blank if you are specifying the object key for the source or destination (AKA primary key)
The
typeandentityattributes are complex, and associated with thetraining:TelcomTypeand training:Entityclasses, respectively. For each of these, the source key is a foreign-key index on the class you are working with, and the destination key is an index on the associated class. The values of the columns indexed by these keys will be coordinated to track the association of the class instances. -
Save your work.
-
Click Update Data Source to apply these changes to the training:DB datasource.
-
Click OK on the Update Data Source window.
-
You are taken to the properties of the
training:DB datasourcein the Data Sources tab of the Persistence layer. -
On the General tab add
Stores Telcom objects for an Entity.as the Description. -
Set the case insensitive flag for the id column to false.
Columns for the primitive attributes, including the id column used for the index have been created for you, as well as the primary key index. However, you need to add the columns and the indexes that are used to define the associations with other classes.
To create the columns and indexes for the associations:
-
In the Columns tab, click the last attribute, then click the Add button

Column properties for the Telcom tableColumn Name
Type
Allocation
Allow Nulls
Precision
Case Insensitive
telcomTypeId
binary
fixed
false
16
false
entityId
binary
fixed
false
16
false
-
In the Indexes tab, add the following two indexes:
Index properties for the Telcom tableName
Type
Unique
Index Columns (press add in lower list)
Telcom.FK_TelcomType
btree
false
telcomTypeId
Telcom.FK_Entity
btree
false
entityId
The Telcom.FK_TelcomType index is used to instantiate the association between the
training:Telcomandtraining:TelcomTypeclasses through their respective type and telcoms attributes. Likewise, the Telcom.FK_Entity index establishes the association between thetraining:Telcomandtraining:Entityclasses. Foreign keys act by taking on values of the (usually primary) keys of other tables.
-
Save your work.
Return to the training:Fundamentals diagram so that you can enable persistence for the training:TelcomType class.
-
Double-click the
training:TelcomTypeclass and select the Persistence Mapping tab. -
Select the training:DB datasource.
-
Set the Primary Table as
TelcomTypeand specify the Key Generator of KeyGenerator.GUIDGen. -
Click the Select Attribute Mappings button
telcomsattributes. -
Set the Name, Source Key, and Destination Key values for the
telcomsattribute according to the following
table.
Association attribute mapping for the TelcomType classAttribute
Source Key
Destination Key
telcoms
Telcom.FK_TelcomType
-
Save your work.
-
Click Update Data Source to apply these changes to the training:DB datasource. Click OK on the Update Data Source window.
-
You are taken to the properties of the
DefaultRelationalDatabasein the Data Sources tab of the Persistence layer. -
In the General tab add
Stores Telcom types. as the Description. -
In the Columns tab, deselect the Case Insensitive property of the
idcolumn. -
In the Indexes tab, add the following index:
Index properties for the TelcomType tableName
Type
Unique
Index Columns
TelcomType.OK_Name
btree
true
name
The TelcomType.OK_Name index ensures that all names in the class are unique. The acronym OK is used to signify "other key," i.e. a key that is neither the primary key nor a foreign key.
-
Save your changes.
Return to the training:Fundamentals diagram so that you can enable persistence mapping for the Entity class:
-
In the
training:Entitydiagram, double-click theEntityclass. The class opens in the editor. -
Click the Persistence Mapping tab.
-
Click the Select Attribute Mappings button
telcomsattribute. -
Set the Source Key, and Destination Key values for the
telcomsattribute according to the following table.
Association attribute mapping for the Entity classAttribute
Source Key
Destination Key
telcoms
Telcom.FK_Entity
Note that the source key for the
Entity.telcomsattribute was the destination key of theTelcom.entityattribute. Likewise, the source key of theTelcom.entityattribute is the destination key of Entity.telcoms.
This completes the mapping required to instantiate the association between theTelcomandEntityclasses.
No changes to the data source are required. -
Save your work and validate the model.
Edit the upgrade file
Now that you have defined the logical database structure and the persistence model, make changes to the upgrade file so that you can upgrade your physical database.
-
In the Persistence layer on the Data Sources tab right-click the training:DB and select Generate Upgrade Steps.
-
Leave the default values for Upgrade and Current Data Source.
-
Select Local History as the Old Data Source. You are going to use a published model as the old model.
-
Select Revision Time from before you added the TelcomType and Telcom tables and click Next.
-
Whenever you upgrade a database, you must increment the version number by a whole number. e.g. 3.1092.1307.167.53 to 4.1092.1307.167.53
. -
Enter the following as the Description:
Added telcoms support. -
One the left side you can see a list of the upgrade steps that will be applied to the database. There are two CreateTable steps: one for the
training:Telcomtable and one for thetraining:TelcomTypetable. For each table, click the Columns and Indexes tabs to review how the tables will be created. -
Click Finish to create the upgrade steps.
-
You must ensure that your current model's version matches the upgrade version. Click the Set current model button

-
With the current model selected, click Edit. Update the Model Version field to match the version associated with the upgrade you just created. So, if your upgrade is associated with version 4.1092.1307.167.53, then change the Model version to 4.1092.1307.167.53. This enables the upgrade tool to recognize that the model has changed so that your update can be applied to existing data stores.
-
Click OK. Notice that the new version is now reflected in the table in the Models tab.
-
Click the Save button
Upgrade the database
Use the Data Load Tool to apply the changes from the upgrade file to the physical database:
-
Launch the Data Load Tool by clicking the drop-down arrow next to the Run tool button

-
In the Model section, select Current.
-
In the Server and Connection field, ensure that the Test option is cleared.
-
In the Server field, select Development(development.properties) environment.
You must select this environment because you need to use a user with permissions to change to the database table structure. -
In the Command field, select upgrade.
-
In the Data Source field, select *.
-
Select Ignore Upgradable Flag.
-
Click Run.
-
You should get an Exit code = 0 as follows:

To verify that the upgrade worked:
-
Run your database's management tool or query client.
-
Verify that the table
TRNTelcomexists with the proper column definitions in the training database:-
For Microsoft SQL Server use the
use training;
exec sp_help TRNTelcom;
statement.
-
Test your work
Test your work by confirming that you can persist training:Telcom and training:TelcomType instances to the database.
To persist instances to the database:
-
Start the Server Console in Debug mode.
-
Open an existing or create a new scratchpad.
-
Previously, you created classes in the Console that were not persisted. This time you use the (
commit) command to save the data in the database.
Add the following command to the end of the existing code from earlier in the lesson :(commit) ; or commit() for javascript
-
Select all the code and press Ctrl+U to run it.
-
Inspect the console output, which should resemble the following:
> (define anEntity (read-instance training:Entity '() '(= lastName "Thing1") '()));
 11:32:39,280 DEBUG [Entity] Invoking Event training:Entity.read(attributes, where,
 orderBy, count, offset, xlock)
; 11:32:39,280 DEBUG [GenericTransactionManager] Starting new transaction
 Tx(0100000000000000957F8007248ECAAF3255D10A83E37864)
; 11:32:39,280 DEBUG [InvocationContext] Started new transaction
 Tx(0100000000000000957F8007248ECAAF3255D10A83E37864)
; 11:32:39,280 DEBUG [SQLAdapter] select A.id, A.locking from TRNEntity A where
 A.lastName = ?
; 11:32:39,280 DEBUG [SQLAdapter] Bind[0] = 'Thing1'
; 11:32:39,280 DEBUG [GenericConnectionManager] Activated
 connection SQLManagedConnection@18170911(user=sa,
 factory=SQLManagedConnectionFactory({serverName=localhost, maxStatements=0,
 lobBuffer=10485760, prepareSql=3, databaseName=test101b, appName=NexJ,
 bufferMaxMemory=65536, xaEmulation=true, sendStringParametersAsUnicode=true}))
; 11:32:39,312 DEBUG [SQLAdapter] SQL execution time: 32 ms
; 11:32:39,312 DEBUG [SQLAdapter] Retrieved 1 instance(s) of Entity in 0 ms

; #<Instance<training:Entity, OID:1:V32:A8D16D8698BB4AE092FB24462FF3BBC1,
 CLEAN>(locking=0)>

> (define aTelcomType (training:TelcomType'new (: name "Home"))); 11:32:41,999 DEBUG
 [TelcomType] Invoking Event TelcomType.new(values)
; 11:32:41,999 DEBUG [training:TelcomType] Invoking Event training:TelcomType.create()

; #<Instance<training:TelcomType, null, NEW>(name="Home")>

> (define aTelcom (training:Telcom'new (: entity anEntity) (: type aTelcomType) (: name
 (aTelcomType'name)) (: address "(416) 555-1234")))
; 11:32:44,952 DEBUG [training:Telcom] Invoking Event training:Telcom.new(values)
; 11:32:44,968 DEBUG [training:Telcom] Invoking Event training:Telcom.create()
; #<Instance<training:Telcom, null, NEW>(name="Home", address="(416) 555-1234",
 type=Instance<TelcomType, null, NEW>, entity=Instance<training:Entity,
 OID:1:V32:A8D16D8698BB4AE092FB24462FF3BBC1, CLEAN>)>

> (commit) ; 11:32:47,202 DEBUG [training:TelcomType] Invoking Event
 training:TelcomType.commit()
; 11:32:47,202 DEBUG [training:Telcom] Invoking Event training:Telcom.commit()
; 11:32:47,202 DEBUG [training:TelcomType] Invoking Event training:TelcomType.load(attributes)
; 11:32:47,202 DEBUG [training:Telcom] Invoking Event training:Telcom.load(attributes)
; 11:32:47,202 DEBUG [training:Telcom] Invoking Event training:Telcom.load(attributes)
; 11:32:47,202 DEBUG [UnitOfWork] Committing 2 instance(s)
; 11:32:47,202 DEBUG [SQLAdapter] insert into TRNTelcom(id, name, address,
 telcomTypeId, entityId, isPrimary, locking) values (?, ?, ?, ?, ?, ?, ?)
; 11:32:47,202 DEBUG [SQLAdapter] Bind[0] = 444882F001E3470EB297EF54E913351D
; 11:32:47,202 DEBUG [SQLAdapter] Bind[1] = 'Home'
; 11:32:47,202 DEBUG [SQLAdapter] Bind[2] = '(416) 555-1234'
; 11:32:47,202 DEBUG [SQLAdapter] Bind[3] = 1BB9C0FC578443A194BC68EC259A12DA
; 11:32:47,202 DEBUG [SQLAdapter] Bind[4] = A8D16D8698BB4AE092FB24462FF3BBC1
; 11:32:47,202 DEBUG [SQLAdapter] Bind[5] = 0
; 11:32:47,218 DEBUG [SQLAdapter] Bind[6] = 0
; 11:32:47,265 DEBUG [SQLAdapter] SQL execution time: 47 ms
; 11:32:47,265 DEBUG [SQLAdapter] insert into TRNTelcomType(id, name, locking)
 values (?, ?, ?)
; 11:32:47,265 DEBUG [SQLAdapter] Bind[0] = 1BB9C0FC578443A194BC68EC259A12DA
; 11:32:47,265 DEBUG [SQLAdapter] Bind[1] = 'Home'
; 11:32:47,265 DEBUG [SQLAdapter] Bind[2] = 0
; 11:32:47,280 DEBUG [SQLAdapter] SQL execution time: 15 ms
; 11:32:47,280 DEBUG [InvocationContext] Committing transaction
 Tx(0100000000000000957F8007248ECAAF3255D10A83E37864)
; 11:32:47,280 DEBUG [GenericTransactionManager] Committing transaction
 Tx(0100000000000000957F8007248ECAAF3255D10A83E37864)
; 11:32:47,280 DEBUG [GenericConnectionManager] Deactivating
connection SQLManagedConnection@18170911(user=sa,
factory=SQLManagedConnectionFactory({serverName=localhost, maxStatements=0,
lobBuffer=10485760, prepareSql=3, databaseName=test101b, appName=NexJ,
bufferMaxMemory=65536, xaEmulation=true, sendStringParametersAsUnicode=true}))
; 11:32:47,280 DEBUG [UnitOfWork] Commit completed

; ()
-
Verify that the data was correctly persisted by querying the database. Execute each of the following queries one by one:
Microsoft SQL ServerSQLselect entityId, telcomTypeId, name from TRNTelcom select id, lastName from TRNEntity select id, name from TRNTelcomType
The
entityIdis a reference to the record id in theEntitytable. Similarly, thetelcomTypeIdis a reference to the "Home" training:TelcomTyperecord. This is where you see the Source Key and Destination Key properties in action.