Develop NexJ Process Management forms using Scheme or JavaScript in NexJ Studio. Forms are stored as libraries in the Resources layer of your model. Within the library, each form is defined as a flow. Each form (or flow) should be defined in its own library, with each flow library using the following naming convention:
Where <formname> is a unique identifier for the form, and composed of all lowercase letters. For example, simple.
Simple forms
A simple form collects information in a single page and single section. A simple form can bind to a single class in the underlying business model. This means that you can use the attributes of the underlying model to provide form values, calculations and validation.
Depending on the process using the form, you can save form information and use it to update underlying model information.
Creating a simple form
When creating a simple form, assume that you are creating a flow to capture a contact's basic information in your system.
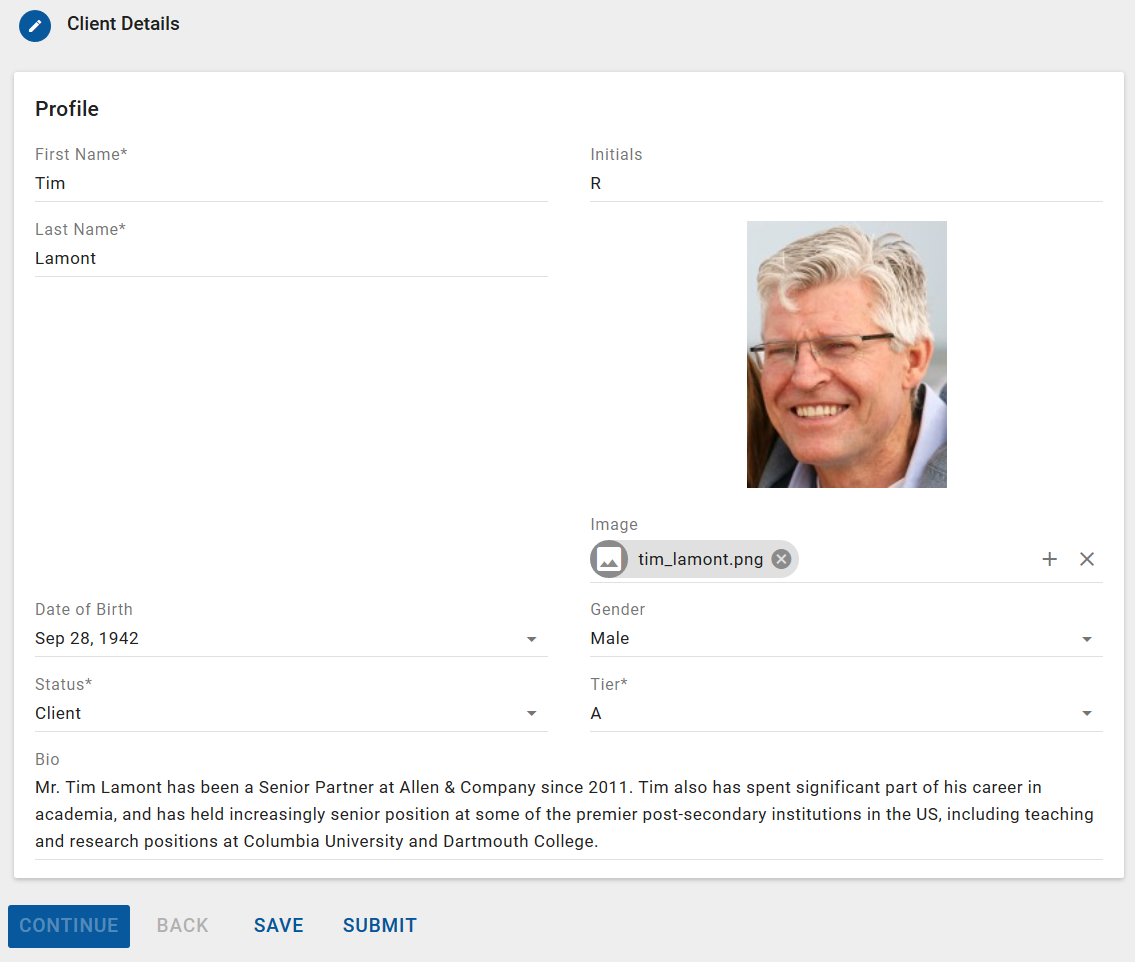
The following example builds a simple form. It creates a page with an ID of Client_Details, captioned with the title Client Details. This page contains a single section labeled Profile. The fields on the page capture the following client information:
First name
Initials
Last Name
Full Name
Image of the client
Birthdate
Gender
Service tier
Notes
When you create a form, define a question for each of these client attributes. These questions become fields on the form. Each question has the following mandatory parts:
Type of question - Affects the control used to obtain the answer.
ID of the question (optional) - If this ID matches an attribute in the class that the form section binds to, the value of that attribute becomes the initial answer to that question on the form. If you want to refer to the question's answer from elsewhere in the form, you must give it an ID.
Questions of type "label" do not have IDs.
For example:
Scheme code
SCHEME
(bp:flow                          ; Defines the beginning of the flow. The element closes on the last line of the code (after the bind declaration).
   (bp:page Client_Details          ; Declares the start of the page and provides the ID Client_Details, which can be used as a reference in more advanced forms.
                                  ; Additionally provides a title (caption) for the page, and declares the page number.
      (: caption "Client Details")
      (: number "1")
      (bp:section profile          ; Declares a single "section" to contain the entry fields (questions) for the form, and then defines each question.
         (: caption "Profile")
         (bp:text firstName)
         (bp:text initials)
         (bp:text lastName)
         (bp:image image)
         (bp:date birthTime)
         (bp:combo genderCode)
         (bp:combo entityStatus)
         (bp:combo tier)
         (bp:textarea notes)
      )
   )
   (: bind Person)              ; Binds the results to the Person class.
)
JavaScript code
JS
bp.flow(                        //Defines the beginning of the flow. The element closes on the last line of the code (after the bind declaration).
    bp.page(Client_Details,     //Declares the start of the page and provides the ID Client_Details, which can be used as a reference in more advanced forms.
                                //Additionally provides a title (caption) for the page, and declares the page number.
        {
            caption: "Client Details",
            number: "1"
        },
        //Declares a single "section" to contain the entry fields (questions) for the form, and then defines each question.
        bp.section(profile,
            {caption: "Profile"},
            bp.text(firstName),
            bp.text(initials),
            bp.text(lastName),
            bp.image(image),
            bp.combo(genderCode),
            bp.combo(entityStatus),
            bp.combo(tier),
            bp.textarea(notes)
        )
    ),
    {bind: Person}        //Binds the results to the Person class.
)
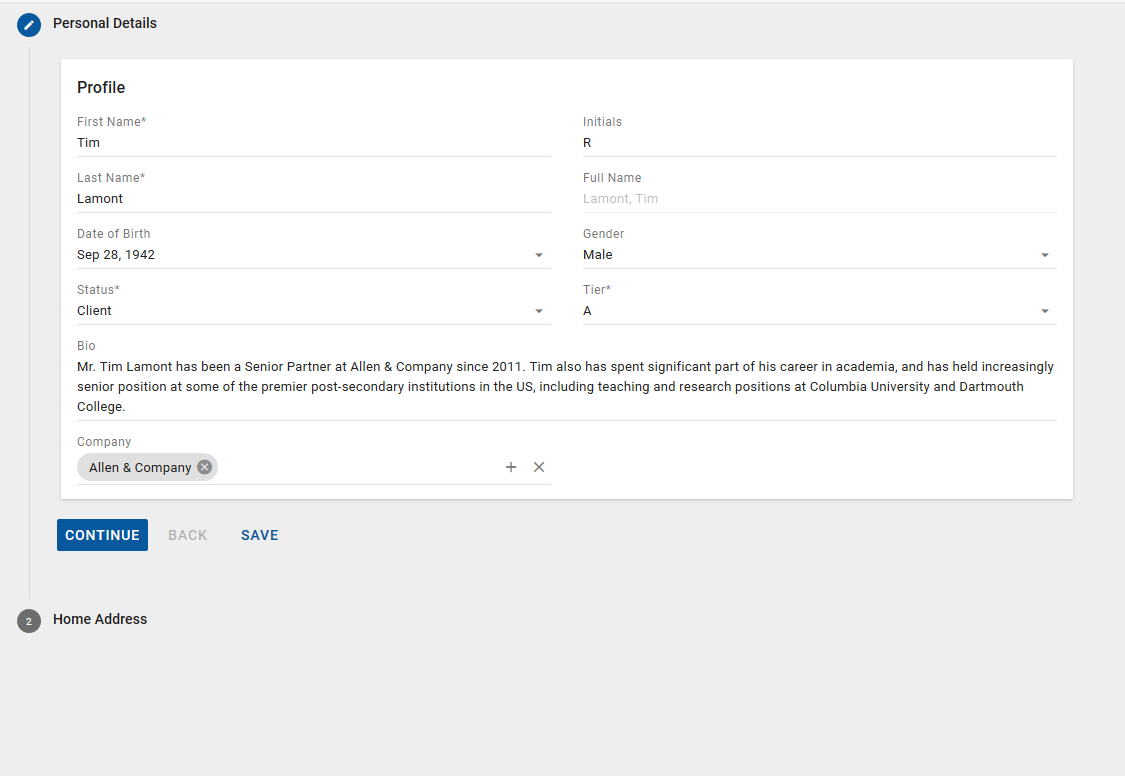
The following image shows an example of a simple form. The labels on the form come from the caption values of the Person class that the form binds to. Indication that a field is mandatory also comes from the model and reflects whether the attribute's Required property is set.
Adding field captions and ghost text
If the attribute caption taken from the model is not sufficient or unclear in the context of your form, you can change what is displayed by adding a caption statement:
Scheme
SCHEME
(: caption "caption_text")
JavaScript
JS
caption: "Caption text",
You can also use this to provide labels for questions that do not bind to a model attribute. Caption text appears on the line of the entry field.
Additionally, for text fields, you can provide instructional text by adding a hint statement:
Scheme
SCHEME
(: hint "hint_text")
JavaScript
JS
hint: "hint text"
Text in this statement appears underneath the entry field.
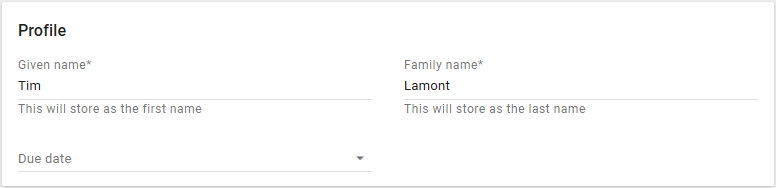
For example, the following code creates a form that gets first and last name information from the Person class, but overrides the captions with Given name and Family name. It also includes a date field that has no mapping to the underlying model and the caption for this question comes directly from the form definition.
Scheme code
SCHEME
(bp:flow
    (bp:page example_page
      (: caption "Personal Details")
      (: number "1")
      (bp:section profile
        (: caption "Profile")
        (bp:text firstName
          (: caption "Given name")
          (: hint "This will store as the first name")
         )
        (bp:text lastName
          (: caption "Family name")
          (: hint "This will store as the last name")
         )
        (bp:date dueDate
          (: caption "Due date")
          )
        )

   )
   (: bind Person)
  )
JavaScript code
JS
bp.flow(
    bp.page(example_page,
        {
            caption: "Personal Details",
            number: "1"
            },
        bp.section(profile, {caption: "Profile"},
            bp.text(firstName,
                {
                    caption: "Given Name",
                    hint: "This will store as the first name"
                }
            ),
            bp.text(lastName,
                {
                    caption: "Family name",
                    hint: "This will store as the last name"
                }
            ),
            bp.date(dueDate, {caption: "Due Date"})
        )
    ),
    {bind: Person}
);
Mandatory and optional fields
By default, answers to questions are optional. The form's end-user does not have to provide a value for every question field on the form. In a bound field, if the underlying attribute is marked as required, an answer to that question is also mandatory. If you want to mark other questions as mandatory, use the following attribute statement:
Scheme
SCHEME
(: required #t)
JavaScript
JS
required: true
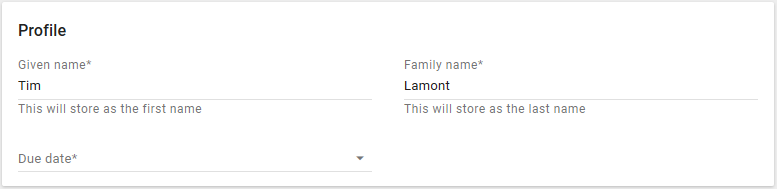
Using the previous example, if you want to make the Due date field mandatory, code the following:
Scheme code
SCHEME
(bp:flow
    (bp:page example_page
      (: caption "Personal Details")
      (: number "1")
      (bp:section profile
        (: caption "Profile")
        (bp:text firstName
          (: caption "Given name")                       ; Required by the underlying model
          (: hint "This will store as the first name")
         )
        (bp:text lastName                                ; Required by the underlying model
          (: caption "Family name")
          (: hint "This will store as the last name")
         )
        (bp:date dueDate                                 ; Not a bound attribute
          (: caption "Due date")                         ;
          (: required #t)                                ; Marked as required explicitly
          )
        )

   )
   (: bind Person)
  )
JavaScript code
JS
bp.flow(
    bp.page(example_page,
        {
            caption: "Personal Details",
            number: "1"
        },
        bp.section(profile,
            {
                caption: "Profile"
            },
            bp.text(firstName,
                {
                    caption: "Given Name",                      // Required by the underlying model
                    hint: "This will store as the first name"
                }
            ),
            bp.text(lastName,
                {
                    caption: "Family name",                     // Required by the underlying model
                    hint: "This will store as the last name"
                }
            ),
            bp.date(dueDate,
                {
                    caption: "Due date",                        // Not a bound attribute
                    required: true                              // Marked as required explicitly
                }
            )
        )
    ),
    {bind: Person}
);
Mandatory fields are validated immediately on edit. There is no need to validate again when saving. To validate all fields without any edits, click Submit.
Setting initial values
You can set an initial value for a field using the following option:
Scheme
SCHEME
(: initialize "value")
JavaScript
JS
{initialize: "value"}
For example, to set the default value of tier to A, specify the following:
Scheme code
SCHEME
(bp:combo tier
  (: initialize "A")
)
JavaScript code
JS
bp.combo(tier, {initialize: "A"});
Remember to validate that the field allows the initialization value.
If a value for a given question already exists in the underlying model, that value becomes the initial value regardless of what is set by Initialize.
Setting calculated values
In some cases, you may want to display a calculated field to either summarize information from elsewhere in the form, or retrieve information to reference from the system data. Calculated fields are defined using the following option:
Scheme
SCHEME
(: value (string-append <value1> <value2>))
JavaScript
JS
value: <value1> + <value2>
For example, the following code snippet takes the values of the firstName, middleName, and lastName fields, concatenates them, and displays them as a fullName value.
To concatenate two data types into a string when creating a caption using Scheme, add a check for values as shown in the following code in order to prevent problems caused by undefined values. In the following example, assetValue is a number and asset is a string.
All forms appear on a single screen. Multi-step forms organize related questions together into expandable steps on a single screen. You are always able to navigate to steps within a form to review and change answers.
You can also use multi-step forms to control the flow of information gathering by making the appearance of later steps on a form dependent on answers provided earlier.
The following code defines a simple two-step form. The resulting form is also included.
Note the following:
Each step is defined in the code as a "page".
You can provide a caption for every step to help users navigate longer forms. Step (page) captions are always visible.
You can provide section captions, which provide guidance within a given step. Section captions are only visible when a step is open.
You can provide a number for each step, which can be up to two characters, and which appears to the side of the form navigation.
Step and section captions are not required, but are recommended to help users navigate the form.
You can additionally divide each step of the form into multiple sections. Like steps, sections help you to group related questions together visually to help with navigating and filling out the form. Unlike steps, however, sections do not expand and collapse as you move between them. The following example code displays the same information as for the multi-step example, but groups it into two sections instead of two steps.
Note the following:
Each section within a step displays as a separate card.
All of the sections within the step, display at the same time. You cannot expand and collapse sections.
If you plan to bind your form to the underlying data, sections can help you access information stored in associated class attributes. For more information on this, see Binding forms and navigating attributes.
You may want to allow a section or step to repeat multiple times in order to collect data sets of varying sizes. To accomplish this, add the following attribute to the form element you want to repeat.
Scheme
SCHEME
(: collection #t)
JavaScript
JS
collection: true
This is usually done on a section-by-section basis, but entire steps can also be defined as collections.
Collections of sections
For example, assume you are creating a form in which part of the information you want to gather is a list of major assets belonging to a client.
For each entry, include a text field with a description of the asset, and another with the estimated value. For example:
Scheme code
SCHEME
(bp:flow
    (bp:page example_page
      (: caption "Assets")
      (: number "1")
      (bp:section profile
        (: caption "Assets listing")
        (: captions (@ question asset)  ; Provides caption for each entry in the collection
          )
        (: collection #t)
        (bp:text asset
          (: caption "Asset")
          (: hint "Brief description of asset. e.g. Car, house")
         )
        (bp:currency assetvalue
          (: caption "Asset value")

         )
        )

   )
   (: bind Person)
  )
JavaScript code
JS
bp.flow(
    bp.page(example_page,
        {
            caption: "Assets",
            number: "1"
        },
        bp.section(profile,
            {
                caption: "Assets listing",
                captions: $.question.asset, //Provides caption for each entry in the collection
                collection: true
            },
            bp.text(asset,
                {
                    caption: "Asset",
                    hint: "Brief description of asset. e.g. Car, house"
                }
            ),
            bp.currency(assetValue, {caption: "Asset value"})
        )
    ),
    {bind: Person}
);
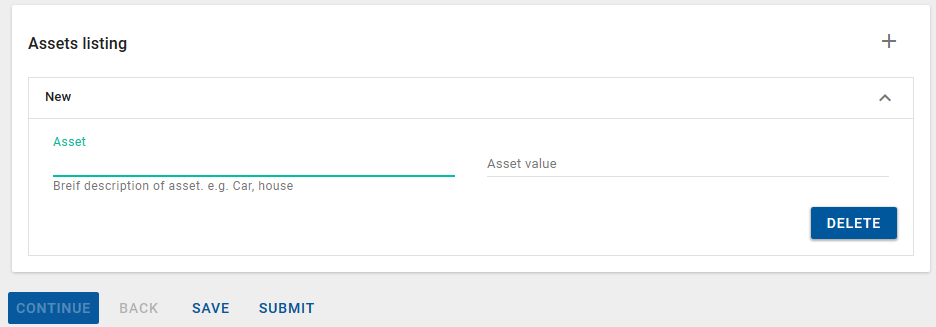
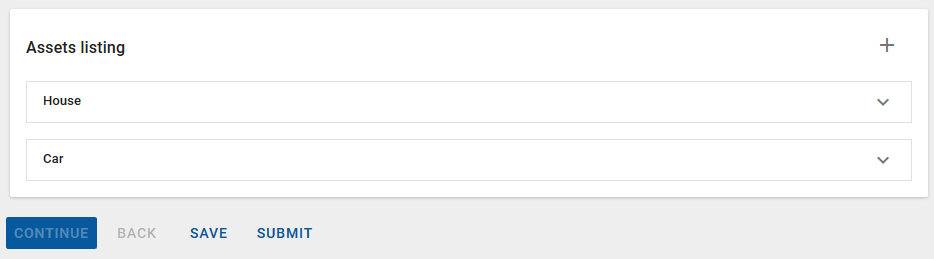
When this section first opens, it looks like:
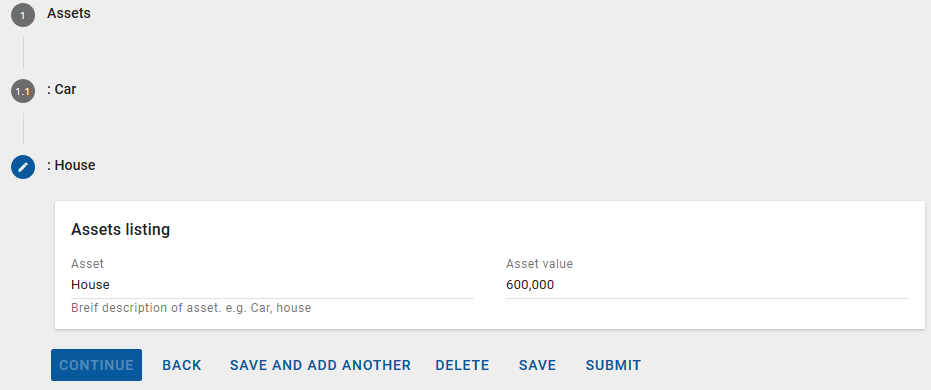
When you click the Add icon , the first entry opens:
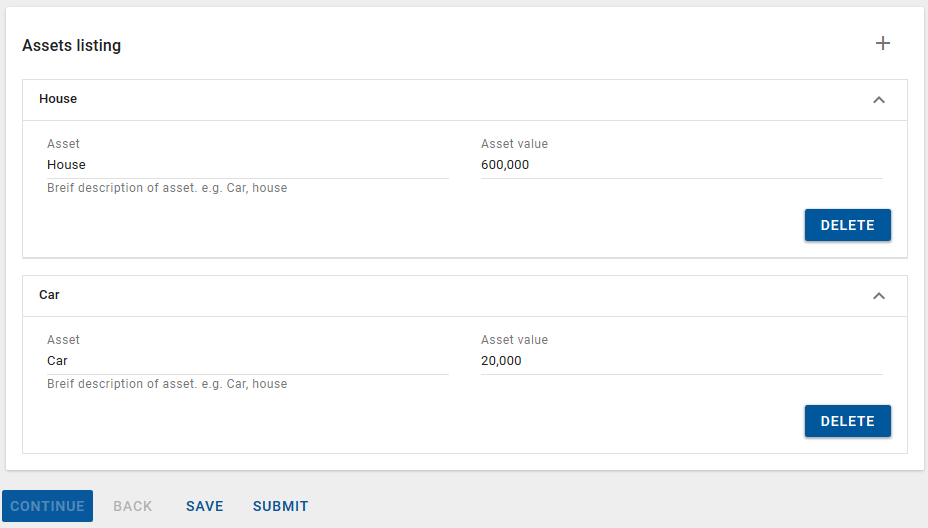
After filling out a couple of entries, the form looks like this:
You can collapse each section without losing data:
Collection of steps
In most cases, sections are used to create collections. For comparison, the following code defines the collection at the step level:
Scheme code
SCHEME
(bp:register-flow "docsamplecollection" #f
(bp:flow
    (bp:page example_page
      (: caption "Assets")
      (: collection #t)                      ; Note that the collection is now on the page
        (: captions (@ question asset)       ; The captions still take their values from the answers in each collection entry
          )
      (: number "1")
      (bp:section profile
        (: caption "Assets listing")
        (bp:text asset
          (: caption "Asset")
          (: hint "Brief description of asset. e.g. Car, house")
         )
        (bp:currency assetvalue
          (: caption "Asset value")

         )
        )

   )
   (: bind Person)
  )

)
JavaScript code
JS
bp.registerFlow("docsamplecollection", jsToScheme("(bp:util:is-finance-mixin)"),
    (function () {
        return bp.flow(
            {
                bind: Person
            },
            bp.page(example_page,
                {
                    caption: "Assets",
                    collection: true,               // Note that the collection is now on the page
                    captions: $.question.asset,     // The captions still take their values from the answers in each collection entry
                    number: "1"
                },
                bp.section(profile, {caption: "Assets listing"},
                    bp.text(asset,
                        {
                            caption: "Asset",
                            hint: "Brief description of asset. e.g. Car, house"
                        }
                    ),
                    bp.currency(assetValue, {caption: "Asset value"})
                )
            )
        );
    })()
);
In this example, the initial state seen by the user is:
The user filling out the form can click Save and Add Another to create each entry in the collection. When completed as in the previous example, it looks like this:
Only one step in the collection can be open at any time. This is consistent with the general step behavior.
Forms with conditions and validation
You can add conditions to forms to control the behavior of fields, sections, and pages. The two primary uses of conditions are to control visibility and requirement, that is, whether questions, sections, or steps are visible to users, and whether questions are mandatory.
In determining these conditions, you can make use of any number of the following:
Answers given to preceding questions in the form.
Values from the underlying data that could be included as questions in the form.
Operators such as exists, equals, starts with, or contains.
Referencing other questions
When you add a condition that is based on the value provided by another question, you must explicitly reference that question in your condition. The referenced question, therefore, must have an ID in its definition. A question's conditions can reference any other question in the same section, or any question in an earlier section or step.
The syntax for making these references:
For referencing a question within the same section:
Scheme
SCHEME
@ question <questionID>
JavaScript
JS
$.question.questionID
For referencing a question in a previous section of the same step:
Scheme
SCHEME
@ section <sectionID questionID>
JavaScript
JS
$.section.sectionID.questionID
For referencing a question on a previous step:
Scheme
SCHEME
@ page <pageID sectionID questionID>
JavaScript
JS
$.page.pageID.sectionID.questionID
Where: <questionID> is the ID of the question you want to reference. <sectionID> is the ID of the section containing the question you want to reference. <pageID> is the ID of the step containing the question you want to reference.
Referencing other values in the underlying model
Other values, values that you might not want to display, can be accessed by a question and used in another question's condition. The basic method for accessing this information is to create a question earlier in the form to access the data you want, and then use the syntax for referencing other questions to access the resulting value.
The best practice for making the data available is:
Create a question earlier in the model that accesses the data you want to use in a later question.
If you do not want to show the question in that earlier section, set the visibility of either the question or the entire section to #f.
Access the question value through an @ question, @ section, or @ page reference as appropriate, later in the form.
Constructing conditional statements
Form definition is based on the Scheme programming language, which is a functional language related to Lisp. The basic syntax structure when creating your validation expressions, follows this general pattern:
operator first_operand second_operand
If any of the operands themselves are expressions, those expressions are embedded in parentheses that contain the same three-part structure.
For example, the following expression:
Scheme
SCHEME
(= "Y" (@ question hasRealEstateEquity))
JavaScript
JS
$.question.hasRealEstateEquity === "Y"
tests whether the value of the answer to the question hasRealEstateEquity evaluates to Y. If it does, the overall expression gives a value of #t (true). Otherwise, it evaluates to #f (false).
Any logical, comparison, or other formula allowed by Scheme can be used in your conditions.
Details about the these and other functions, and about their syntax, can be found in the NexJ Studio help system under the NexJ Scheme Library Reference information.
Controlling whether a question is mandatory
If you want to make a question mandatory only under certain conditions, specify an expression that evaluates to a Boolean value for the required attribute on the field.
For a simple illustration, suppose you have created a form that asks the following questions:
Does the person have equity in a house?
If so, what is the estimated value of the house and what is the total outstanding in debts against the house (for example, mortgages)?
Assume that you want to make the answer to the second question mandatory only if the answer to the first question is Yes.
To accomplish this, code the following:
Scheme code
CODE
(bp:section s2
  (bp:radio hasRealEsstateEquity
    (: caption "Does the client have any real estate equity?")
    (: options YesNoEnum)
    (: required #t)
    (: initialize "Y")
  )
  (bp:number realEstateValue
    (: caption "Estimated value of real estate")
    (: required (= "Y" (@ question hasRealEstateEquity))) ; Question is required if the person has real estate equity.
  )
  (bp:number realEstateDebt
    (: caption "Estimated debts against the real estate")
    (: required (= "Y" (@ question hasRealEstateEquity))) ; Question is required if the person has real estate equity.
  )
)
JavaScript code
JS
bp.section(s2,
    bp.radio(hasRealEstateEquity,
        {
            caption: "Does the client have any real estate equity?",
            options: YesNoEnum,
            required: true,
            initialize: "Y"
        }
    ),
    bp.number(realEstateValue,
        {
            caption: "Estimated value of real estate",
            required: $.question.hasRealEstateEquity === "Y" //Question is required if the person has real estate equity.
        }
    ),
    bp.number(realEstateDebt,
        {
            caption: "Estimated debts against the real estate",
            required: $.question.hasRealEstateEquity === "Y" //Question is required if the person has real estate equity.
        }
    )
);
Controlling whether a question is enabled
You can conditionally enable questions in the same way that you conditionally set whether they are required. The only difference is that rather than using the following statement:
Scheme
SCHEME
(: required (expr))
JavaScript
JS
required: $.expr
use
Scheme
SCHEME
(: enabled (expr))
JavaScript
JS
enabled: $expr
Using the following statement:
Scheme
SCHEME
(: enabled #f)
JavaScript
JS
enabled: false,
allows you to create an effectively read-only field within the form. This is useful for calculated fields, or for showing information that you want the person filling the form to see, but not change.
Controlling the visibility of questions, section, and pages
Control the visibility of a step, section, or control using the following expression:
Scheme
SCHEME
(: visible (expr))
JavaScript
JS
visible ($.expr)
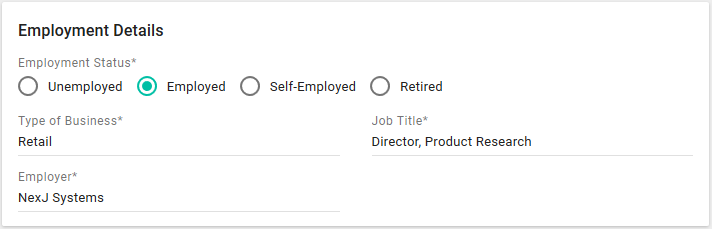
For example, in the following code, the answer to the first question controls the visibility of the final three. See the accompanying pictures for an illustration:
In the first instance, the Employment Status is Employed, and all three follow-on questions appear.
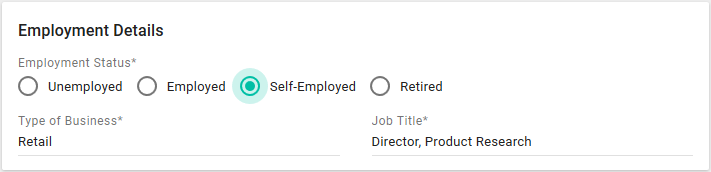
In the second instance, the answer to the first question is Self-Employed and no information about the employer is shown. Because the field was initialized to NexJ Systems, this is the value that is stored in the form, though likely ignored by future processing down the line.
In this case, the person has indicated they are retired, and no additional employment questions are asked. As with the second instance, the initialization values mean that the form, in fact, stores that the type of business is Retail, the position held was Director, Product Research, and that the employer was NexJ Systems. Again, a well-designed workflow making use of this form later ignores these values.
When using conditional statement to control the visibility or enabling of fields, be careful to ensure that all required fields either initialize with an answer, as in the example above, or ensure that users can edit them. If an empty required field becomes hidden or disabled, your users are unable to complete and submit the form.
National language considerations
Forms support the UTF-8 character set. When composing forms in libraries, you cannot enter non-ASCII characters directly, as they do not display properly in the form. To display unicode characters, you must use their escaped unicode values. For example, if composing a form in French and you want to include a section label that reads "connaître votre client", enter conna\u00EEtre votre client in your form definition.
If composing a form in a bi-directional language, enter the character symbols in a left-to-right manner. The rendering engine corrects the display to right-to-left as appropriate. For example, to write "أَلِف بَاء", (the names of the first two letters of the Arabic alphabet) enter \u0623\u064E\u0644\u0650\u0641 \u0628\u064E\u0627\u0621.
To aid in conversion of strings to escaped unicode, use an online tool such as the one available at https://r12a.github.io/app-conversion (use the JavaScript output if using this converter).
Form localization
Process Management forms let you display forms in different languages based on user preference. You can change the localization of form controls by using strings defined on the client (.js file). Form contents can be translated using strings defined on the server (.strings file) and client (.js file).
Forms with proper translations for the strings are translated based on your browser preference.
To change the localization of your forms, you must:
Add the translation for the form controls, such as buttons and other elements of the form. To do this, go to NexJ Studio, and:
Navigate to the client_project/mod/nexj/ui.bp/i18n folder. You may have to create this folder if it does not already exist.
Make a copy of the en.js (default) file. The en.js file can be found in NexJ Studio by navigating to Window > Show View > Project Explorer.
Name the <xx>.js file according to the language you want to use. This file defines the behavior of the currency, date, and system in the language and its variant codes. You can make changes to this file through Resources > Locales.
To add the translations for the form contents, you must first enable your project to display your preferred locale. In NexJ Studio:
Navigate to the client_project/mod/nexj/i18n folder. If the folder does not already exist, add it as a new folder.
Add a locale file. Make a copy of the en.js file found in client_project/mod/nexj/i18n/, and rename the file.
Add another translation file to client_project/mod/nexj/ui.chart/i18n/. You can use the en.js file found in client_project/mod/nexj/ui.chart/i18n/ as a sample.
To translate the form content, provide translations for every string used by the form in the .strings file located in Resources > Strings. For example, translate the strings inside en.strings with ids (IDS_BUSINESS_PHONE, idsc.ReportLayout.caption, and so on), but do not end in .en or .fr.
Confirm that your translations are in your client_project.
For example, to create a form in Italian:
Translate the form-specific buttons that show in the Process Management forms Admin Portal by:
Going to NexJ Studio, navigate to the client_project/mod/nexj/ui.bp/i18n folder, and make a copy of the en.js file which you would rename it.js.
Translate the file contents into Italian.
Add the two files containing translations for the portal application by:
Making a copy of the en.js file found in client_project/mod/nexj/i18n/, renaming the file it.js, and placing it in the client_project/mod/nexj/i18n/ folder.
Translate the file into Italian.
Add a second translation file, this time to client_project/mod/nexj/ui.chart/i18n/ by making a copy of the en.js file found in this folder, and renaming it it.js.
Provide the Italian translation for the steps in your form.
When creating localized text inside your forms, use a string identifier, such as idsc.Person.firstName in the caption, captions or valueCaption field of the flow elements in the domain specific language. As an example, a first name text box with a localized caption of First Name would be:
To enable localization, you must modify the form template. Any change on the template will trigger a seed of the localization. All newly created templates will work with localization by default.
You cannot change language in the forms portal. This must be done by configuring client locales. See Resources.
If the user interface gets the same locale supported at a later time, the file in the Process Management project will override the user interface version. You will need to remove/modify the Process Management locale as necessary.
Registering page elements on global registry
You can reference pre-registered form libraries inside a form without having to redefine them. If you want to reference a library through bp:util:library-ref, register elements using bp:register-flow-library.
The following example registers a new library containing a question called registered-question, and then references it in a form called myForm.
Scheme code
SCHEME
(bp:register-flow-library "registered-question" #t ; registers a new library
   (bp:text q2
      (: caption "My registered question")
   )
)

(bp:register-flow "myForm" #t
   (bp:flow
      (bp:page p1
         (: caption "Page Caption")
         (bp:section s1
            (: caption "Section Caption")
            (bp:util:library-ref "registered-question") ; References the new registered library
         )
      )
   )
)
You can use a tool property in a page control to add a button to execute an action. The following three dynamic properties are supported:
caption
visible
function
Each property can contain either a static value or multiple question references. The following examples show how to use a tool property in a page or a page repeater.
Using tool in a page
SCHEME
; This template has two pages
; The first page has one tool button
; -- Button isHideSIN: When the checkbox is selected, this button is visible and its caption is "TRUE".
;                      When the checkbox is cleared, this button is hidden.
; The second page has three buttons
; -- Button isHideSIN: When the checkbox is selected, this button is visible and its caption is "TRUE".
;                      When the checkbox is cleared, this button is visible and its caption is "FALSE".
;					   Clicking on this button prints "Clicking on isHideSIN tool" in the client.
; -- Button visibleTool: This button is always visible and its caption is "VISIBLE TOOL".
;						 Clicking on this button prints "Clicking on visible tool" in the client.
; -- Button hiddenTool: This button is always hidden.

(bp:register-flow
   "additionalBtnInPage"
   #t
   (bp:flow
      (bp:page
         p1
         (bp:section
            s1
            (bp:checkbox chkHideSIN (: caption "Hide SIN"))
         )
         (: tools
           (bp:tool isHideSIN (: caption (@ question chkHideSIN)) (: visible (@ question chkHideSIN)))
         )
         (: caption "First Page")
      )
      (bp:page
         p2
         (bp:section s1)
         (: tools
            (bp:tool
               isHideSIN
               (: caption (@ question chkHideSIN))
               (: function (logger'info "Clicking on isHideSIN tool"))
            )
            (bp:tool visibleTool (: caption "Visible Tool") (: function (logger'info "Clicking on visible tool")))
            (bp:tool hiddenTool (: caption "Hidden Tool") (: visible #f) (: function (logger'info "Clicking on hidden tool")))
         )
         (: caption "Second Page")
      )
   )
)
Using tool in a page repeater
SCHEME
; This page repeater template has three tool buttons
; -- Button typeTool:  This button shows the selected value of custom field type combo in its own page.
;                      When there is no selection in the type combo, this button becomes hidden.
;					   Clicking on this button prints "Type is {typeName}" in the client.
; -- Button visibleTool: This button is always visible and its caption is "VISIBLE TOOL".
;						 Clicking on this button prints "Clicking on visible tool" in the client.
; -- Button hiddenTool: This button is always hidden.

(bp:register-flow "additionalBtnInPageRepeater" #t
   (bp:flow
      (bp:page customFieldEntities
         (: caption "Custom Field Type Page")
         (: number "2")
         (bp:section s1
            (bp:combo type)
         )
         (: tools
            (bp:tool
               typeTool
               (: caption ((@ question type)'caption))
               (: visible (not (null? ((@ question type)'caption))))
               (: function (logger'info "Type is: "((@ question type)'caption)))
            )
            (bp:tool visibleTool (: caption "Visible Tool") (: function (logger'info "Clicking on visible tool")))
            (bp:tool hiddenTool (: caption "Hidden Tool") (: visible #f) (: function (logger'info "Clicking on hidden tool")))
         )
      )
      (: bind Person)
   )
)
Binding forms and navigating attributes
Each form is bound to a single class in the business model. By default, the attributes that questions collect data from, are the attributes of that class.
Complications can arise if the values you want to access are actually within an associated class. In this case, you must create a section specifically for accessing those attributes. Additionally, the ID of that section must match the name of the non-primary attribute whose information you want to access.
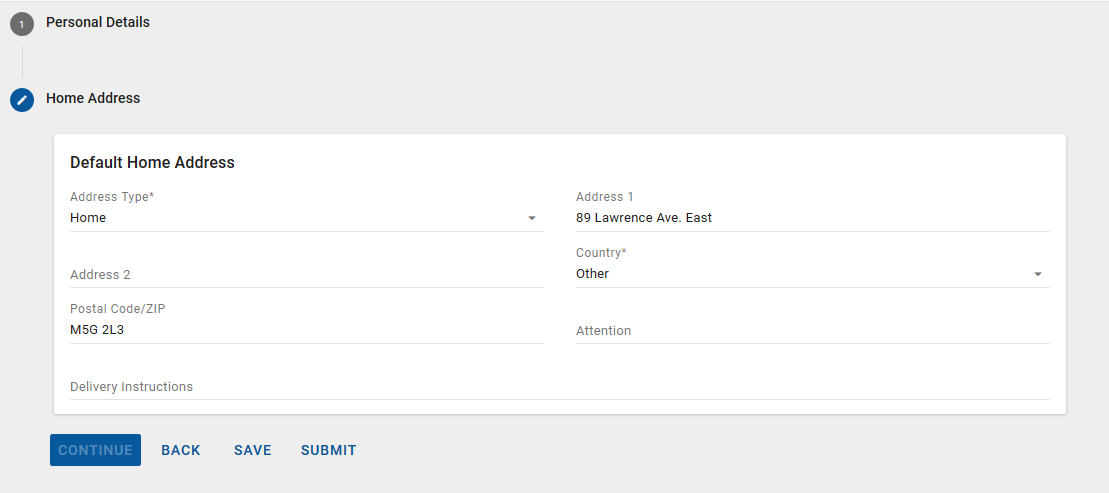
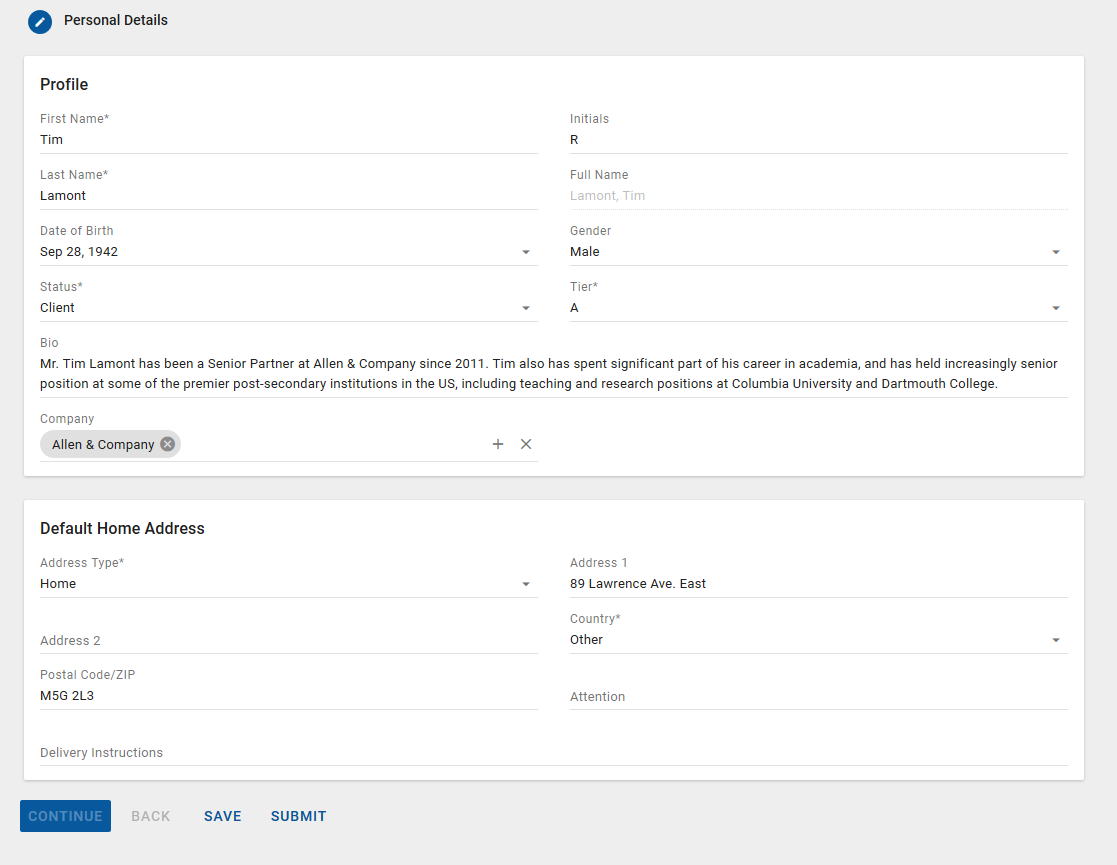
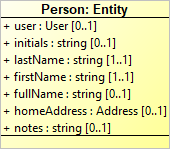
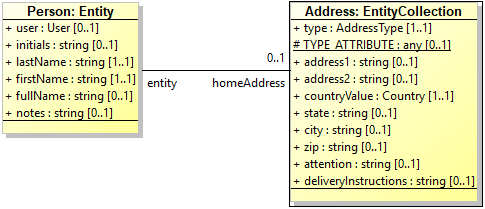
For example, consider gathering the home information address for an instance of the Person class:
As shown in this reduced class diagram, the homeAddress attribute is a non-primitive attribute.
Expanded, you can see more clearly that the homeAddress attribute is an instance of the associated Address class.
In order to access and update the homeAddress data for the person, create a section in your form that explicitly references the homeAddress attribute. That section then gives you access to the attributes of the Address class. The following code illustrates this example:
Scheme code
SCHEME
 (bp:flow
    (bp:page Personal_Details
      (: caption "Personal Details")
      (: number "1")
      (bp:section profile
        (: caption "Profile")
        (bp:text firstName)
        (bp:text initials)
        (bp:text lastName)
        (bp:text fullName)
        (bp:date birthTime)
        (bp:textarea notes)
        (bp:object company)
      )
        (bp:section homeAddress   ; The section ID matches the non-primitive attribute name in the Person class.
          (bp:combo type)
          (bp:text address1)
          (bp:text address2)
          (bp:combo countryValue)
		  (bp:text state)
          (bp:text city)
          (bp:text zip)
          (bp:text attention)
          (bp:textarea deliveryInstructions)
         )
   )
   (: bind Person)
  )
Line 27 binds the form as a whole to the Person class. However, as illustrated in the class diagram, the homeAddress attribute is an associated class. To access the attributes within homeAddress, the section ID is specified to match the complex attribute.
The level to which you can traverse the class model is currently limited to one level out. Given the class that you bind your form to, you can name any of its associated classes in a section and access their primitive attributes. You cannot, however, access the associated classes of an associated class.
There is one exception to this limitation, and it is illustrated in the preceding example: the homeAddress attribute type is, strictly speaking, a second-level associated class to the Person class. However, because of its use of bp:OBJECT_AS_ENUM aspect, it behaves as if it is an enumeration, and is treated as such for the purposes of form definition.
Debugging your forms
If you want to add debugging to the server-side of your Process Management forms, add (logger’info …) to the code, and observe the results in the Scheme console. To debug client-side code, use the Chrome debugger.
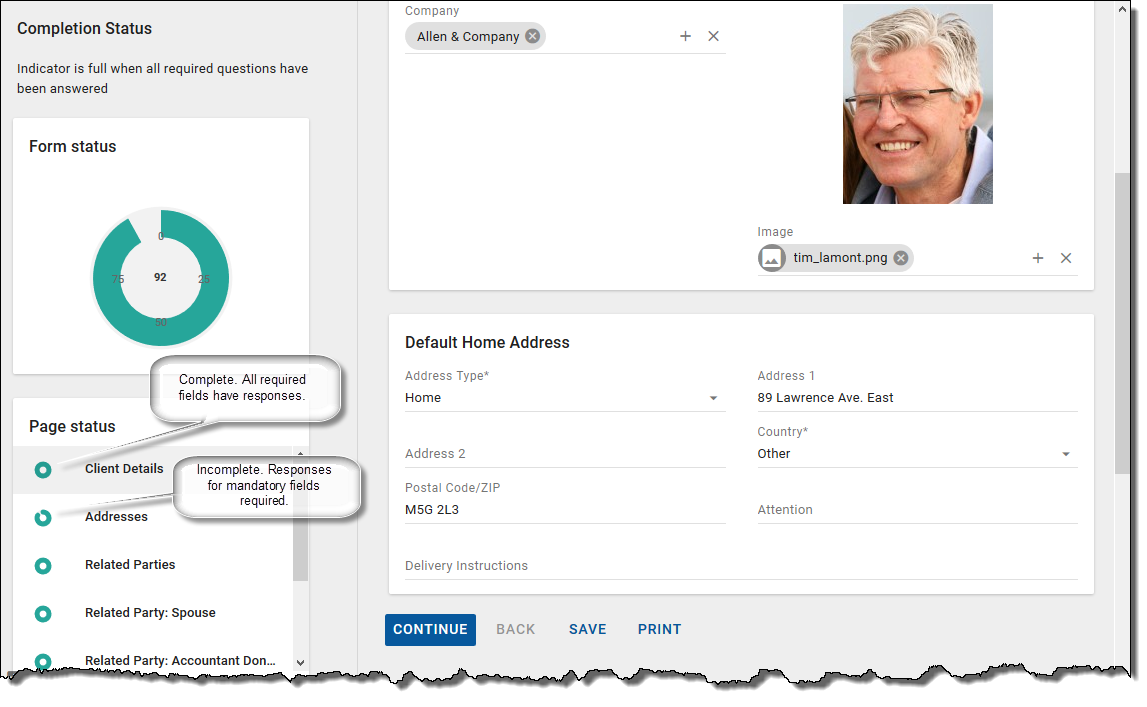
Using the progress list
When creating a multi-page form, a progress list is displayed in the form's Completion Status by default. This enables users to track their completion of required questions using a progress indicator for each page of the form, as well as a visualization of the entire form's status. This is shown in the following example:
You can disable the progress list by adding the following code, under the bp:flow element, in your form.
Scheme
SCHEME
(: showProgress #f)
JavaScript
JS
showProgress: false
The following code is for an example form that disables the progress list and contains the following sections:
If you want to implement the progress list for a single page form, add the following code under the bp:flow element in your form.
Scheme
SCHEME
(: showProgress #t)
JavaScript
JS
showProgress: true
Managing your forms
Process Management forms in use, templates, template attachments, and documents are managed from the Process Management Admin Portal. You can also develop forms using the Admin Portal. Access the Admin Portal from <Application Root URL>/nexj/ui/bp-admin. When working with a form's code on the Templates workspace in the Admin Portal, clicking the Reset button resets all values to the default values. For information about managing your forms using the Process Management Admin portal, see "Managing Process Management forms" in the Application Administration documentation.
Bypassing conflict warning messages
By default, upgrade conflicts are visible in the NexJ CRM user interface. You can configure upgrade conflicts so that users are not notified every time there are changes to a form's structure relating to pages, sections, and questions. To disable upgrade conflicts, set the cpm.showUpgradeConflicts property to false in the Development.properties file.
Configuring Process Management forms using JavaScript
This section provides information specific to those configuring Process Management forms in JavaScript. JavaScript forms are configured as libraries, similar to Scheme files on the metadata level, but using a .njs file extension, enabling the NexJ Studio framework to recognize and load them while the application is running.
The following JavaScript expressions are specific to Process Management.
WHERE clauses
Because WHERE clauses in Scheme are usually in a list (a type not normally supported by JavaScript), there is a new JavaScript expression for configuring WHERE clauses:
For complex WHERE clauses that are not supported by bp:where, use the supported Scheme literal expressions in order to use Scheme WHERE clauses as JavaScript.
JS
bp.objects(holdings,
    {
        caption: "Available Holdings",
        valueType: "Holding",
		//Use a Scheme where clause in the JavaScript configuration
        where: jsToScheme("`(any (= (@ account primaryOwner) (string->oid ,(@ global relatedObjectId))))")
    }
)
Scheme literals
To implement any logic that cannot be supported with JavaScript, you can embed Scheme expressions into the JavaScript. Use the jsToScheme() function to wrap stringified Scheme expressions so they can be called inline within existing JavaScript.
JS
bp.flow(
    {
        title: "Simple CPM demo",
        $onSubmit: jsToScheme("(logger 'info \"[OnSubmit] flow has been submitted\")")
    },
    bp.page(p1, ...)
)
In order to access any external identifiers or identifiers written in Scheme, use the sequence #("<identifier name>") as shown below.
JS
bp.flow(
    {
        title: "Sample Form with NexJ Model Bind",
        bind: #("Person")
    },
    bp.page(p1,
        bp.section(s1,
            bp.text(firstName),
            bp.text(lastName)
        )
    )
)
Null is true
Because of how JavaScript is compiled to Scheme expressions and evaluated in a Scheme interpretor, null values will return as true. To avoid any undesired behavior, it is recommended that you explicitly check for null values in the configuration.
JS
bp.text(q1, {
        //this will be true, even when q0 is empty
        visible: this.question.q0,
        //do this instead:
        enabled: this.question.q0 != null
    }
)
NexJ JavaScript vs Scheme resources
Both .njs and .scm forms can coexist under the libraries folder in the project metadata. However, the parser cannot currently differentiate a Scheme vs JavaScript resource when both file names and paths are the same.
Avoid sharing the same name between Scheme and JavaScript resources.
JavaScript limitations
The following statements are not supported by JavaScript and will throw errors:
When you open the Process Management Admin portal, the Templates tab is in the run-time configurability sandbox. Working in this space, you can execute forms for independent evaluation, monitoring or testing. You do not need to stop and start servers to view any changes you make. No redeployment is needed. Build your forms using Scheme or JavaScript. When you are ready to implement the form, copy the code, paste and check it into an SCM or NJS library file in NexJ Studio.
Forms created/modified in the sandbox space run in the same manner as forms deployed from source control. As such, forms can contain actions that modify data in the system. This feature should be limited to administrator-type users who understand the consequences of any actions added/modified on a form and should only be used in a non-production environment as a tool to test form changes at runtime.
Creating forms in your sandbox
To create a new form:
Click the Add icon .
Click the Edit icon to change the name of the form.
Choose either run-time JavaScript (NJS) or Scheme (SCM) code.
To edit an existing form, click on the code.
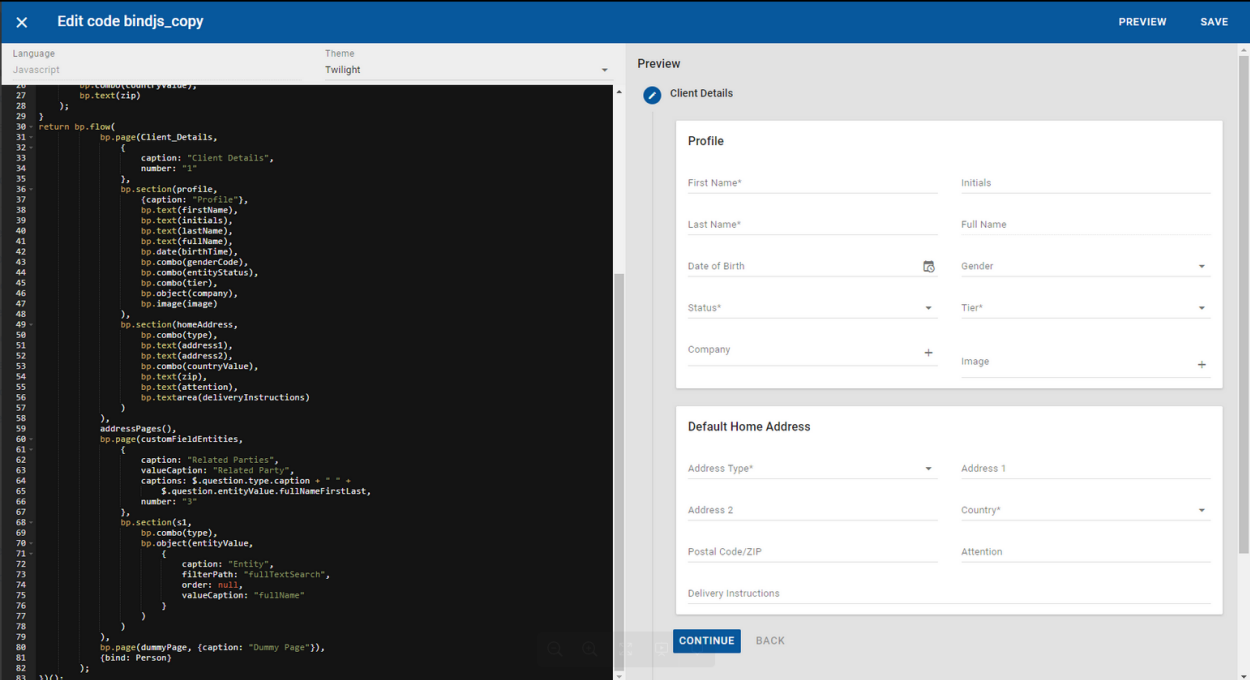
When you create a form, you are presented with a split workspace; one half is code (either JavaScript or Scheme, depending on which you have selected), the other half is a preview of what the form will look like. The code view includes code smart formatting such as auto-completion of Process Management functions, auto indentation and alignments, and keywords formatting.
Changing font size is not recommended as the controls are built to align with Material Design guidelines. Color changes can be achieved by changing the theme at the project level.
After you have made changes to the code, click the Preview button to refresh the form. When you are satisfied with the form's functions and appearance, click Save to publish the form.
In the code for forms using references, helper functions must be situated above the flow, and the entire code must be wrapped in another function following JavaScript and Scheme conventions.
Additional examples
The following examples demonstrate some possible configurations.
Forms using references
Scheme code with references
SCHEME
((lambda ()
(define (bp:test:p2)
   (bp:page p2 (: caption "p2")
      (bp:section s1
         ;defined questions for page 2, section 1
         (bp:attachment attach) ;comments after code
         (bp:radio options
            ;a comment inside a question
            (: options (collection "1" "2" "3"))
         )
      )
   )
)
(define (bp:test:p3)
   (bp:page p3 (: caption "p3")
      (bp:section s1
         ;comment with brackets ())
         (bp:textarea comments (: value (string-append "test" "123")))
         (bp:integer number (: min 0) (: max 10) (: step 1)) ;after code with brackets ((()
         (bp:integer numberCalculated (: value (@ question number)) (: onServer '(value)))
      )
   )
)
(define (bp:test:p4)
   (bp:page p4 (: caption "p4")
      (bp:section s1
         (bp:text q1)
      )
   )
)
(define (bp:test:p4Helper)
   (bp:test:p4)
)
(bp:flow
      ;pages 2 and 3 are defined in the above functions
      (bp:page p1 (: caption "p1")
         (bp:section s1
            (bp:text q1 (: value "some text;"))
            (bp:text q2
               ;add some custom formatting
                   (: value "some text with a \"")

                 (: caption "text with a \";\";")
            )
         )
      )
      (bp:test:p2)
      (bp:test:p3)
      (bp:test:p4Helper)
   )
))
Is it possible to validate the mandatory fields in each save, instead of at the end of the form?
Each field is validated immediately on edit. There is no need to validate again on Save. To validate all fields without any edits, click the Submit button.
Is it possible to control the font sizes and colors in the form?
We do not encourage changing font sizes as the controls are built to pixel perfect standards as specified by Google's Material Design guidelines. You can change colors by applying your own theme. For more information about themes, see UI themes and CSS.
Is there a way to put debugger in the CPM form?
For server-side CPM DSL configuration scripts, you can add (logger’info …) to the code and observe results in the Scheme console.
For client-side code, debug using the Chrome debugger.
Is it possible to refresh the form answer from the model?
Make sure the question you want to sync with the class, has the bind property set. For example, on(bp:flow), set the bind property to the class.
On the question, either rename the question or set the bind property to match the model the attribute name.
How do I write a collection into an associated class?
Example: A form associated with class class1, and with an associated attribute asc1 to class class2, and the collection in the form collection1 has five questions each for the five attributes of class2. Assuming asc1 is a collection association, try the following: