
Structure: Portlets, dialogs, and layouts
The structural components as discussed in Structure: Portals contain workspaces contain portlets, are used to arrange portlets. For more information about how the application organizes portlets, see Application pattern.
Learning objectives
- Understand how to create and use layouts.
- Understand the internal structure of portlets and dialogs.
Key concepts
Model-driven architecture (MDA) portlets and dialogs, use containers such as composites, tabs, and switches to arrange layouts.
- Layouts - arrange and bind controls for use in portlets and dialogs.
- Portlets - the basic UI components that make up an application. Portlets host one or more layouts and present features to end users.
- Dialogs - similar to portlets, but are used specifically for creating, editing, and presenting information in a transactional rather than informational way.
Portlets, dialogs, and layouts use containers to arrange their child views. The container elements are:
- Composites - containers that display child views in columns.
- Tabs - containers that display child views in tabs.
- Switches - containers that display only one child view at a time.
A container's child views can be other container elements. For example:
- Composites can hold composites, tabs, and switches.
- Tabs can hold composites, tabs, and switches.
- Switches can hold composites, tabs, and switches.
This provides flexibility in how you arrange your layouts and controls. There are best practices around how to present information to satisfy specific use cases. To learn more about these best practices, see NexJ Style Guide.
Views
Most of what we work with in the UI are considered views, for example, layouts, buttons, charts, tables, and so on. They form the view aspect of the model, view, controller pattern.
Portlets and dialogs primarily use containers to arrange layouts, while layouts mainly use containers to arrange controls.
When creating a new MDA portlet, we follow these common steps:
- Create a layout, bind it, and place controls on it.
- Create a portlet and add our layout to it.
- Add the portlet to a workspace.
In preparation for the learning activities in this lesson, make sure that your files from the Structure: Portals contain workspaces contain portlets lesson contain the following code. If not, copy this code into your files before continuing.
Layouts
Layouts arrange and bind controls for use in portlets and dialogs. They are usually bound to a class in the business model for querying, viewing, creating, or editing. There is an unbound layout, but it is not common. One or more layouts are arranged in portlets or dialogs and they have their own menus, toolbars, actions, and displayed controls.
Learning activity
- Right-click on Layout in the navigator, and select New Layout.
- Enter
training:EntityListas the name.
Click the Source tab at the bottom of the layout editor and replace the
EntityList.layoutcontents with the following XML code.training:EntityList.layout<Layout class="Entity"> <Composite name="composite"> <Table name="tblEntityList" caption="idsa.training.layout.EntityList.caption" rows="(@)"> <Column name="colType" caption="idsa.training.layout.EntityList.type" icons="type iconDefault"/> <Column name="colIcon" caption="idsa.training.layout.EntityList.icon" icons="(image . image)(data . mimeData)(type . mimeType)" texts="initial"/> <Column name="colName" caption="idsa.training.layout.EntityList.name" length="100" values="fullName"/> </Table> </Composite> </Layout>class property
The class property on a layout is the connection between the UX layer and the business model. The layout's window into the business model starts with this class. Binding of controls (in our example, table columns) starts with primitive attributes (for example, firstName and lastName) on the class and potentially branches out through business model associations (for example, workPhone address).
In this example, the layout is bound to the Entity class. It contains a composite, which in turn, contains a table control. The table is bound to(@)which is an association path. It starts at the underlying model, the Entity class, and goes no farther. If it were bound to the entity's addresses, the rows binding might look like(@ addrs). The table has three columns that are bound to the entity type; theiconDefault, entityimage, and entityfullNameattributes.A note on icons
When referring to icons, you will see either a path to an icon attribute as in
icons="type iconDefault",or a list of name/value pairs as in theicons="(image . image)(data . mimeData)(type . mimeType)"example above. This syntax is explained in theiconsproperty description in the Table Column topic.The following names are matched up with attributes on the bound object:
- image - name of the attribute containing the image, usually of type OBJ, from the current instance. The attribute name is often "image", although this is not a requirement.
- data -
Obj'mimeDataattribute of type binary returning the image data. It is alwaysmimeDataif the image attribute is of type OBJ. - type -
Obj'mimeTypeattribute of type string returningmimetypeof the image data. It is alwaysmimeTypeif the image attribute is of type OBJ. - icon - optional. The name of an attribute of type string returning an icon name if the image is null.
- default - optional.
"icon:person" -a constant expression to fall back on if both image and icon are null.
To learn more about these icons, see the OBJ class and the Entity'image attributes in NexJ Studio.
Open
idsa.training.en.string, and add the following entries.idsa.training.en.strings... idsa.training.layout.EntityList.caption=Entity List idsa.training.layout.EntityList.type=Type idsa.training.layout.EntityList.icon=Icon idsa.training.layout.EntityList.name=Name
Save your work.
Close the layout file and re-open it. You should see a logical rendering of the table on the layout tab.
It is useful to know the type of entity we are looking at, so we added a Type column at the beginning of the list of columns. We are following the association path fromEntitytoEntityTypethrough theEntity'typeattribute and then displaying theiconDefaultattribute.
This renders as the following:
Entity Class Hierarchy
The table in this layout is bound to the Entity class. Entity is subclassed into Person and Organization which are subsequently subclassed into UserPerson, Company, and Department. The image displayed in the type column is based on the type of class.

We will see the effect of this once we wrap our layout in a portlet.
Portlets
Portlets are the basic UI components that make up an application. They host one or more layouts and present features to end users.
Learning activity
- Right-click on Portlets in the navigator, and select New Portlet.
- Enter
training:EntityListas the name.
Go to the Source tab, copy the following contents into it, and save.
training:EntityList.portlet<Portlet> <Composite name="composite"> <LayoutRef layout="training:EntityList" name="training_EntityList_layout"/> </Composite> </Portlet>In your
Sandbox.workspace, change the contents to the following:training:Sandbox.workspace<Workspace caption="idsa.training.workspace.Sandbox.caption" icon="icon:attach_money"> <Page name="page"> <Tab layout="cols:3 fluid:true" name="tabDetail" type="grid"> <PortletRef name="training_EntityList_portlet" portlet="training:EntityList"/> </Tab> </Page> </Workspace>- Because we've added new files, save, restart your server, and re-seed.
When you refresh your browser, it should look similar to the following:
Navigate to the portlet URL at http://localhost:7080/training/ui/portlet/training:EntityList. It should appear similar to the following:

With this configuration, we now have the following functions:
Paging -
Automatically added to your list.
Set List Columns -
Allows you to show and hide columns.
Sorting -
Sorting on columns is available.Validation
At any point, you can validate your model using Project > Validate or the
 button on the toolbar. To see what happens when an error is found:
- Change the column values for
fullNametofullName2in your layout, save, and run validation. After validation, you should get a message indicating that a problem has occurred. - To fix the problem, double-click on the
Unknown attribute "fullName2" in class "Entity"error in the Problems view of NexJ Studio. - Change the column values back from
fullName2tofullName.
- Change the column values for
- Change your browser's URL to http://localhost:7080/training/ui/portal/training:Contact.
This is the URL for calling portal applications: <serverRoot>/ui/portal/<portalName>
Depending on your browser's size, it should appear similar to one of the following: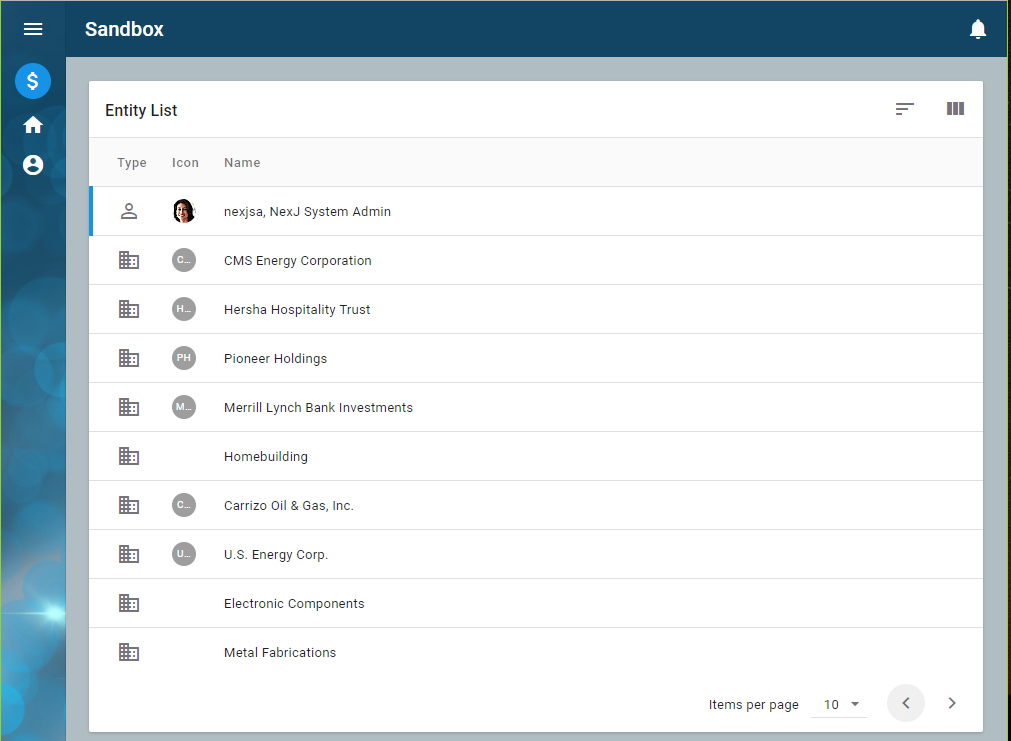
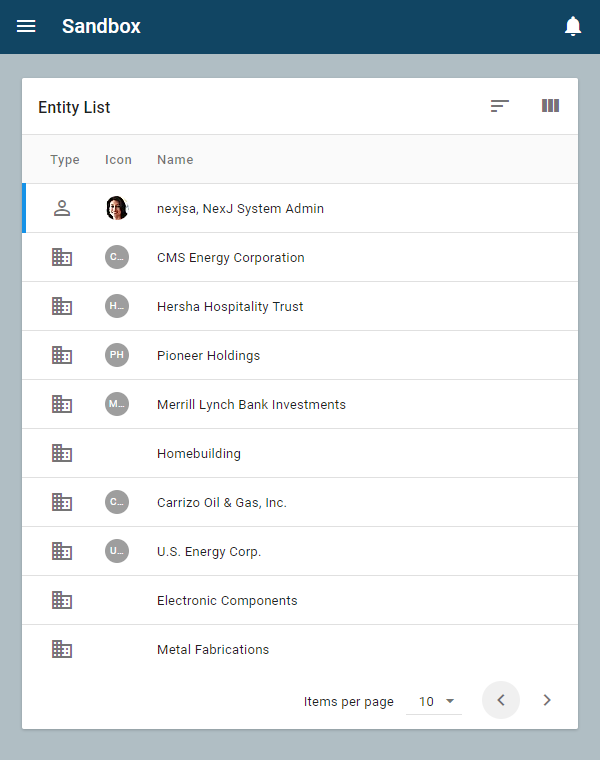
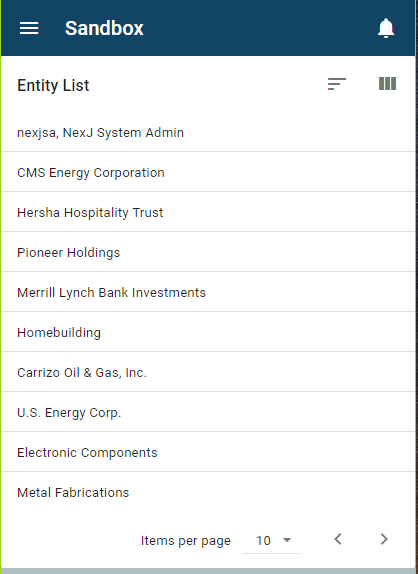
Notice the automatic responsive capabilities of the application.
Portlet and dialogs can contain more than one layout. You can connect the layouts by using the association property on their layoutRefs. While this will be covered later, the following codes shows what an association looks like:
<Portlet>
   <Composite name="tblRootLayout">
      <LayoutRef layout="training:EntityList" name="entityList"/>
      <LayoutRef association="entityList addrs" layout="training:AddressList" name="addressList"/>
   </Composite>
</Portlet>
Where association="entityList addrs" means that the addressList layout will be updated based on the entityList layout's current selection's addrs property. This assumes that the training:AddressList is bound to the Address class.
For more information about portlets, see Portlet.
Dialogs
Like portlets, dialogs arrange one or more layouts using containers to create a UI for end users. Dialogs are similar to portlets but are specifically used for creating, editing, and presenting information in a transactional, rather than informational way. They don't receive context like portlets do. Instead, they are launched as popups and get their context from the script that calls them.
Currently, dialog names must contain a namespace element of mda. It can be anywhere in the name, for example, training:mda:EntityProperties.
Learning activity
Let's create a dialog using existing layouts.
- Right-click on Dialogs in the navigator, and select New Dialog.
Enter
training:mda:EntityPropertiesas the name.
We are going to jump ahead a bit for a moment, beyond the structure of portlets and dialogs, in order to fire an event to make the dialog appear.UIEvents and UIActions
A UIEvent is a notification object (event) used to inform elements of your application that the user has performed an action such as pressing a button, selecting an item in a menu or list, or selecting a row in a grid. For more information, see UIEvent.
UIActions are user interface handlers that are invoked in response to a UIEvent. For more information, see UIAction.
Update your
training:EntityListlayout with the following code:training:EntityList.layout<Layout class="Entity"> <UIActions> <UIAction event="sysProperties"> <Popup association="tblEntityList" edit="true" screen="training:mda:EntityProperties"/> </UIAction> </UIActions> <Composite name="composite"> <Table caption="idsa.training.layout.EntityList.caption" name="tblEntityList" rows="(@)"> <Menu name="mnuRightClick"> <Item caption="ids.edit2" event="sysProperties" icon="edit" name="mitProperties"/> </Menu> <Column name="colType" caption="idsa.training.layout.EntityList.type" icons="type iconDefault"/> <Column name="colIcon" caption="idsa.training.layout.EntityList.icon" icons="(image . image)(data . mimeData)(type . mimeType)" texts="initial"/> <Column name="colName" caption="idsa.training.layout.EntityList.name" length="100" values="fullName"/> </Table> </Composite> </Layout>We have added a menu (
mnuRightClick) containing an item which raises thesysPropertiesUIEvent. We have also added a UIAction that handles this event with a pop-up element that shows the training:mda:EntityPropertiesdialog. Notice that thePopup associationis set totblEntityList, our table element in the layout containing the model and current selection.Dialogs and Screens
Dialogs and portlets used to be called screens. This is why the
Popuphandler has a screen attribute rather than a dialog. This will likely change in the near future.- Save your work, restart your server, and reload the UI.
When you select a row in the list, the Edit button displays at the right side of the row. Click on it and a dialog opens with "Edit a <
className>" whereclassNameis the type of the row you are on (for example, company, user, or person).
Paste
training:mda:EntityPropertieswith the following code:training:mda:EntityProperties.dialog<Dialog caption="ids.caption.editPopup"> <Composite cols="2" name="composite"> <LayoutRef layout="mda:EntityPropertyDashboard" name="mda_EntityPropertyDashboard_layout"/> <LayoutRef association="mda_EntityPropertyDashboard_layout" layout="mda:EntityAuditFields" name="mda_EntityAuditFields_layout" span="2"/> </Composite> <Actions layout="mda:PopupButtons" name="frmDockingButtons"/> </Dialog>- Save your work and click the Reload UI toolbar button and refresh your browser.
- Click on the Edit button in the row.
You should see a dialog similar to the following, with an audit layout included.
Next, let's add a number of layouts that are specific to Users, Persons, Companies, and so on, all of the subclasses of
Entity,as well as an Actions element that refers to a layout containing controls, usually buttons, that will raise events likesysOkandsysCancel. Paste the following code into thetraining:mda:EntityPropertiessource.training:mda:EntityProperties.dialog<Dialog caption="ids.caption.editPopup"> <Composite cols="2" name="composite"> <LayoutRef layout="mda:EntityPropertyDashboard" head="true" name="mda_EntityPropertyDashboard_layout"/> <Switch caption="ids.detail" head="true" name="grpDetailLayout" span="2" value="mda_EntityPropertyDashboard_layout"> <Composite case="UserPerson" name="compUser"> <LayoutRef association="mda_EntityPropertyDashboard_layout" layout="mda:UserPersonEditDetail" head="true" name="mda_UserPersonEditDetail_layout"/> </Composite> <Composite case="Person" name="compPerson"> <LayoutRef association="mda_EntityPropertyDashboard_layout" layout="mda:PersonEditDetail" head="true" name="mda_PersonEditDetail_layout"/> </Composite> <Composite case="Company" name="compOrg"> <LayoutRef association="mda_EntityPropertyDashboard_layout" layout="mda:CompanyEditDetail" head="true" name="mda_CompanyEditDetail_layout"/> </Composite> </Switch> <LayoutRef association="mda_EntityPropertyDashboard_layout" head="true" layout="mda:EntityAuditFields" name="mda_EntityAuditFields_layout" span="2"/> </Composite> <Actions layout="mda:PopupButtons" name="mda_PopupButtons_layout"/> </Dialog>- Save and reload the UI.
Pay attention to thecaseproperty of the composite elements in the switch. This is what determines which layout will be displayed. - Click on the Edit button in the row.
You should see a full edit layout for the differentEntitysubclasses.
- Click on different rows to see how the switch element provides polymorphic editing capabilities.
For more information about dialogs, see Dialog.
Summary
You should now understand the structural elements of portlets and dialogs. Next, we will explore UIEvents, UIActions, and DataActions.