Testing models
The following information describes how to create a unit test and run it to test the functionality of your model.
Creating a unit test
Use the unit test tools in NexJ Studio to verify the correctness of individual units of the model's design. You can run unit tests periodically to ensure that your model continues to behave as expected as you implement design changes.
Example unit test case
For example, you can create a unit test case to validate the behavior of the fullName attribute across the classes that contain it:
- Navigate to the Business Model layer in NexJ Studio and click the Unit Tests tab.
- Right-click in the navigator and select New Unit Test.
- In the Name field, enter
Telcomand click Finish. The newTelcomunit test opens in the editor and displays the Test Cases tab. - In the Overview tab, enter the following Description:
Unit tests for the training:Telcom model. - In the Test Cases tab, click the Add button
 to add a new test case.
A single unit test can contain multiple separate test cases that run in the order that they appear in the Test Cases list. - Double-click the name of the new test case to edit it and change it to
fullNameTest. - Double-click the Description area for the test case and enter:
Tests the fullName attribute on all the classes that contain it. In the test case script area (the large blank area at the bottom), enter the following Scheme script:
(define c (training:Company'new (: lastName "YourCo") (: businessNumber "BN-1234") (: incorporationDate #m1999-11-15)))
(define p (training:Person'new (: firstName "Bob") (: initials "A") (: lastName "Sled") (: company c) (: primaryLanguage (training:LanguageEnum'get'ENGLISH))))
(define tp (training:TelcomType'new (: name "Business")))
(define email (training:EmailAddress'new (: entity p) (: type tp) (: name (tp'name)) (: address "bsled@yourco.com") (: displayName "Bob Sled")))
(define tel (training:TelephoneNumber'new (: type tp) (: name (tp'name)) (: address "(416) 555-1212") (: entity p) (: extension "x123")))
(commit)

(assert-equal "Company: YourCo (Business Number: BN-1234, Since: 1999)" (c'fullName))
(assert-equal "Person: Sled, Bob - Company: YourCo (Business Number: BN-1234, Since: 1999)" (p'fullName))
(assert-equal "Email: Business-bsled@yourco.com (Bob Sled)" (email'fullName))
(assert-equal "Phone: Business-(416) 555-1212 x123" (tel'fullName))
The script defines related instances of the
training:Company,training:Person,training:EmailAddress, andtraining:TelephoneNumberclasses, commits them to the database, and then uses (assert-equal) to verify the calculatedfullNameattribute values.- Save your changes.
Running the unit test
You must ensure that NexJ Studio is configured to run the unit test using the correct environment.
You want the unit test to run in the UnitTest environment that was created when you created your model:
- Open the Project menu in NexJ Studio and select Properties.
- Select Deployment in the list at the left.
- Set the Unit Test Server property to
UnitTest (environment,test). - Click OK.
To run the unit test:
- In the Unit Tests tab in NexJ Studio, right-click the
training:Telcomunit test and select Run Unit Test.
When the unit test runs, the following actions take place:
- The unit test database is recreated.
- The steps of each of the test cases are carried out.
- The results are reported in the Unit Test view (located in a tab beside the model tab).
NexJ Studio does not validate the names of test cases. If you have a unit test case with an invalid name, it will be reported as not found when you run your unit tests.
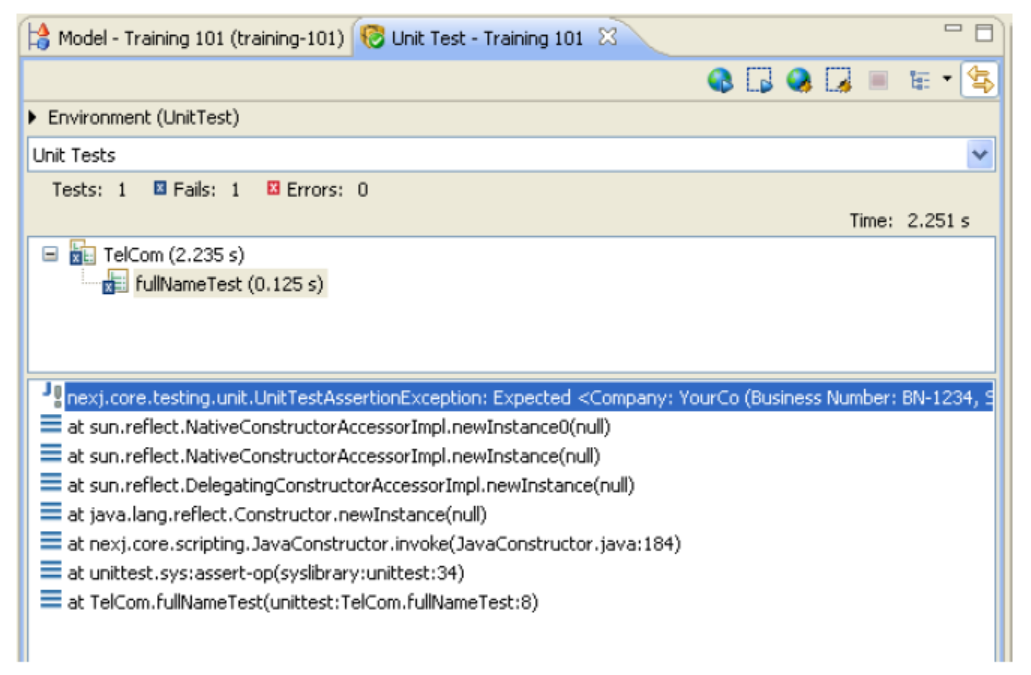
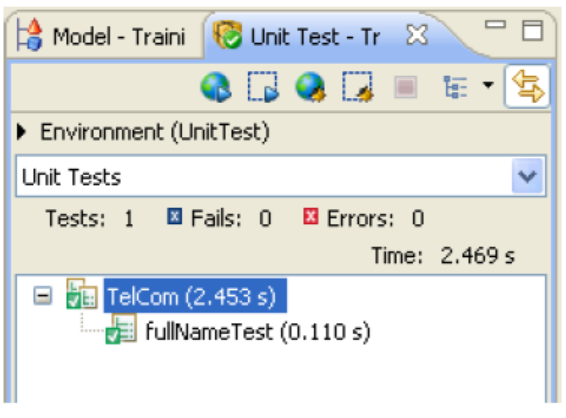
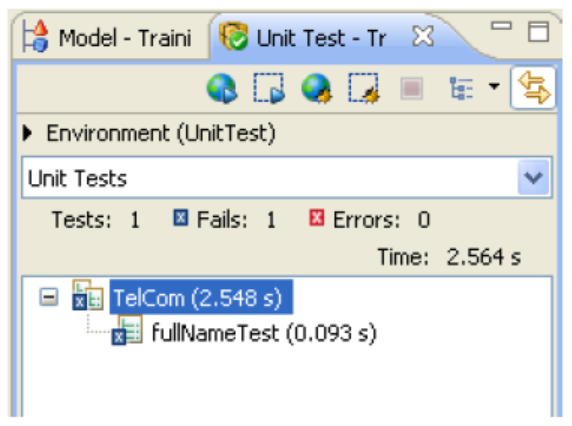
The Unit Test view contains a summary of the test cases that ran, and whether they succeeded or failed. Test cases that complete correctly are marked with a checkmark, test cases that fail are marked with an x.
Successful unit test
Failed unit test
The test case that you created in this example verifies four values. If even one of them is a mismatch, the entire test case is marked as having failed. To find out exactly where the test case failed, click the name of the failed test case. The details of the failed test case display in the lower part of the view.