
This lesson walks you through the set up of your local environment while becoming familiar with some of NexJ Studio's features and functions.
Prerequisites
The following are required to successfully use this training:
-
A computer with a minimum of 16 GB of RAM running Microsoft Windows 7 or Microsoft Windows 10. The 64-bit version of the operating system is recommended.
-
2 GB of free disk space
-
Java Runtime Environment (JRE) 8 or later
-
A local instance of MSSQL 2012 or MSSQL 2016, set up and configured
-
An internet connection capable of accessing the nexj.com domains.
To check if the prerequisites are installed:
-
From your Windows command prompt, type java -version. You should be running version 7 or later.
Bashjava version "1.8.0_111" Java(TM) SE Runtime Environment (build 1.8.0_111-b14) Java HotSpot(TM) 64-Bit Server VM (build 25.111-b14, mixed mode)
-
Run SQL Server Management Studio and log in as sa, using SQL Server Authentication (rather than Windows Authentication).
If you need to install MS SQL:
-
Download and install Microsoft SQL Server 2012 Express with Advanced Services or later.
-
In Microsoft SQL Server Configuration Manager, enable TCP/IP and set the TCP Port to 1433 for IPAll (this step is required).
-
Open SQL Server Management Studio and login as sa and choose SQL Server Authentication .
If you are unable to do so:-
Open SQL Server Management Studio and connect to server using Windows Authentication.
-
Navigate to Security > Logins. Right-click on SA and set the properties.
-
On the General page, set the Password.
-
On the Status page, ensure that Login is Enabled.
-
Close and re-open SQL Server Management Studio.
-
Login with sa, and SQL Server Authentication.
-
-
We recommend that you limit the maximum memory available to the instance (for example, 512MB) and the maximum worker threads (for example, 100).
To do this:-
Right-click on your SQL instance name > Properties > Memory and adjust the Maximum server memory.
-
Right-click on your SQL instance name > Properties > Processors and adjust the Maximum worker threads.
-
Installing NexJ Studio for training
For predictable results during this training, install into c:\nexj_studio . If you install into a different folder, many of the samples and instructions in these guides will not work.
-
Create a folder called
c:\nexj_studio\. -
In the file system, navigate to
\\tor-sv-file\Documentation\TrainingFiles\and copynexj-studio-13.9-training.zipintoc:\nexj_studio. If you are a client, contact your NexJ team to request a copy of the zip file. -
Unzip the file contents to
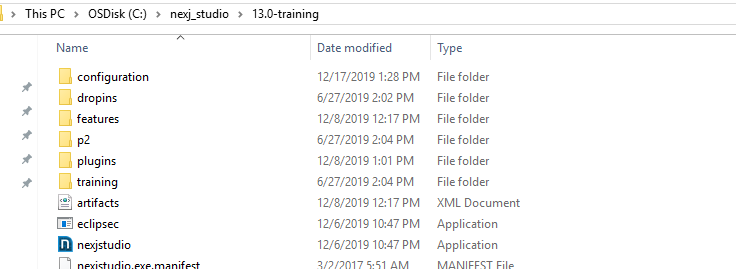
c:\nexj_studio. This should create a subfolder named13.0-training.Right-click on
nexj-studio-13.9-training.zipand select 7-Zip/Extract Here if you use 7-zip to manage archives.The file structure you end up with should be as follows:
-
From this folder, create a shortcut for
nexjstudio.exeand place it in a convenient location.
When you launch NexJ Studio for the first time (with nexjstudio.exe), the Welcome screen opens. If you receive a message indicating that your Classpath variable NEXJ_PLUGIN has been updated, dismiss the dialog. If you see an "Updates available" dialog, dismiss this as well.
Click Getting started on the Welcome screen to read a bit about NexJ Studio's views.
The page NexJ Studio was not found -- Please check/update the page name used in the MultiExcerpt-Include macro
Close the Welcome Screen to begin working with NexJ Studio.
You can have multiple instances of NexJ Studio on your machine. You may put versions in different locations and run them at the same time as long as they are pointing to different workspaces.
Creating your databases
The model contains a the application's logical database structure. Our development environment also has the physical details of how to connect to and create this database. These details include settings for the server, security, database types (for example, Oracle or MS SQL), integration channels, and more. Environment files help manage settings for the different environments (for example, QA, Development, User Testing, and Production). For more information about environments, see Environment Files .
In some of the tooling, you are presented with a Server selection and a Connections selection, but end up selecting an Environment. Originally, a Server file managed information about the server (for example, security, clustering, LDAP) and a set of Connection files managed database and integration connections. This has been modernized and simplified and we now typically use an Environment file representing both the Server and Connections along with Properties files that may be selected for different purposes (for example, development, unit testing, and performance testing).
The bottom line is that you select an Environment/Properties file combination (for example, Development (Development.properties) in the Server dropdown and leave the Connections blank.
NexJ Studio has many tools to help with your development activities. Use the Database Schema Tool to generate SQL scripts for creating the Training and UnitTest databases.
As stated in the prerequisites, MS SQL Server must already be installed.
To create the database for our training development:
-
Select Run > Run Tool > Database Schema Tool. Use the following settings (should be the default):
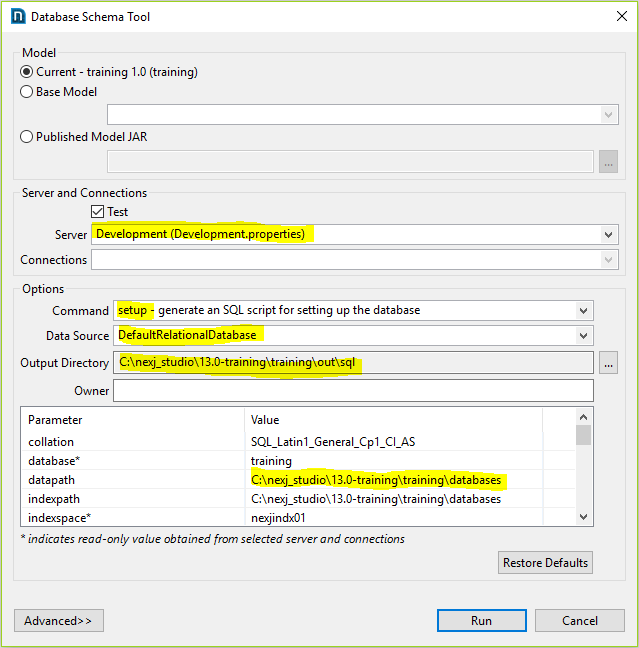
The data path setting is dependent on your MS SQL settings and personal preferences. We recommend you retain the training default settings. -
Click Run.
In the Console view, you should see activity that ends with "Exit code = 0". In general, for all NexJ Studio tools, "Exit code = 0" indicates success.
This generates a database creation script in your /training/out/sql folder calledtraining_DefaultRelationalDatabase_setup.sql. -
Open SQL Management Studio, and run the script.
This creates your storage, index space, database users, and roles for your development database.
When you run the script, you should see:

After creating the database for our training development, create the unit test database. This database is used over and over to reload a fresh image before starting certain unit tests.
-
Re-run the Database Schema tool, selecting UnitTest.properties.
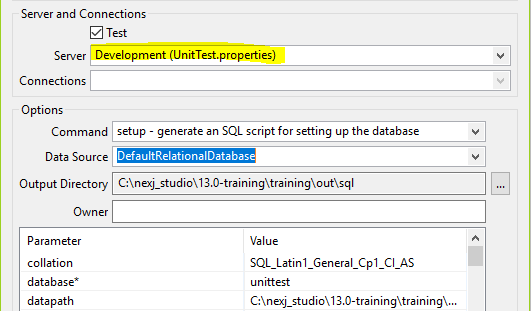
This overwritestraining_DefaultRelationalDatabase_setup.sqlwith settings for your unit test database. -
Run this in SQL Management Studio as well.
To test that everything worked:
-
Select your development environment with Project > Select Server > Development (Development.properties,test).
-
Click the Set Current Server icon

-
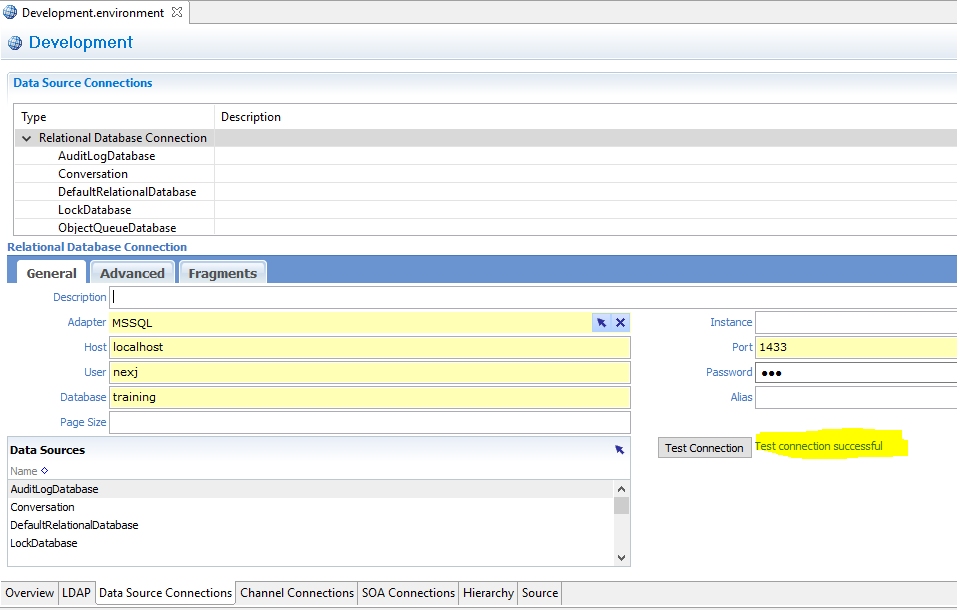
Navigate to the Data Source Connections tab at the bottom of the Environment Editor, and select Relational Database Connection.
-
Click the Test Connection button.
You should get a Test connection successful response.
Loading the database
So far, we have created the empty databases. We can now use the Data Load Tool along with the logical database definition from the DefaultRelational.data source file to create all of the tables and indexes, and load them with appropriate sample data.
-
Select the Run > Run Tool > Data Load Tool.
-
Make sure you check the Test option in the Server and Connections section and set the Server property to Development.properties, the Command to recreate, and click Run.
This creates the application's tables and indexes, and loads your database with sample data.
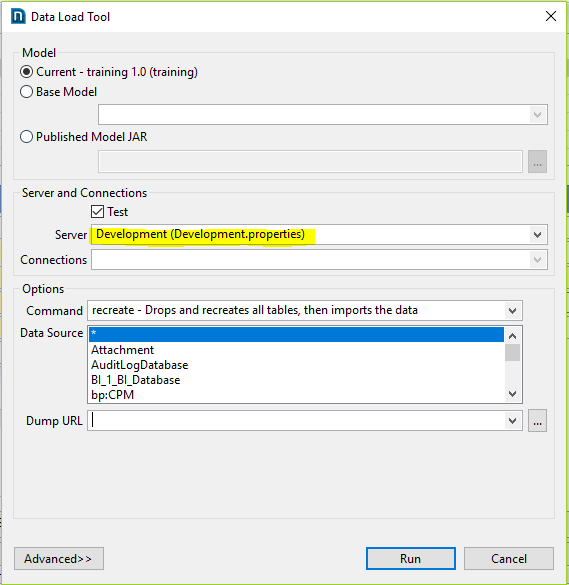
Again, an Exit code = 0 indicates success. You can now run an application in your local environment. -
Select Run > Run Scheme Console > Server Console .
When you see

in your console output, your server is up and running. -
To access the application, browse to http://localhost:7080/training/ui/portal and enter User:
wm1, Password:nexj.
You might want to bookmark this URL in your browser, as we will be using it frequently going forward. The following screenshot shows an example of the Home workspace that is using the training theme. For more information about themes, see UI themes and CSS.
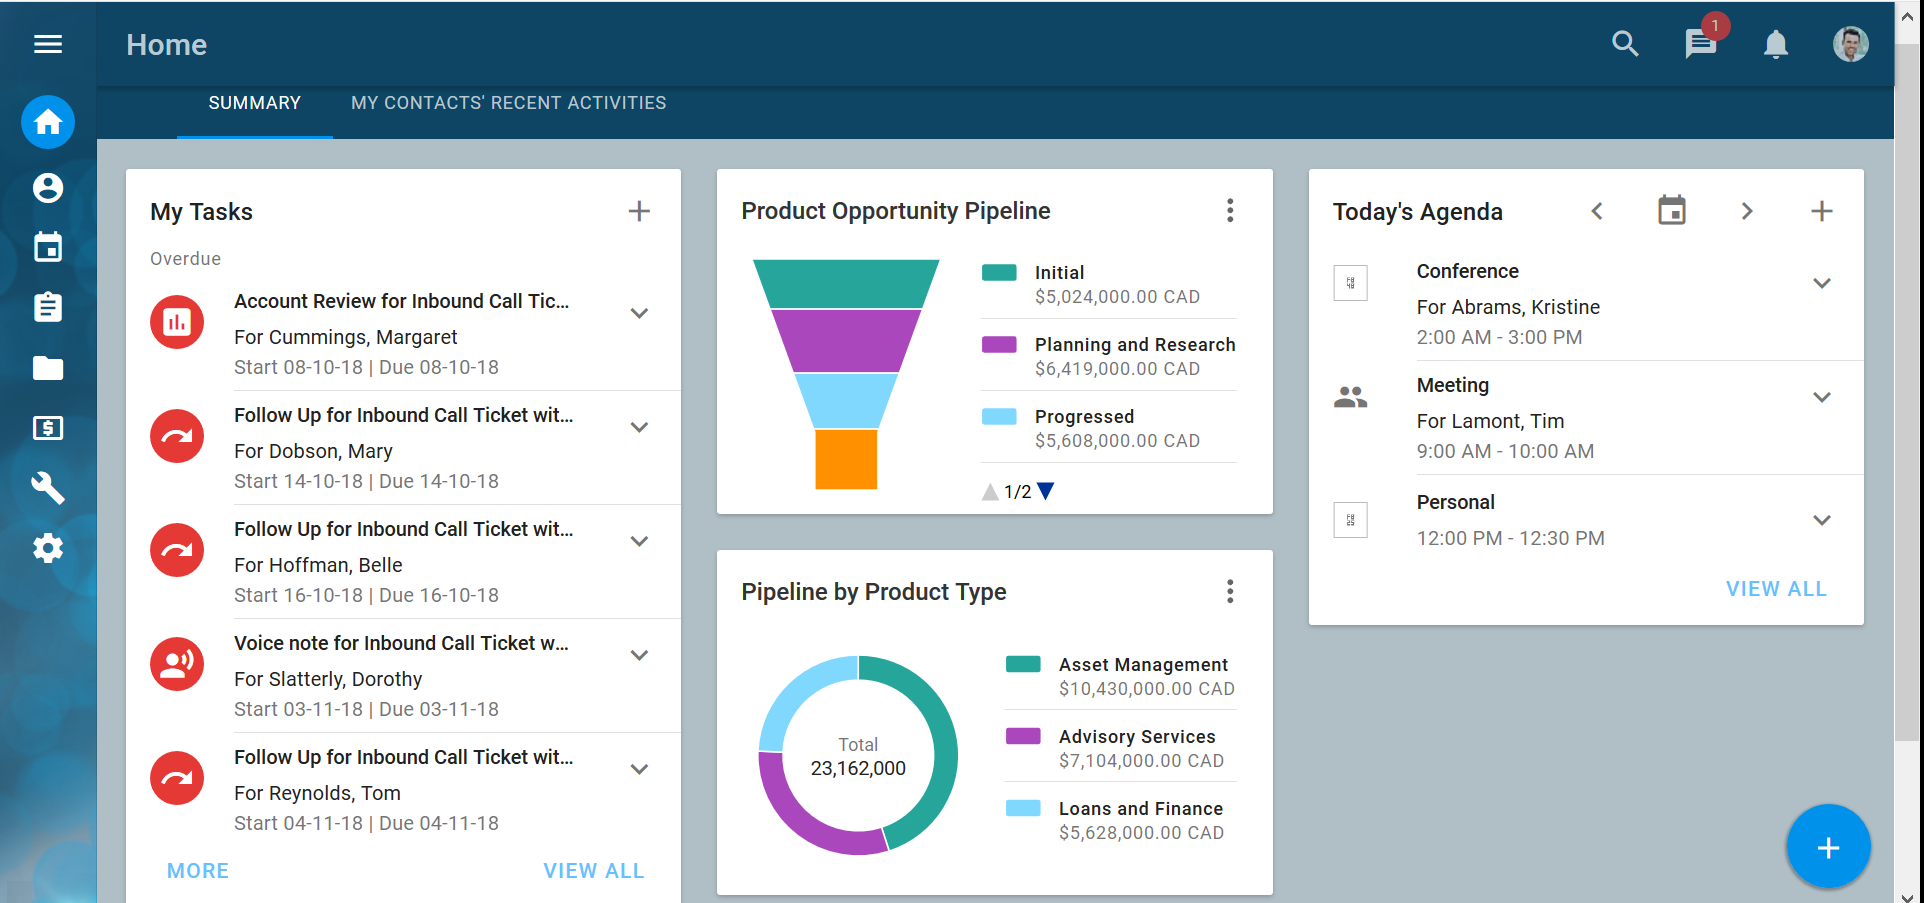
Congratulations on getting your environment set up! You are now locally running a full Model Server loaded with the training model.
While loading the database, running unit tests, or just running your server, you may see output similar to the following:
; 17:58:02,939 WARN [SQLAdapter] (Thread-0) Retrieved 7323 instance(s) of EnumCode in 2803 ms (potential performance problem)
nexj.core.util.StackTrace
at nexj.core.persistence.GenericCursor.logDuration(GenericCursor.java:400)
at nexj.core.persistence.GenericCursor.internalNext(GenericCursor.java:1347)
at nexj.core.persistence.GenericCursor.next(GenericCursor.java:1447)
This is not really an exception. It is a warning that a query took longer than a preset time to execute. We are always looking for ways to improve performance, so use this approach to flag long running (usually > 1 second) queries for further investigation in the server log output. You can disregard these types of warnings during training.
Training environment
For training, we have pre-configured the NexJ Studio, Java, and Debug perspectives which are available at the top-right corner of the toolbar 
The NexJ Studio perspective is best when working with the tools and models. The Java perspective works well if you need direct access to the file system. The Debug perspective is helpful for understanding what is going on under the covers.
The file system starts with the install directory ( c:/nexj_studio/13.0-training ). This folder contains nexjstudio.exe and nexjstudio.ini. Underneath this is a bunch of eclipse folders and a folder called 'training' which contains folders called:
-
models (eclipse workspace), which contains subfolders for
-
training (a training model with standard subfolders such as env, meta, and mod)
-
and a number of react example projects
-
out (project output folder with standard subfolders such as deploy, publish, and sql)
-
databases (a location to create your databases)
-
server (where your deployed server will be installed in future lessons)
For information about standard subfolder structures, see NexJ Studio documentation.
Environment files
We have provided you with two environments: one for regular development, and one for running unit tests. You have already configured the database during the setup steps above. There is one Development.environment file as well as two properties files: Development.properties, and UnitTest.properties. You may inspect these files in the C:\nexj_studio\13.0-training\training\models\training\env folder if you are curious. They are ready to use for the upcoming lessons.
Run a unit test
Unit tests are important to the maintainability of your application.
-
Stop the Scheme Console by clicking the Terminate button

-
Select the Unit Test tab in the Model Navigator view of NexJ Studio.
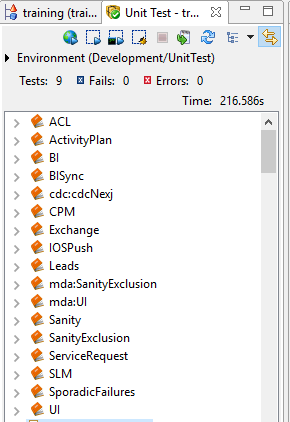
-
Right-click on the Account unit test and choose Run Selected .
This initializes and loads your unit test database and runs the suite of tests for the application's Account functionality. This will take some time.
When complete, you should receive an Exit Code = 0 in the console and the Unit Test view should look similar to the following (if you expand the Account element):
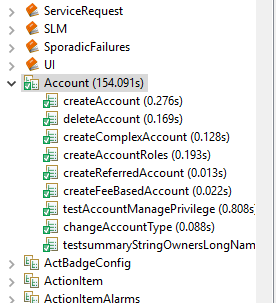
If there was an error, the stack trace will be available at the bottom of the Unit Test view.
Congratulations! Next, review key NexJ Studio concepts in the Orientation topic.